Create Dirty Windows - material tutorial
New tutorial by RenderRam.


In accordance with the art. 13 section 1 and 2 of the European Parliament and Council Regulation 2016/679 of the 27th April, 2016 on the protection of natural persons, with regard to the processing of personal data and on the free movement of such data, and repealing Directive 95/46/EC (General Data Protection Regulation), hereafter RODO, I hereby inform that:
1. EVERMOTION S.C., 8 Przędzalniana Str., 15-688 Białystok, Poland is the Administrator of your Personal Data (APD)
2. Data Protection Inspector can be reached through e-mail: iod@evermotion.org
3. Your personal data are to be processed on the basis of art. 6 section 1 letter a, b and f of RODO in order to:
a) prepare, conclude and execute the agreement and for other purposes approved by you,
b) to execute the legitimate interest like marketing of products and the agreement, claim assertion or defence against claims resulting from the law regulations.
4. Entities entitled to the reception of your personal data may be the authorised public bodies; mail providers; providers of the services covered by the agreement; responsible for debt recovery, keeping the archives, document utilization, legal consulting, technical services, IT services and accountancy.
5. Your personal data shall not be transferred to the third country, nor to the international bodies.
6. Your personal data shall be processed within the period of the agreement and upon your additional consent until you withdraw it. APD shall keep the data for the period of any civil law claim execution connected with the agreement.
7. You have the right to demand an access to your personal data, to correct or to delete the data if there is no other basis for the processing or any other purpose of such processing or to limit the processing of the data, to transfer the data to another administrator and to raise objections to the further data processing if there is no legal basis for further processing and to withdraw any previous consent.
8. You provide the personal data voluntarily, however they are necessary to conclude the agreement. The refusal of providing such data may result in the refusal of the agreement conclusion.
9. You have the right to lodge a complaint to the Personal Data Protection Office when in your opinion the data processing violates the regulations of General Data Protection Regulation of the 27 April, 2016 (RODO).
10. Your data will be automatically processed, including the form of profiling.
11. You are obligated to forward above mentioned information to your representative, especially if you appointed this person in the agreement as the contact person or as the representative for the agreement execution.
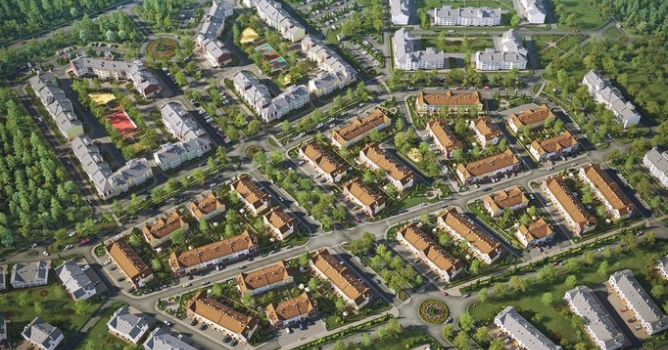

"How to make up a tremendous master plan better"
How we do it in Ravelin3D studio (tips and principles).
Click on image to enlarge 
Click on image to enlarge 
Click on image to enlarge 
Introduction
Based on the statistics on our site the visualization we make is more often designed for big residential complexes and villa communities. Sometimes these projects consist of dozens of multistory blocks, and the 3D-scenes include great number of greenery, automobiles, people and other objects of fillings. Most of all, our clients don’t have the ultimate version of materials and that is why we have to make such-like projects upon the conditions of numerous corrections and alterations. We prefer to work in 3D and avoid compositing in 2d software, as it is easier to correct something in 3D, than constantly make changes in post-production.
The most frequent question we’re asked: "How do you render such tremendous scenes? How your 3D Max manages with it? Perhaps, you have really cool hardware".
The answer is: No, the hardware we have is common as dirt. However, we work taking into account two important principles:
After reading this article, it can seem to you that these rules just slow down the work. However, this assumption is deceptive. These principles rapidly fall into habit, and the only thing you need is to constantly follow them. As a result you will be able to work with scene of any volume in the shortest terms.
Click on image to enlarge 
Click on image to enlarge 
Hardware configuration
Let us start with typical configuration of computers that are used in Ravelin3D studio.
As you can see, our computers are rather powerful, but not uncommon (quite up-to-date setup for 2015). The secret of success is scene organization and workflow.
Control polycount

The number of polygons the main scene rarely exceeds 16 millions.
If you want to sort quickly objects by polycount, add the "Faces" column to "Select by name" menu and sort all the objects by quantity of polygons.

Use VrayProxy
We use "VrayProxy" for all objects with a lot polygons. This is very important, especially regarding trees, bushes and automobiles, as they consist of many polygons and, as a rule, we often copy them into scene. We convert objects into "VrayProxy" before importing them to scene. It is not worth the trouble to make conversion into "VrayProxy" in the main scene, it can lead to errors. After "VrayProxy" objects are put in scene, turn on the "Bounding Box" display mode, it will reduce the load on graphics card. It is especially relevant if the scene contains many "VrayProxy" objects.

Tip: The copy of “Instance” of each unique “VrayProxy” (for example, each unique tree) can be removed from working area and put in one place. Border this area with a rectangle - in such a way you won’t miss small “VrayProxy” colours or small bushes. This set can be easily exported to other scenes. Use this approach and you’ll have ready-made sets of “VrayProxy” frequently used objects at hand. You will not have to make them from scratch.
Instancing and scattering
If you need to copy objects, that will not be edited later, use copy as “Instance”. If there are more than 20 objects, use “MultiScatter”, especially when copying repeating objects (mostly greenery). Make “MultiScatter” presets for copying elements in advance.
Click on image to enlarge 
Click on image to enlarge 
Use Xref - You can find it under File > References > Xref scene
We use “Xref” to optimize workflow. It’s especially important, when several specialists work on the same project. With “Xref” you can build a scene from several parts. Each co-worker can work on his part independent of the rest of the team. Main scene will be constantly updated during this process.

Example: the project main scene is scene.max, which includes master plan, greenery, cars, and other objects. Houses for this project are in separate scenes “house1.max”, “house2.max”, etc.
Buildings “house1” and “house2” are uploaded in “scene.max” from individual files. They cannot be edited in “scene.max”, but they are rendered along with it. Quick and handy.
Click on image to enlarge 

If necessary, you can turn off displaying these houses in viewport — it significantly saves resources.
Use Layers
We actively use layers for the purpose of convenience and work optimization.
Click on image to enlarge 
Optimize materials and viewport
We use only JPEG textures. We recommend not using TIFF and PNG textures, since they consume a lot of memory and significantly slacken overall performance.
Use only “Vray” plugin materials. If there’s imported model with standard materials – pass it through “Vray mtl converter” plugin. It automatically converts all materials to “Vray” format and prevents all possible errors and drawbacks of displaying. We recommend checking big scenes with this plugin from time to time. Standard materials can be a cause of shut-downs when rendering. Use one copy of one material in a scene. Do not copy it unless necessary. For example, if one material is a part of “MultiSub”, than copy it there, using “Instance” copying. Optimize the number of “subdivs” parameter in materials. Do not overrate them unless necessary, the standard amount of “subdivs” – “8-20”. Sometimes in reflecting objects with the use of “glossy” parameter, the number of “subdivs” should be increased. For example, to “30” in order to avoid noise.
Optimized viewport is a formula for quick and effective work. For the sake of convenience when working with large scenes in viewport, we follow these rules:

To increase viewport performance you can put multipolygonal objects in “Box” display mode.

Click on image to enlarge 
All “VrayProxy” objects, which aren’t worked at, are displayed as “Box”. Set all “MultiScatter” objects with ready settings to minimum values in “Preview” parameter, “Preview type: Box”.

Use “Adaptive Degradation” mode in viewport settings.

Color your groups. For example, all trees can be coloured with one colour using “Object color” parameter. In such a way it will be easier to understand the scene, and you’ll get handy masks as a bonus when rendering.
Use “Viewport clipping” when modeling.
Render regions
We actively use “Region render” computation method to change a scene and render the only changed area. If we change something and want to do a quick preview, we hide all “multiscatter” and “proxy” objects that are not used at the moment. This way we save memory and rendering is greatly accelerated.
Prepare scene to rendering
In our studio all images are rendered by means of “distributive render” on several computers. To avoid problems regarding parallel rendering follow the next rules:

We use rendering across a network, that’s why all work files should be on server. We don’t store files on local computers since in this case there will be places without textures in render or lost proxy.
Render standard settings:
Click on image to enlarge 
Vray Global switches:
Reflection/refraction max depth: 3 — this parameter is enough for most of scenes. Unnecessary rereflections are not rendered. It can be increased when necessary.
Vray: System
Default geometry: Static
Dynamic memory limit: 30000 MB
It significantly speeds up rendering.
I hope my tips will help you when working with very large projects.
Follow us on our Behance account: https://www.behance.net/ravelin
Good luck!
Click on image to enlarge 


LEAVE A COMMENT


|

|

|

|

|


COMMENTS