Create Dirty Windows - material tutorial
New tutorial by RenderRam.


In accordance with the art. 13 section 1 and 2 of the European Parliament and Council Regulation 2016/679 of the 27th April, 2016 on the protection of natural persons, with regard to the processing of personal data and on the free movement of such data, and repealing Directive 95/46/EC (General Data Protection Regulation), hereafter RODO, I hereby inform that:
1. EVERMOTION S.C., 8 Przędzalniana Str., 15-688 Białystok, Poland is the Administrator of your Personal Data (APD)
2. Data Protection Inspector can be reached through e-mail: iod@evermotion.org
3. Your personal data are to be processed on the basis of art. 6 section 1 letter a, b and f of RODO in order to:
a) prepare, conclude and execute the agreement and for other purposes approved by you,
b) to execute the legitimate interest like marketing of products and the agreement, claim assertion or defence against claims resulting from the law regulations.
4. Entities entitled to the reception of your personal data may be the authorised public bodies; mail providers; providers of the services covered by the agreement; responsible for debt recovery, keeping the archives, document utilization, legal consulting, technical services, IT services and accountancy.
5. Your personal data shall not be transferred to the third country, nor to the international bodies.
6. Your personal data shall be processed within the period of the agreement and upon your additional consent until you withdraw it. APD shall keep the data for the period of any civil law claim execution connected with the agreement.
7. You have the right to demand an access to your personal data, to correct or to delete the data if there is no other basis for the processing or any other purpose of such processing or to limit the processing of the data, to transfer the data to another administrator and to raise objections to the further data processing if there is no legal basis for further processing and to withdraw any previous consent.
8. You provide the personal data voluntarily, however they are necessary to conclude the agreement. The refusal of providing such data may result in the refusal of the agreement conclusion.
9. You have the right to lodge a complaint to the Personal Data Protection Office when in your opinion the data processing violates the regulations of General Data Protection Regulation of the 27 April, 2016 (RODO).
10. Your data will be automatically processed, including the form of profiling.
11. You are obligated to forward above mentioned information to your representative, especially if you appointed this person in the agreement as the contact person or as the representative for the agreement execution.
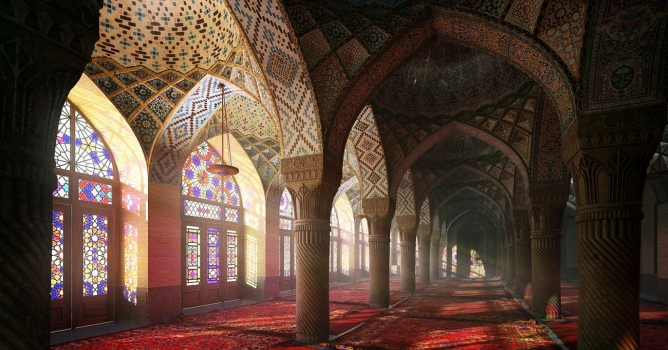

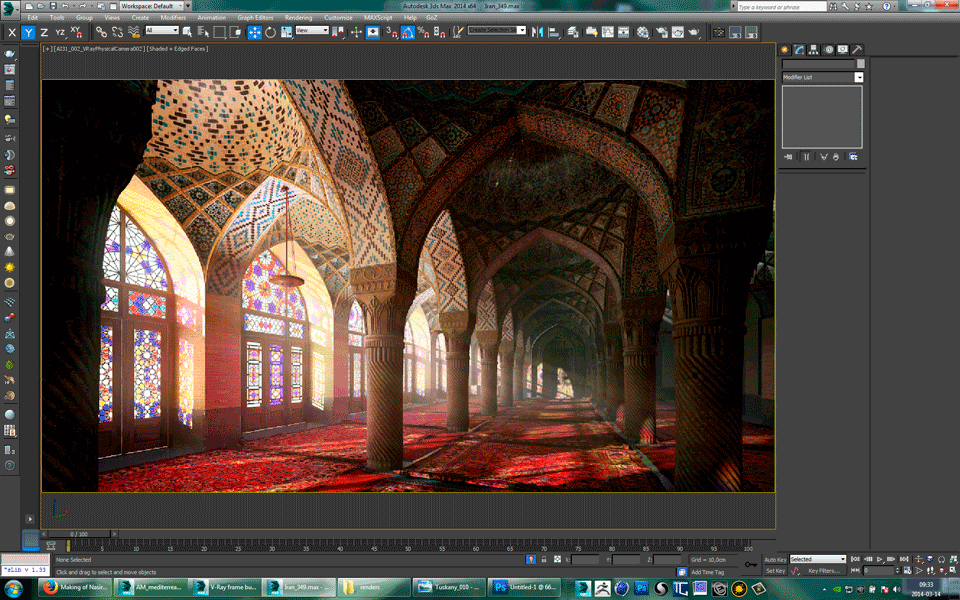
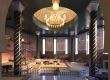
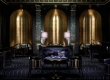
I want to show you making of the scene from the latest Evermotion collection - Archinteriors vol. 31. It presents praying room at Nasir al-Mulk Mosque (or Pink Mosque), located in Shiraz, Iran. I chose it for its beautiful, colorful lighting and decoration that gives wide possibilities of creating unique, mysterious mood inside.
In this tutorial I'd like to share my workflow and some tips about modeling main walls and domes of this interior.
As soon as I picked up dozens of reference photos, I chosed one that had photo camera information included.
I used it as a background image in my modeling software and set camera according to the photo information. On this base I could set scale nad proportions of my scene. I determined which segment of the building is repeatable. Then I focused on just that one piece.
EDIT: As a response to a comment below this article, I present more precisely how I started modeling, having reference photo in background (as a reference I used my own rendering, as I don't have rights to show here any of reference photos I based on).
I started from a simple plane, paralell to x axis of the scene. I assumed that the wall may be about 70 cm wide. Then I modelled an arch following y and z axis only. Used Symmetry Modifier, and then Shell to achieve some thickness of the rib. Voila!
Here is the process illustrated in animated GIF:
Click on image to enlarge
Click on image to enlarge
Click on image to enlarge
Click on image to enlarge
Basing on photo reference in the background, I found proper curvature of formeret (entrance arch). I placed gizmo on crossing lines, pointed by peak of the formeret and traverse arch (perpendicular to the nave). To construct first pendentive I used Symmetry Modifier and Array Tool, with instance option selected. Having all ribs instanced let me fill free spaces between them very quickly. Then I prepared still instanced ribs to being merged and connected into single object. After that I chose its quarter, needed to build the first pendentive.
Click on image to enlarge
Click on image to enlarge
Click on image to enlarge
Click on image to enlarge
Click on image to enlarge
Click on image to enlarge
Click on image to enlarge
Click on image to enlarge
Click on image to enlarge
Click on image to enlarge
I placed dome onto the first pendentive, chamfered sharp edges and then unwrapped whole object. I like to unwrap my models on early stage of work, especially when I intend to mirror or copy them. After these changes it's easier just to rearrange UVs instead of doing the same job for copied geometry. Again a lot of Symmetry Modifier in use to create first vault.
Click on image to enlarge
Click on image to enlarge
Click on image to enlarge
Click on image to enlarge
Click on image to enlarge
Click on image to enlarge
Click on image to enlarge
Click on image to enlarge
Click on image to enlarge
Mirroring the first dome, little modeling fixes and again rearranging UVs, gives me basic, repeatable, piece of interior. Now I just need to copy one vault to have three naves. I also decided to move UVs of the following pair of my basic vaults, so that every second pair had different texture on. Finally I collapsed modifiers, added gable wall and unwrapped it.
Click on image to enlarge
Click on image to enlarge
Click on image to enlarge
Click on image to enlarge
Click on image to enlarge
Click on image to enlarge
Click on image to enlarge
Click on image to enlarge
Rest was similar: I had to model repeatable piece of side wall, unwrap it, copy and merge with main walls. Result is model unwrapped into 11 UV tiles.
Click on image to enlarge
Click on image to enlarge
Click on image to enlarge
Click on image to enlarge
Click on image to enlarge
You can see that the first and the second pair of my "basic" vaults have four different textures on them. It is repeated for following domes. Having such an amount of UV tiles helps when creating textures in Mari. To gather all 11 textures alltogether in 3ds max, you need to use Composite Material.
Click on image to enlarge
Click on image to enlarge
Click on image to enlarge
Final result: quite low poly model and diversified texture.
Click on image to enlarge
Click on image to enlarge
Click on image to enlarge
Thanks for your attention! :) Hope that it will be useful to you.


LEAVE A COMMENT


|

|

|

|

|


COMMENTS