Create Dirty Windows - material tutorial
New tutorial by RenderRam.


In accordance with the art. 13 section 1 and 2 of the European Parliament and Council Regulation 2016/679 of the 27th April, 2016 on the protection of natural persons, with regard to the processing of personal data and on the free movement of such data, and repealing Directive 95/46/EC (General Data Protection Regulation), hereafter RODO, I hereby inform that:
1. EVERMOTION S.C., 8 Przędzalniana Str., 15-688 Białystok, Poland is the Administrator of your Personal Data (APD)
2. Data Protection Inspector can be reached through e-mail: iod@evermotion.org
3. Your personal data are to be processed on the basis of art. 6 section 1 letter a, b and f of RODO in order to:
a) prepare, conclude and execute the agreement and for other purposes approved by you,
b) to execute the legitimate interest like marketing of products and the agreement, claim assertion or defence against claims resulting from the law regulations.
4. Entities entitled to the reception of your personal data may be the authorised public bodies; mail providers; providers of the services covered by the agreement; responsible for debt recovery, keeping the archives, document utilization, legal consulting, technical services, IT services and accountancy.
5. Your personal data shall not be transferred to the third country, nor to the international bodies.
6. Your personal data shall be processed within the period of the agreement and upon your additional consent until you withdraw it. APD shall keep the data for the period of any civil law claim execution connected with the agreement.
7. You have the right to demand an access to your personal data, to correct or to delete the data if there is no other basis for the processing or any other purpose of such processing or to limit the processing of the data, to transfer the data to another administrator and to raise objections to the further data processing if there is no legal basis for further processing and to withdraw any previous consent.
8. You provide the personal data voluntarily, however they are necessary to conclude the agreement. The refusal of providing such data may result in the refusal of the agreement conclusion.
9. You have the right to lodge a complaint to the Personal Data Protection Office when in your opinion the data processing violates the regulations of General Data Protection Regulation of the 27 April, 2016 (RODO).
10. Your data will be automatically processed, including the form of profiling.
11. You are obligated to forward above mentioned information to your representative, especially if you appointed this person in the agreement as the contact person or as the representative for the agreement execution.


This tutorial was written by Michal Mos, Render Wrangler at GarageFarm.NET.
I've seen many people struggling with optimizing their scenes for shorter and more stable rendering, I was that person too. That's why with the help of my colleagues at GarageFarm.NET I decided to create a series of tutorials about rendering optimization in the most popular 3D applications and render engines. I've used my own experience and knowledge derived from being a freelancer as well as a render wrangler on a render farm. Here is he first part of our guide that covers geometry optimization techniques in 3ds Max. I hope you like it and find it useful - Michal Mos, GarageFarm.NET.
So after many sleepless nights you finally achieved a desired image look but then you hit that render button and it turns out the scene eats up too much RAM or requires too much computing power to get it done within reasonable time. We’ve all been there.
Here’s what may be a result of that:
Who is this guide for?
This guide is for every 3D artist who have had an unpleasant experience with too high resource usage when rendering a project locally or on a network.
You will find useful optimisation techniques for beginner and intermediate 3ds Max users. If you are an advanced user, you probably already know most of them, but still you might find some new information here. There is a saying, you don’t know what you don’t know.
The optimization methods listed below will be especially useful to animators as even a slight increase in render time is multiplied by the number of frames in your animation.
The aim of this guide is simple - reduce the render time and RAM usage - and gain more time for the creative side of the project, save time and money and have more satisfied clients.
PART 1. Geometry
The more geometry (polycount) in your scene, the bigger the scene file, the more RAM it needs in order to be rendered, and the longer the rendering takes.
To reduce the polycount in your scene you can try the following methods:
1.1 Check the polycount

You can turn more statistics options on and off by clicking on the upper-left corner in Viewport (“+”) → clicking “Configure Viewports” → “Statistics” panel.

If you want to learn more about the statistics and what they mean, check out Autodesk help.
1.2 Find heavy models.
Open the window "Select by name" (press "h") and add the "Faces" column to the menu.
You can do that by right clicking the "Name" bar and choosing the "Configure Columns" option. You’ll see a list of additional columns, one of them being “Faces”.
This column will sort all objects in the scene by number of polygons.

1.3 Remove unnecessary geometry.
Where to look:
How to find hidden objects?

To find the models lost outside of your scene during importing or working on the project, you can right-click on any Viewport and choose the “unhide all” option, with the “Unhide objects on hidden layers” option selected. Then choose the “zoom extents” option in the bottom right corner of the max interface and press “ctrl + a” to select all the models in the scene. Lost models will become visible in the scene.

1.4 Use instances instead of copies.
In 3ds Max you can copy an object either as a copy or an instance (or reference which is a sort of an instance).
When you copy a mesh as a "copy", 3ds Max creates another mesh that will be stored in your scene both on hard drive and RAM, which makes the polycount higher.
However, if you create an "instance", 3ds Max will just store the information that a copy of a mesh is present in another place in the scene but keeping only the data of a single mesh in memory and in the scene file.
Thanks to using "instances" you can put a huge number of copied objects into the scene but they will use practically the same amount of RAM and have a similar filesize as a single object.
The only disadvantage of that method is that those meshes must be kept identical to the initial object.
Example

1.5 Optimize models
Try to optimize models based on their distance to the camera or level of detail needed.
Adjust the level of detail of models to their visibility in the final render. For example, if you need cars in your visualisation but they are going to be far away, use simpler models or optimize them. A curb on a street can be beveled when it's close to the camera, but those that are farther away can have sharp edges.
Don't add Turbosmooth or Meshsmooth modifiers if it is not necessary, and keep the "Iterations" value as low as possible.
1.6 Use 3ds Max optimizing modifiers
They can quickly reduce the number of polys in your model, but they might deform its shape.
It’s best to use them when the object is far away from the camera, or when it is a high poly object (like a model of a car collapsed after using Turbosmooth modifier).
Play around with the settings of modifiers to keep desired detail level, but reduce the number of polygons.
In order to reduce the scenes size and its resource usage, you will need to collapse the model with the optimizing modifier applied before the rendering, especially when you are going to render it via a network. Always remember to save a copy of the scene before making changes to be able to revert to older settings in case something goes wrong.
Optimizing modifiers for 3ds Max
1.6.1 - Optimize Modifier
The Optimize Modifier lets you reduce the number of faces and vertices in an object. This simplifies the geometry and speeds up rendering while maintaining an acceptable quality of the image. A Before/After readout gives you the exact feedback on the reduction as you make each change.
For more information about this modifier check out Autodesk Help.
1.6.2 - MultiRes Modifier
The MultiRes Modifier reduces the memory overhead needed to render models by decreasing the number of vertices and polygons. MultiRes offers several advantages over the Optimize modifier including faster operation and the ability to specify the level of reduction as an exact percentage or vertex count.
For more information about this modifier check out Autodesk Help.
1.6.3 - Prooptimizer Modifier.
The ProOptimizer Modifier lets you select objects and interactively optimize them.
For more information about this modifier check out Autodesk Help.
1.6.4 - Batch ProOptimizer utility.
The ProOptimizer feature is an optimization tool that helps you reduce the number of vertices (and also the number of faces) in an object while preserving the object’s appearance. Its options let you maintain material, mapping, and vertex color information in the optimized model.
For more information about this modifier check out Autodesk Help.
1.7 Use pre-rendered planes with textures instead of models + shaders
Sometimes you need to create an environment for your scene outside of your camera view but affecting your scene by appearing in reflections, casting shadows or illuminating it with indirect lighting (GI).
In that case, keep the models which create such environment simple or replace them with planes with pre-rendered textures added, and cut them out with opacity map if this is necessary.
You can also use that method for objects which are more distant from the camera but render too long, or are visible through materials like glass (for example several rows of glossy bottles on a shop shelf).
That method is especially efficient if you want to create a large amount of foliage visible in reflections or casting shadows on the scene.
If the opacity maps render too long, please check out the Textures guide (Part 2) to know how to set them up to render much faster.
EXAMPLE 1

A comparison of rendering a model with a reflection of environment created with instanced models vs pre-rendered planes with opacity map.
EXAMPLE 2

A comparison of rendering far away objects as models vs pre-rendered planes with opacity map.
EXAMPLE 3

A comparison of rendering of multiple objects with refraction and blurry reflections rendered as models vs pre-rendered planes with opacity map.
1.8 When to collapse models.
The methods listed below can reduce your scene size on hard drive, so that your project will upload and open in 3ds Max faster, which is important in the case of rendering via a network or a render farm.
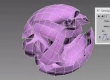
EXAMPLE 1

A comparison of resource usage when rendering models with Meshsmooth modifier applied on them vs model after collapsing the stack to an Editable Poly. The models are copied as instances.
Editable splines - You can create dense 3d models using modifiers like Lathe, Sweep or the "rendering" option in the editable spline options. They will be saved in your project as smaller data in comparison to models collapsed to editable poly.
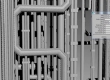
EXAMPLE 2

A comparison of resource utilization for editable spline with 3d options/modifiers applied (Lathe and Sweep) and after converting them to editable poly.
SUMMARY
When it comes to geometry optimization, the rule is simple - the less, the better.
It is good to apply all of those optimization techniques as a part of your workflow as you work on your scene rather than attempting to optimize it when the scene is already finished and the final render times turn out to be too high. In the long run, such workflow can save you lots of time and money.
Please consider all those methods as suggestions only. Their effect may vary depending on your scene setup, plugins and the render engine you use. It is best to run a test of several frames of optimized scene to check the effect before the final render.
This article originally has appeared on GarageFarm.NET.
Sources
Links
Hardware used for rendering
Credits
Next part is coming soon, stay tuned!


LEAVE A COMMENT


|

|

|

|

|


COMMENTS