Topology Study : How To Model Ski Googles in Blender
Using Blender modeling tools for creating realistic ski googles.


In accordance with the art. 13 section 1 and 2 of the European Parliament and Council Regulation 2016/679 of the 27th April, 2016 on the protection of natural persons, with regard to the processing of personal data and on the free movement of such data, and repealing Directive 95/46/EC (General Data Protection Regulation), hereafter RODO, I hereby inform that:
1. EVERMOTION S.C., 8 Przędzalniana Str., 15-688 Białystok, Poland is the Administrator of your Personal Data (APD)
2. Data Protection Inspector can be reached through e-mail: iod@evermotion.org
3. Your personal data are to be processed on the basis of art. 6 section 1 letter a, b and f of RODO in order to:
a) prepare, conclude and execute the agreement and for other purposes approved by you,
b) to execute the legitimate interest like marketing of products and the agreement, claim assertion or defence against claims resulting from the law regulations.
4. Entities entitled to the reception of your personal data may be the authorised public bodies; mail providers; providers of the services covered by the agreement; responsible for debt recovery, keeping the archives, document utilization, legal consulting, technical services, IT services and accountancy.
5. Your personal data shall not be transferred to the third country, nor to the international bodies.
6. Your personal data shall be processed within the period of the agreement and upon your additional consent until you withdraw it. APD shall keep the data for the period of any civil law claim execution connected with the agreement.
7. You have the right to demand an access to your personal data, to correct or to delete the data if there is no other basis for the processing or any other purpose of such processing or to limit the processing of the data, to transfer the data to another administrator and to raise objections to the further data processing if there is no legal basis for further processing and to withdraw any previous consent.
8. You provide the personal data voluntarily, however they are necessary to conclude the agreement. The refusal of providing such data may result in the refusal of the agreement conclusion.
9. You have the right to lodge a complaint to the Personal Data Protection Office when in your opinion the data processing violates the regulations of General Data Protection Regulation of the 27 April, 2016 (RODO).
10. Your data will be automatically processed, including the form of profiling.
11. You are obligated to forward above mentioned information to your representative, especially if you appointed this person in the agreement as the contact person or as the representative for the agreement execution.

„Steampunk Loft” has won 1st place in Evermotion Challenge 2015. See other winning works.
Inspiration:
Hello everyone! Evermotion Challenge was a great opportunity to create a different looking loft space. Overall idea of steampunk arose from inspiration of Gleb Alexandrov works. When I saw his art for the first time I thought to myself “I must create some project in similar topic!” Since then it’s been always on my mind.
I thought that the idea of a loft as a working place combined with living space of a steam machines constructor could be interesting. In the story, the old engine house was made over into a loft. My aim was to create a project that would tell a viewer a certain story.
Click on image to enlarge
Software used:
Work was made with the use of 3ds Max and V-ray. I used Photoshop for postproduction. BerconMaps plugin used for bump. I’ve been working with 3ds Max software for about 2 years now. Earlier I used Cinema 4D. Now I know that switching to a different software was a good decision (more tutorials for 3ds Max).
Modeling and composition:
First thing which I modeled was a huge machine. I was sure this is “must” in my project.
Click on image to enlarge
Click on image to enlarge
Then I defined the arrangement of the walls. I assumed it was going to be a high, lofty room.
Click on image to enlarge
After that I created an old looking steel window. I tried to achieve a good level of detail because I wanted to place the light source in the background and as a result it was very well visible.
Click on image to enlarge
While surfing the Internet to find something that could be the focal point I came across the steampunk style monobike model created by Stefano Marchetti. At first I thought it was a 1:1 model, however after a short analysis it turned out to be a thumbnail. Mindblowingly detailed! Perfectly suited the vision which I had in mind.
Click on image to enlarge
The composition was one of the things that took the most time. I wanted the room to be high and lofty. That’s why I decided for the vertical frame. I highly recommend the method of creating composition basing on the very simplified forms. It enables to find out quickly which idea you like the most and you don’t waste time on modeling the object that could turn out mismatched in the final phase.
Click on image to enlarge
When I was sure the composition would finally look ok, I proceeded to monobike modeling. It was the most laborious part.
Click on image to enlarge
In the meantime I modeled the steel and wooden elements of construction
Click on image to enlarge
Click on image to enlarge
Next, I made the toolbox and the table.
Click on image to enlarge
I decided not to assemble the modeled machine into one. I wanted to achieve unfinished look.
Click on image to enlarge
Then I added rails as an old residue of the factory. To get the dirty spots and stains effect I did the following:
Click on image to enlarge
And this is how I made the cracks in the floor:
Click on image to enlarge
Photos on the right side shows ready made 3D model from 3dsky.org. I modified this lamp a little.
Click on image to enlarge
The last step was to complete the composition with the other ready made 3d models.
Click on image to enlarge
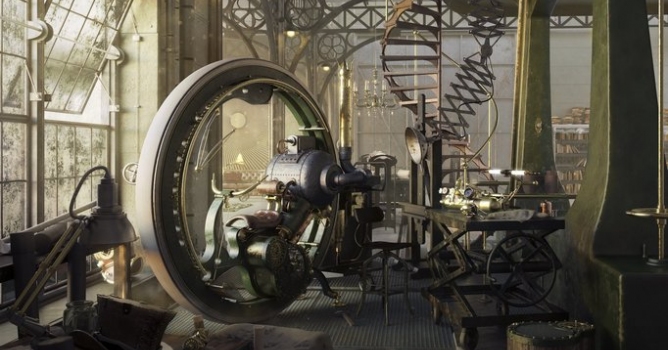
This is how the final composition looked like. I added the metal panels with rivets on the walls. The pipes fulfill the interior’s steampunk character. I also wanted the living space to be visible in the final picture.
Click on image to enlarge
In the main frame I distinguished three plans. In the foreground are elements in the left bottom corner. I decided not to illuminate them more. In the second plan is a monobike model illuminated by sunbeams entering through the window. The third plan is the living space of the constructor. I also added a balloon which fits in the steampunk ambience.
Click on image to enlarge
The overall composition was based on the rule of thirds.
Click on image to enlarge
Texturing and materials:
Regarding materials, I tried to achieve possibly the most interesting textures and reflections. The most attention I paid to metals.
Here is great tutorial for realistic vray materials : https://www.evermotion.org/tutorials/show/8714/mastering-vray-advanced-materials
Most of metal materials I made with BerconMaps in bump slot. I decided to combine various materials together to obtain more realistic reflections. I also added vray dirt to them.
Click on image to enlarge
In the gold material case I went a little wilder. I combined a simple gold material with a copper one. Both of them were created out of three or two materials of a different reflection level. By combining them together I achieved a very interesting texture, deep color and more realistic look of the material.
Click on image to enlarge
Click on image to enlarge
Click on image to enlarge
Other materials were made in a similar way. I increased bump value on boiler material.
Click on image to enlarge
Click on image to enlarge
Click on image to enlarge
The glass material was created in a very simple way, which made it possible for me to save a lot of time. Anyway, it looks quite alright.
Click on image to enlarge
Click on image to enlarge
I decided to add more rust to the stairs material. I was modeling the stairs in the very beginning when I had enough time to add welds as well. I presents on a simple model how to create them.
Click on image to enlarge
Click on image to enlarge
 Result
Lightning:
The way I illuminated the scene was quite simple. I used hdr map (dome light) with vray portals. Additionally, I placed lights on the pillars to get the warm light effect. Through the window on the left side I lightened up the monobike and the large machine. Through the windows under the ceiling there come sunbeams that illuminate the balloon.
Click on image to enlarge
Click on image to enlarge
Click on image to enlarge
Click on image to enlarge
Rendering:
Here you can check out the test pictures with different types of lightning. The last version I liked the most and I chose it to the final render.
Click on image to enlarge
As a camera I used v-ray physical cam which gave me full control of the frame. It’s really great.
Click on image to enlarge
For the final image I used gamma 2.2 with Reinhard color mapping, and burn value set to 0.5
Click on image to enlarge
The final image was rendered at 2063x3000px.
Postproduction:
The postproduction gave me the most pleasure. The effect I got in the beginning I considered a good base. I wanted to achieve stronger contrast and light effect.

I also used some vray render elements in postproduction.
Click on image to enlarge
I used z-depth to achieve aerial perspective. With this pass I wanted to enhance the size of the room.
Click on image to enlarge
Click on image to enlarge
With the use of a Photoshop paintbrush I enhanced the effect of the sunbeams illuminating the large machine. I also added some radiance to the sunlight coming through the window. That created the exact ambience which I wanted to achieve in this interior.
Click on image to enlarge
Click on image to enlarge

And here it is:
Click on image to enlarge
Thank you for your attention! If you have any suggestions or questions feel free to comment. Or text me on:
Cheers!


LEAVE A COMMENT


|

|

|

|

|


COMMENTS