Create Dirty Windows - material tutorial
New tutorial by RenderRam.


In accordance with the art. 13 section 1 and 2 of the European Parliament and Council Regulation 2016/679 of the 27th April, 2016 on the protection of natural persons, with regard to the processing of personal data and on the free movement of such data, and repealing Directive 95/46/EC (General Data Protection Regulation), hereafter RODO, I hereby inform that:
1. EVERMOTION S.C., 8 Przędzalniana Str., 15-688 Białystok, Poland is the Administrator of your Personal Data (APD)
2. Data Protection Inspector can be reached through e-mail: iod@evermotion.org
3. Your personal data are to be processed on the basis of art. 6 section 1 letter a, b and f of RODO in order to:
a) prepare, conclude and execute the agreement and for other purposes approved by you,
b) to execute the legitimate interest like marketing of products and the agreement, claim assertion or defence against claims resulting from the law regulations.
4. Entities entitled to the reception of your personal data may be the authorised public bodies; mail providers; providers of the services covered by the agreement; responsible for debt recovery, keeping the archives, document utilization, legal consulting, technical services, IT services and accountancy.
5. Your personal data shall not be transferred to the third country, nor to the international bodies.
6. Your personal data shall be processed within the period of the agreement and upon your additional consent until you withdraw it. APD shall keep the data for the period of any civil law claim execution connected with the agreement.
7. You have the right to demand an access to your personal data, to correct or to delete the data if there is no other basis for the processing or any other purpose of such processing or to limit the processing of the data, to transfer the data to another administrator and to raise objections to the further data processing if there is no legal basis for further processing and to withdraw any previous consent.
8. You provide the personal data voluntarily, however they are necessary to conclude the agreement. The refusal of providing such data may result in the refusal of the agreement conclusion.
9. You have the right to lodge a complaint to the Personal Data Protection Office when in your opinion the data processing violates the regulations of General Data Protection Regulation of the 27 April, 2016 (RODO).
10. Your data will be automatically processed, including the form of profiling.
11. You are obligated to forward above mentioned information to your representative, especially if you appointed this person in the agreement as the contact person or as the representative for the agreement execution.

In this tutorial I'd like to show you how you can quickly start making your own projects in ZBrush, with just a few tools.
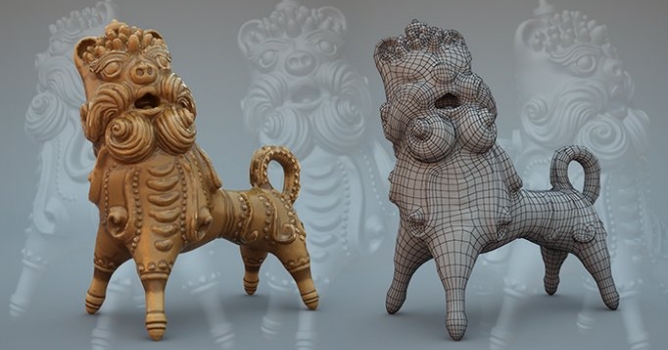
At first, let's look at the speedsculpt and rotation of ready model:
Building ram skeleton with ZSpheres
Let's start with making a rough skeleton for our model. It doesn't need to be perfect, just to catch some overall proportions of the figure.
Click on image to enlarge
Now we just need to click on the Sphere and drag to make another one. Notice that the pointing circle changes its colour from red to green when you move it close to the ZSphere axis lines. That’s why be careful when you draw ZSphere close to a symmetry line. Make sure that a pointing circle is green, so you drew only one ZSphere instead of two symmetrical ones
Click on image to enlarge
If you want to preview how the skeleton will look like when converted to a mesh, click A shortcut. Click it once again to get back to the ZSpheres. It’s better to have Floor enabled just for now, to make sure that all four legs reach the same level.
Click on image to enlarge
Start shaping
It's the new tool, so remember to activate symmetry for it beforehand (X shortcut).
Click on image to enlarge
To catch a shape of the figure we may need to use Move Brush a lot, Move Topological Brush, Clay, Clay Tubes and StandardBrushes. A Stronger Smooth Brush can also be very helpful. You can find it in LightBox/Brush/Smooth/Smooth Strong.
Topology
At first it’s better to work on relatively low poly mesh. We don’t need to worry about topology for now, as we’re going to change it later anyway. Let’s just have fun with sculpting, dividing geometry when we feel we need it.
Click on image to enlarge
Masking
Click on image to enlarge
Rotating legs
Click on image to enlarge
You can always fix it’s position by grabbing and moving orange circles of the Action Line. Let’s position it parallelly to the leg axis. To rotate the mesh, grab and move the smaller red circle, positioned on the other end of the Action Line than our rotation point. Unmask all when you finish.
Detailing legs
Go back to the Drawing Mode. Then by holding down the Shift + Ctrl keys, clicking and draging your pen over the model, hide unused at the moment part of the mesh. We can choose desired Stroke mode for this operation.
Click on image to enlarge
Click on image to enlarge
Click on image to enlarge
Click on image to enlarge
Click on image to enlarge
Click on image to enlarge
Tail detailing
Click on image to enlarge
Ornaments
Click on image to enlarge
Asymmetry
Click on image to enlarge
Retopology
After this operation, topology flow needs to be rebuilt once again. If we want to put our sculpture into a bigger scene, we should consider optimizing it a bit too. Especially if we want to expose it on a second plan, as in this case.
We will retopologize our sculpture with ZRemesher this time. Duplicate our subtool first. One will be optimized and another one will be preserved for keeping all the details that will be lost after retopology. We;re going to reproject them later.
Click on image to enlarge
Finally let’s make some polishing and add more ornaments, without symmetry active this time. Use those brushes we already know: Standard, Move, some masking too. New ornaments changed the mesh significantly, so I decided to ZRemesh it once again. This time I wanted to suggest ZBrush how it should lead topology flow. I used ZRemesher Guides Brush to achieve that. ZBrush will follow those guides quicker if we move a Curves Strength slide to an extreme right position.
UVs
We may need UVs to make use of the displace or AO maps later. The easiest and the quickest way to do this in ZBrush is to take advantage of the ZPlugin: UV Master. With this tool we can create UVs with a few clicks only. You can find UV Master plugin under ZPlugin menu. It’s much easier when you dock the ZPlugin Palette in the left tray.
At first let’s click the Work On Clone button. We need this step if there are any SubDivision levels active. Now there’s nothing more left than click the Unwrap and the Flatten buttons if you want to check how newly created UV looks like. Click the Unflatten button to revert to 3D mesh.
If you’re not happy with that default UV (it’s surely very stretched), there is another quick way to fix it. You can create a few Polygroups, which will serve as a base for separate UV islands.
Polygroups
There is a separate division in Tool Palette for Polygroups options. Auto Groups button creates Polygroups based on topology continuity and its visibility. Group Visible button creates Polygroups based on visibility only.
Knowing those options only, you can create as many Polygroups as you wish. Just hide the whole mesh, apart from a section you want to become a separate Polygroup. I wrote roughly about Polygoups when describing figures legs creation, but just to remind: Ctrl+Shift+Click on a mesh to isolate a chosen Polygroup. To preview the Polygroups, turn on PolyFrame option. Each Polygroup has a different colour.
Back to UVs
Now when we have Polygroups created, we can go back to finish creating the UVs for ram’s figure. This time, before we click Unwrap button, let’s choose Polygroups button first. With this option chosen, ZBrush will create seams in place of our Polygroups borders.
Just like before, check how the new UV look like by clicking Flatten button. If it’s good enough (my favourite expression btw. ;), click UnFlatten.
Remember that we’re working on our figure’s clone all the time. Now we need to copy the UVs to the original, divided mesh. To do this click Copy UVs button, change the tool to SubDivided one and click Paste UVs button on the UV Master division of the ZPlugin palette.
Click on image to enlarge
Thank you for your time, I hope you’ll find those tips useful in your work. Feel free to comment and ask me any questions regarding sculpting in ZBrush.


LEAVE A COMMENT


|

|

|

|

|


COMMENTS