Evermotion Pass 10% Off - Get Instant Access to Thousands of 3D Assets

Check Plans

Information Clause

In accordance with the art. 13 section 1 and 2 of the European Parliament and Council Regulation 2016/679 of the 27th April, 2016 on the protection of natural persons, with regard to the processing of personal data and on the free movement of such data, and repealing Directive 95/46/EC (General Data Protection Regulation), hereafter RODO, I hereby inform that:

1. EVERMOTION S.C., 8 Przędzalniana Str., 15-688 Białystok, Poland is the Administrator of your Personal Data (APD)

2. Data Protection Inspector can be reached through e-mail: iod@evermotion.org

3. Your personal data are to be processed on the basis of art. 6 section 1 letter a, b and f of RODO in order to:
a) prepare, conclude and execute the agreement and for other purposes approved by you,
b) to execute the legitimate interest like marketing of products and the agreement, claim assertion or defence against claims resulting from the law regulations.

4. Entities entitled to the reception of your personal data may be the authorised public bodies; mail providers; providers of the services covered by the agreement; responsible for debt recovery, keeping the archives, document utilization, legal consulting, technical services, IT services and accountancy.

5. Your personal data shall not be transferred to the third country, nor to the international bodies.

6. Your personal data shall be processed within the period of the agreement and upon your additional consent until you withdraw it. APD shall keep the data for the period of any civil law claim execution connected with the agreement.

7. You have the right to demand an access to your personal data, to correct or to delete the data if there is no other basis for the processing or any other purpose of such processing or to limit the processing of the data, to transfer the data to another administrator and to raise objections to the further data processing if there is no legal basis for further processing and to withdraw any previous consent.

8. You provide the personal data voluntarily, however they are necessary to conclude the agreement. The refusal of providing such data may result in the refusal of the agreement conclusion.

9. You have the right to lodge a complaint to the Personal Data Protection Office when in your opinion the data processing violates the regulations of General Data Protection Regulation of the 27 April, 2016 (RODO).

10. Your data will be automatically processed, including the form of profiling.
11. You are obligated to forward above mentioned information to your representative, especially if you appointed this person in the agreement as the contact person or as the representative for the agreement execution.

OK

Making of Small Luxury Bathroom - Tip of the Week

Michał Franczak 2015-04-24 11:42 tutorial  > 3ds MAX  > texturing

Breaking down a scene from Archinteriors vol. 39, inspired by Chalet Black Pearl.

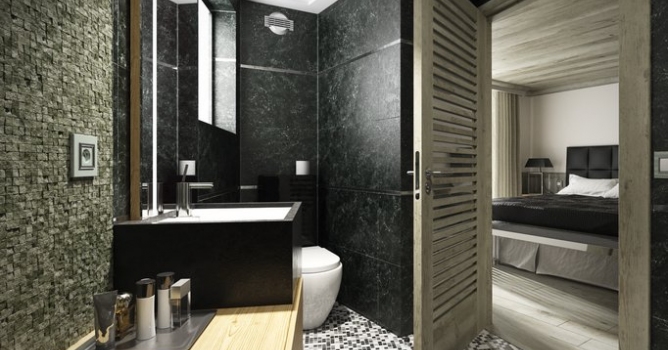
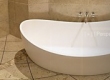
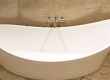
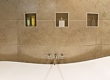
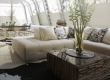
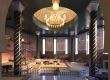
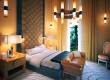
This small, but luxury bathroom is placed in Chalet Black Pearl built by Philippe Capezzone, owner and designer of the 5* Hotel Kilimandjaro in Courchevel 1850. Chalet Black Pearl is a mix of contemporary design mingled with traditional Savoyard stone and classic woodwork panelling. Finished with Andrew Martin materials and furnishings together with many local Savoyard artefacts. Interior scene was made in 3ds Max and V-Ray by Kuba Dąbrowski from Evermotion. It is scene 09 from Archinteriors vol. 39. You can buy Archinteriors vol. 39 collection in  Evermotion Shop. This Tip of the Week focuses on lights, camera, render settings and the method we used for walls and floor creation.

Click on image to enlarge nr_AI39_009_PP_738.jpg

Final image after post-production. We had to deal with very small surface, but it has some extraordinary materials and nice wall finishing that we achieved with external tools. More on that later.


Click on image to enlarge nr_AI39_009_wire_740.jpg

Wireframe view.


Click on image to enlarge nr_reference_737.jpg

Reference photo. We think that Kuba matched it pretty closely :)


Click on image to enlarge nr_AI39S09_0034_1_735.jpg

View from camera.


Click on image to enlarge nr_AI39S09_0033_2_734.jpg

Top view. Kuba modeled two rooms - a bathroom and a room that is visible through doorway.


Click on image to enlarge nr_AI39S09_0032_3_733.jpg

Isometric view of interiors.


Click on image to enlarge nr_AI39S09_0031_4_732.jpg

Camera settings. Camera is placed near the wall, it has quite small FOV (21 mm).


Click on image to enlarge nr_AI39S09_0030_5_731.jpg

Light settings. Kuba placed one light behind small bathroom window.


Click on image to enlarge nr_AI39S09_0029_6_730.jpg

Another light was placed above the camera.


Click on image to enlarge nr_AI39S09_0028_7_729.jpg

Our "sun" - Target direct Light settings.


Click on image to enlarge nr_AI39S09_0027_8_728.jpg

Spot light brings out the details of the stone wall.


Click on image to enlarge nr_AI39S09_0025_10_726.jpg

Another vray light is placed behind big window in bedroom.


Click on image to enlarge nr_AI39S09_0026_9_727.jpg

Vray lights listed.


Click on image to enlarge nr_AI39S09_0024_11_725.jpg

Floor plane with mosaic material.


Click on image to enlarge nr_AI39S09_0023_12_724.jpg

Floor material settings.


Click on image to enlarge nr_AI39S09_0022_13_723.jpg

Marble wall material.


Click on image to enlarge nr_AI39S09_0021_14_722.jpg

Stone wall was made in a specific way. Kuba made 5 different stone elements and then he scattered them with Forest Pack. Each stone is also randomly rotated by 90, 180 and 270 degrees, which gaves 4 more variations. So we have 20 stone variations. After scattering, Kuba randomized position of stones to achieve uneven wall surface. Stone wall has a material that uses 8 submaterial that have different color variants. So we have 20 stone variations x 8 colors = 160 different faces. It is enough to achieve realistic look.


Click on image to enlarge nr_AI39S09_0020_15_721.jpg

One of stone elements.


Click on image to enlarge nr_AI39S09_0019_16_720.jpg

Stone wall material. Multi-Sub Vray material with 8 submaterials.


Click on image to enlarge nr_AI39S09_0017_18_718.jpg

One of submaterial settings. The rest of them has different color correction settings (hue, brightness, saturation).


Click on image to enlarge nr_AI39S09_0016_19_717.jpg

Ceiling.


Click on image to enlarge nr_AI39S09_0015_20_716.jpg

Ceiling material consists of two submaterials.


Click on image to enlarge nr_AI39S09_0014_21_715.jpg

Ceiling Material 1.


Click on image to enlarge nr_AI39S09_0013_22_714.jpg

Ceiling material 2.


Click on image to enlarge nr_AI39S09_0012_23_713.jpg

Floor plane in the bedroom.


Click on image to enlarge nr_AI39S09_0011_24_712.jpg

Floor plane in the bedroom - mesh.


Click on image to enlarge nr_AI39S09_0010_25_711.jpg

Bedroom floor material.


Click on image to enlarge nr_AI39S09_0009_26_710.jpg

Mirror - a simple plane.


Click on image to enlarge nr_AI39S09_0008_27_709.jpg

Mirror material.


Click on image to enlarge nr_AI39S09_0007_28_708.jpg

Tap model.


Click on image to enlarge nr_AI39S09_0006_29_707.jpg

Tap material.


Click on image to enlarge nr_render_settings_736.jpg

Render settings.


Click on image to enlarge nr_AE_39_09.RGB_color_739.jpg

Raw render lacks contrast, we need to enhance levels in Photoshop.


Click on image to enlarge ps_stack_3.jpg

We didn't make very time-consuming post-production. The layer that affects render most is Curves layer. Kuba added VrayReflection, Specular and Lighting layers on top of it (Reflection and Specular - screen with 10% opacity, Lighting - Soft Light with 10% opacity). Then Kuba sharpened it a bit and put vignette layer on the top.


Click on image to enlarge nr_AI39_009_PP_738.jpg

Final render after post-production. Thanks for reading! :)


Author: Michał Franczak Editor: Michał Franczak
Tags: archinteriors bathroom luxury ai39 archinteriorsvol.39
You may also like...
Creating a bathroom in 3ds max - 5 of 8

Creating a bathroom in 3ds max - 5 of 8

In this tutorial we are going to create a bathroom in 3ds max and render it with Vray. The main goal of this tutorial is to show different techniques for modeling and rendering. So the objects and materials have been chosen according to this goal.
×

LEAVE A COMMENT

You need to be logged in to leave a comment. Don't have account? Register now.

Hesham Elshipli 22:18:18  |  24-04-2015
Thank you. I have one question. For the wall, I already thought about your way using forest before. But there is a problem with intersections in Forest specially in close up shots. Did you overcome this problem or just because the wall is far from the camera it is not a problem for you :)
dr_After 09:53:47  |  27-04-2015
There are not intersections between wall elements - they are close to each other, but do not intersect.