Create Dirty Windows - material tutorial
New tutorial by RenderRam.


In accordance with the art. 13 section 1 and 2 of the European Parliament and Council Regulation 2016/679 of the 27th April, 2016 on the protection of natural persons, with regard to the processing of personal data and on the free movement of such data, and repealing Directive 95/46/EC (General Data Protection Regulation), hereafter RODO, I hereby inform that:
1. EVERMOTION S.C., 8 Przędzalniana Str., 15-688 Białystok, Poland is the Administrator of your Personal Data (APD)
2. Data Protection Inspector can be reached through e-mail: iod@evermotion.org
3. Your personal data are to be processed on the basis of art. 6 section 1 letter a, b and f of RODO in order to:
a) prepare, conclude and execute the agreement and for other purposes approved by you,
b) to execute the legitimate interest like marketing of products and the agreement, claim assertion or defence against claims resulting from the law regulations.
4. Entities entitled to the reception of your personal data may be the authorised public bodies; mail providers; providers of the services covered by the agreement; responsible for debt recovery, keeping the archives, document utilization, legal consulting, technical services, IT services and accountancy.
5. Your personal data shall not be transferred to the third country, nor to the international bodies.
6. Your personal data shall be processed within the period of the agreement and upon your additional consent until you withdraw it. APD shall keep the data for the period of any civil law claim execution connected with the agreement.
7. You have the right to demand an access to your personal data, to correct or to delete the data if there is no other basis for the processing or any other purpose of such processing or to limit the processing of the data, to transfer the data to another administrator and to raise objections to the further data processing if there is no legal basis for further processing and to withdraw any previous consent.
8. You provide the personal data voluntarily, however they are necessary to conclude the agreement. The refusal of providing such data may result in the refusal of the agreement conclusion.
9. You have the right to lodge a complaint to the Personal Data Protection Office when in your opinion the data processing violates the regulations of General Data Protection Regulation of the 27 April, 2016 (RODO).
10. Your data will be automatically processed, including the form of profiling.
11. You are obligated to forward above mentioned information to your representative, especially if you appointed this person in the agreement as the contact person or as the representative for the agreement execution.

Creating stone wall may seem a difficult and time consuming task. It feels as if it requires sophisticated sculpting skills that some of 3D artists do not possess. Naturally you can go for displacement and other texturing hacks but if some close-up renders are required you need a different approach. The solution I'm just about to share with you is based on shattering simple object to pieces and then transforming them using bunch of modifiers. My setup in Blender is fast, clean and produces geometry that is fairly simple to texture using Cycles and its powerful nodes system.
Lets start by enabling Cell Fracture Addon from Blender User Preferences. You can either search for it by typing its name or directly inside Object Category. When set to active, you'll be provided with one extra option in Toolshelf called Cell Fracture.

Mind out that you'll need a simple base for your wall before launching the addon. Add a Cube, scale it along desired axis and apply its size with a help of Ctrl+A shortcut. Give your model default Particle System and lower the number of emited object, in my case 40 is more than enough. This value will determine the number of rocks that will together form the wall we need.

Select Cube and hit Cell Frature button that will give you access to dozens of new settings. I won't discuss them all, instead lets focus on those that are really needed to complete our task. Firts of all set Point Source to Own Particles so that the particle system we created will become the root of every single piece of shattered Cube. Increase the Noise value and lower Scale for all the axis as we need our Cube to be cut in small and randomly shaped pieces. Don't forget to disable Apply Split Edge option or else newly generated objects will be useless for further editing using modifiers stack. I tend to leave Next Layer option ticked as I prefer to keep shattered elements on the other layer than the base one. Having it done push OK button and shred your object to bits.

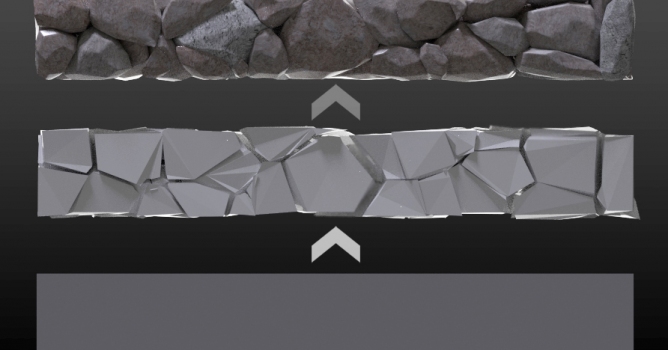
First of all select all of your objects (excluding the base) and join them into one model. Make sure you don't have any loose geometry (disconnected vertices, edges or faces) or a really small pieces that may produce annoying bugs in the future. In case of their presence delete them ASAP.

Add Displace modifier and decrease its Midlevel and Strength options. Ideally you want to slightly deform your mesh and push its fragments away from its center. Use Cloud texture as a source of generated noise, if needed tweak its size until desired result.

In order to change the shape of every piece a little bit more we need to add Subdivision Surface modifier that uses Simple aligorithm. This way we'll make sure that future Catmull-Clark subdivisions will work fairly well and won't spherify rocks too much. Optionally you can follow this step by Triangulate modifier with Fixed Quad Method.

Further deformation of our stones (and probably teh most important one) will be caused by Decimate modifier. Keep Ratio at a reasnable low level in order to control the final density of the stone wall. Consider activating Triangulate option that may keep your model bug-free.

Add another Subdivision Surface modifier and leave its default settings intact. As you can see rocks got smoother yet they touch each other as if they were placed to form a wall. That's exactly what we wished for!

You can easily stop right here and complete stack with Edge Split modifier... but sometimes it's not the case. For any render closeups I suggest adding Bevel modifier that will determine the style of your stone wall. Keeping Limit Method as None will make your stones hard-edged whilst choosing Angle will smooth them a bit. As I prefer cartoonish and imagine-evoking solutions I gave the first option a try.

Finally add the third Subdivision Surface modifier with Catmull-Clark aligorithm. As you can see the shape of our wall stone is now clearly visible. Setting up shaders is now the only thing that's left to do.

Switch your rendering engine to Cycles and add a new default material to your wall. Select your model and unwrap it using Smart UV Project (shortcut U). Because we are going to work on every single rock we need to separate all loose parts of our mesh (shortcut P in Edit Mode). Unfortunatelly this step requires applying all the modfiers so make sure everything looks like intended. When ready, hit Alt+C and choose Convert to Mesh option. Prepare a few tiled textures of stones and open material node editor. This is the place when magic starts.

Instead of discussing every single node I decided to divide them in sections. These are the most important chains of my setup that determine the final look of our model.
Click on image to enlarge
As you can see I scaled all of my textures ten times so they would fit the general size of the wall (section red). Every time I mixed or even attached them to other nodes I used a simple randomizing technique (green section). It invlolves Object Info and Color Ramp node with a bunch of extra points from the greyscale. Remember that they are read differently for every object on the scene that carries the very same material. Therefore I plugged it to Hue Saturation Value inputs as long as other nodes dicreasing blend points contrast when needed. This way I made sure that every piece of my wall will look slightly different from another. Finally, when all the images were combined and changed a bit, I added Glossy shader and mixed it with default diffuse using Fresnel node (blue section). Once you activate rendered viewport shading you can admire your stone wall directly in 3D space!


LEAVE A COMMENT


|

|

|

|

|


COMMENTS