Evermotion Pass 10% Off - Get Instant Access to Thousands of 3D Assets

Check Plans

Information Clause

In accordance with the art. 13 section 1 and 2 of the European Parliament and Council Regulation 2016/679 of the 27th April, 2016 on the protection of natural persons, with regard to the processing of personal data and on the free movement of such data, and repealing Directive 95/46/EC (General Data Protection Regulation), hereafter RODO, I hereby inform that:

1. EVERMOTION S.C., 8 Przędzalniana Str., 15-688 Białystok, Poland is the Administrator of your Personal Data (APD)

2. Data Protection Inspector can be reached through e-mail: iod@evermotion.org

3. Your personal data are to be processed on the basis of art. 6 section 1 letter a, b and f of RODO in order to:
a) prepare, conclude and execute the agreement and for other purposes approved by you,
b) to execute the legitimate interest like marketing of products and the agreement, claim assertion or defence against claims resulting from the law regulations.

4. Entities entitled to the reception of your personal data may be the authorised public bodies; mail providers; providers of the services covered by the agreement; responsible for debt recovery, keeping the archives, document utilization, legal consulting, technical services, IT services and accountancy.

5. Your personal data shall not be transferred to the third country, nor to the international bodies.

6. Your personal data shall be processed within the period of the agreement and upon your additional consent until you withdraw it. APD shall keep the data for the period of any civil law claim execution connected with the agreement.

7. You have the right to demand an access to your personal data, to correct or to delete the data if there is no other basis for the processing or any other purpose of such processing or to limit the processing of the data, to transfer the data to another administrator and to raise objections to the further data processing if there is no legal basis for further processing and to withdraw any previous consent.

8. You provide the personal data voluntarily, however they are necessary to conclude the agreement. The refusal of providing such data may result in the refusal of the agreement conclusion.

9. You have the right to lodge a complaint to the Personal Data Protection Office when in your opinion the data processing violates the regulations of General Data Protection Regulation of the 27 April, 2016 (RODO).

10. Your data will be automatically processed, including the form of profiling.
11. You are obligated to forward above mentioned information to your representative, especially if you appointed this person in the agreement as the contact person or as the representative for the agreement execution.

OK

Making of City Corner - Tip of The Week

Michał Franczak 2014-10-03 12:43 tutorial  > 3ds MAX  > modeling

This scene comes from Evermotion Archexteriors vol. 24.

This scene was made by Michal Horba from Evermotion and it is included in Archexteriors vol. 24. You can preorder this collection in Evermotion Shop for introductory price €90 (till October 7). This scene was modeled and set with 3DS Max and rendered with V-Ray (check V-Ray price!).

Click on image to enlarge 00_FINAL_nr_2803.jpg
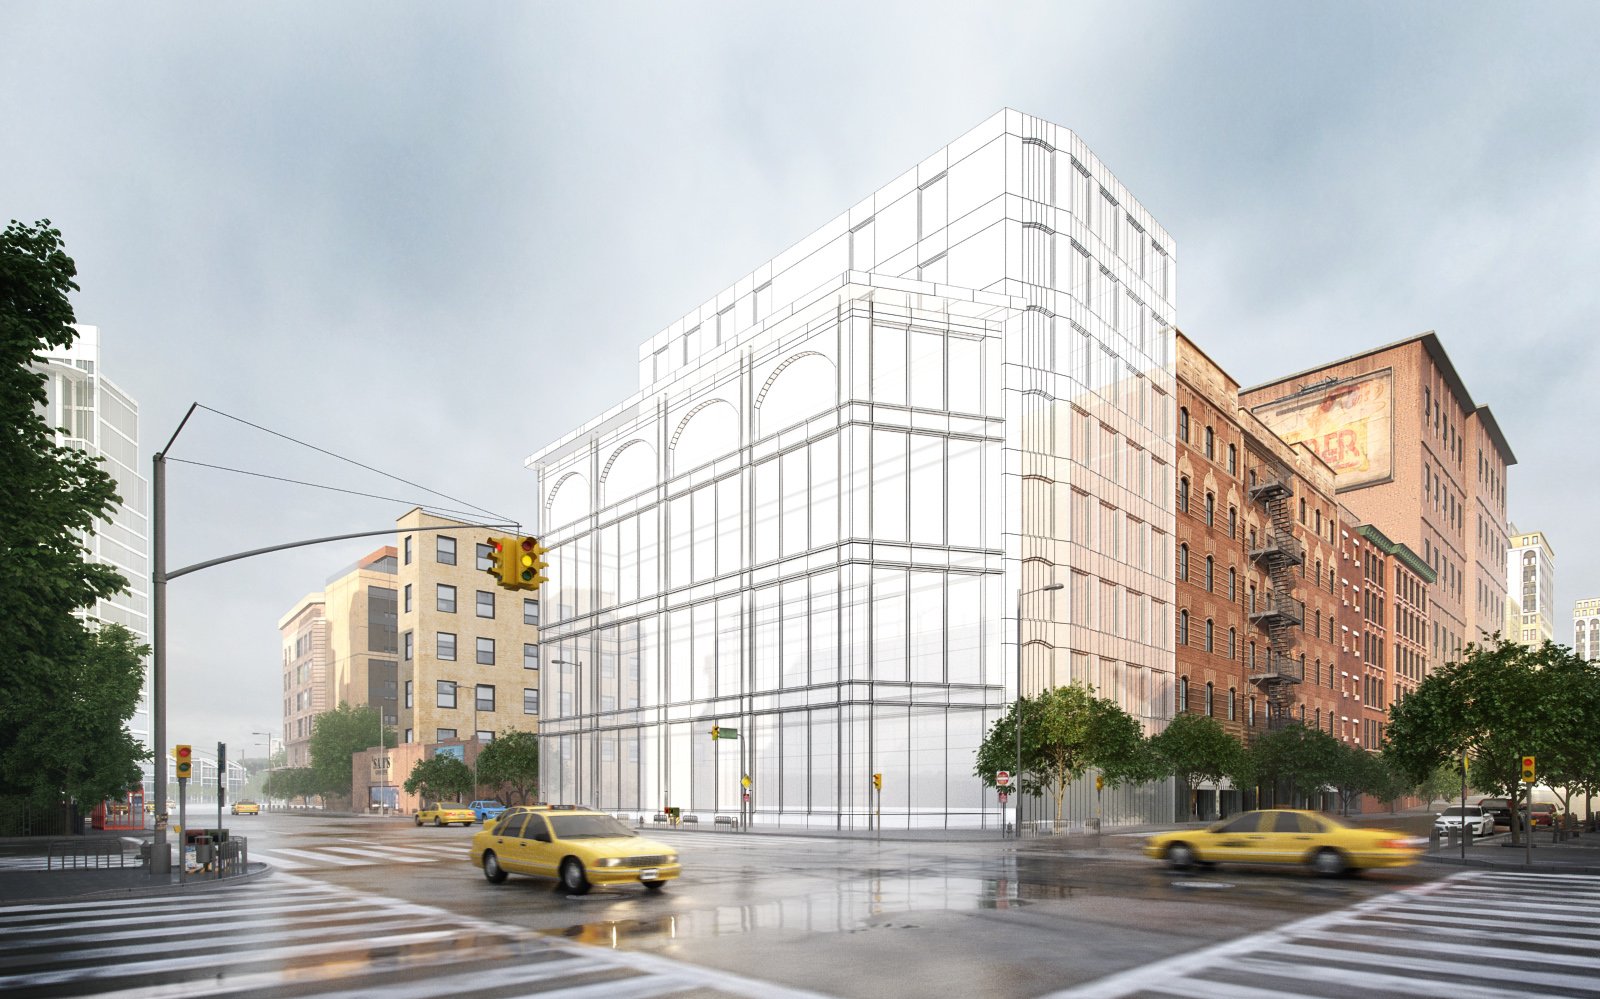
This is the final image after post production.


Click on image to enlarge 00_wire_nr_2805.jpg
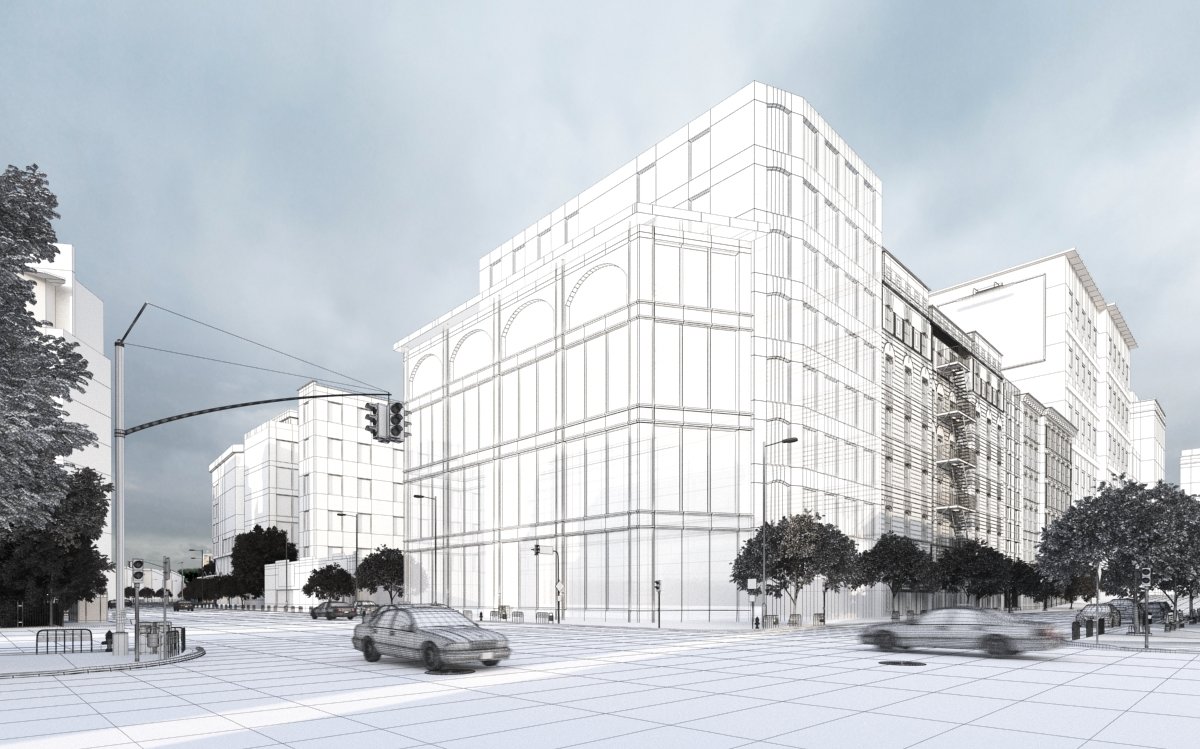
Wireframe


Scene setup

Click on image to enlarge 1_nr_2792.jpg
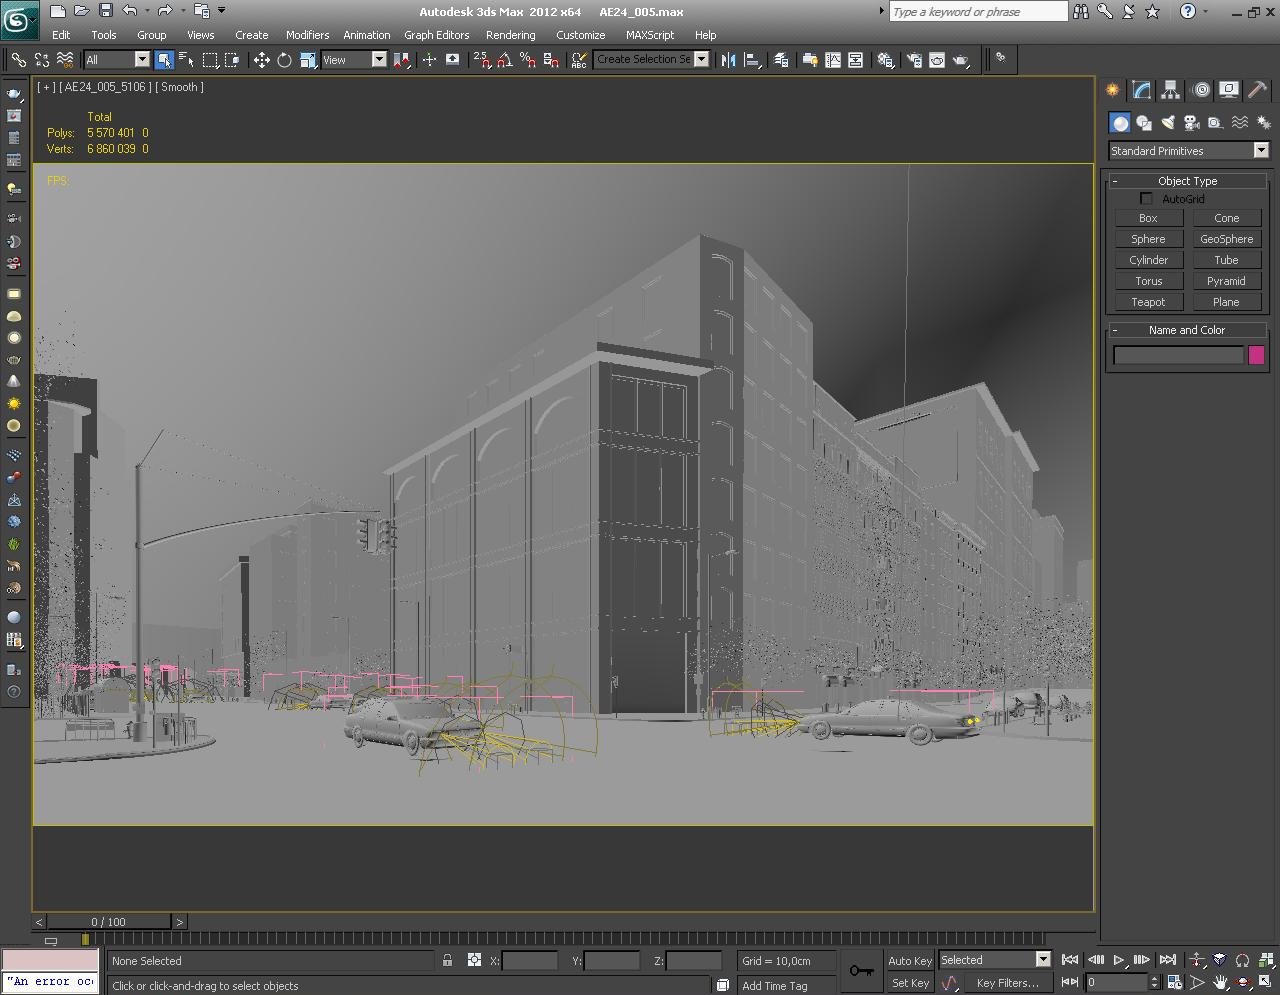
View from camera


Click on image to enlarge 2_nr_2793.jpg

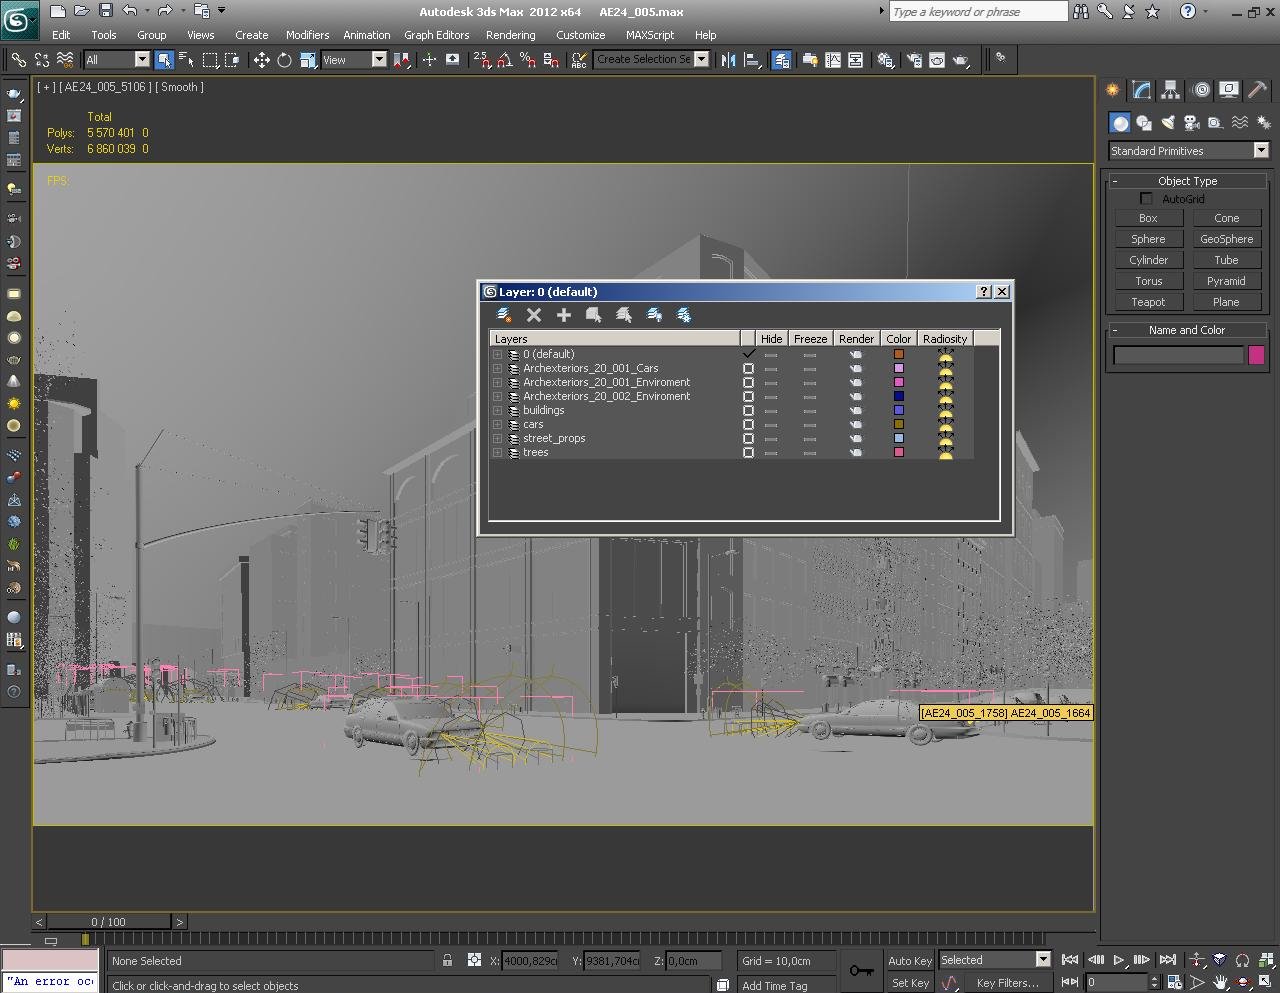
This scene is pretty heavy so it was necesarry to use layers. Thanks to them it is possible to quickly navigate this scene.


Click on image to enlarge 3_nr_2794.jpg
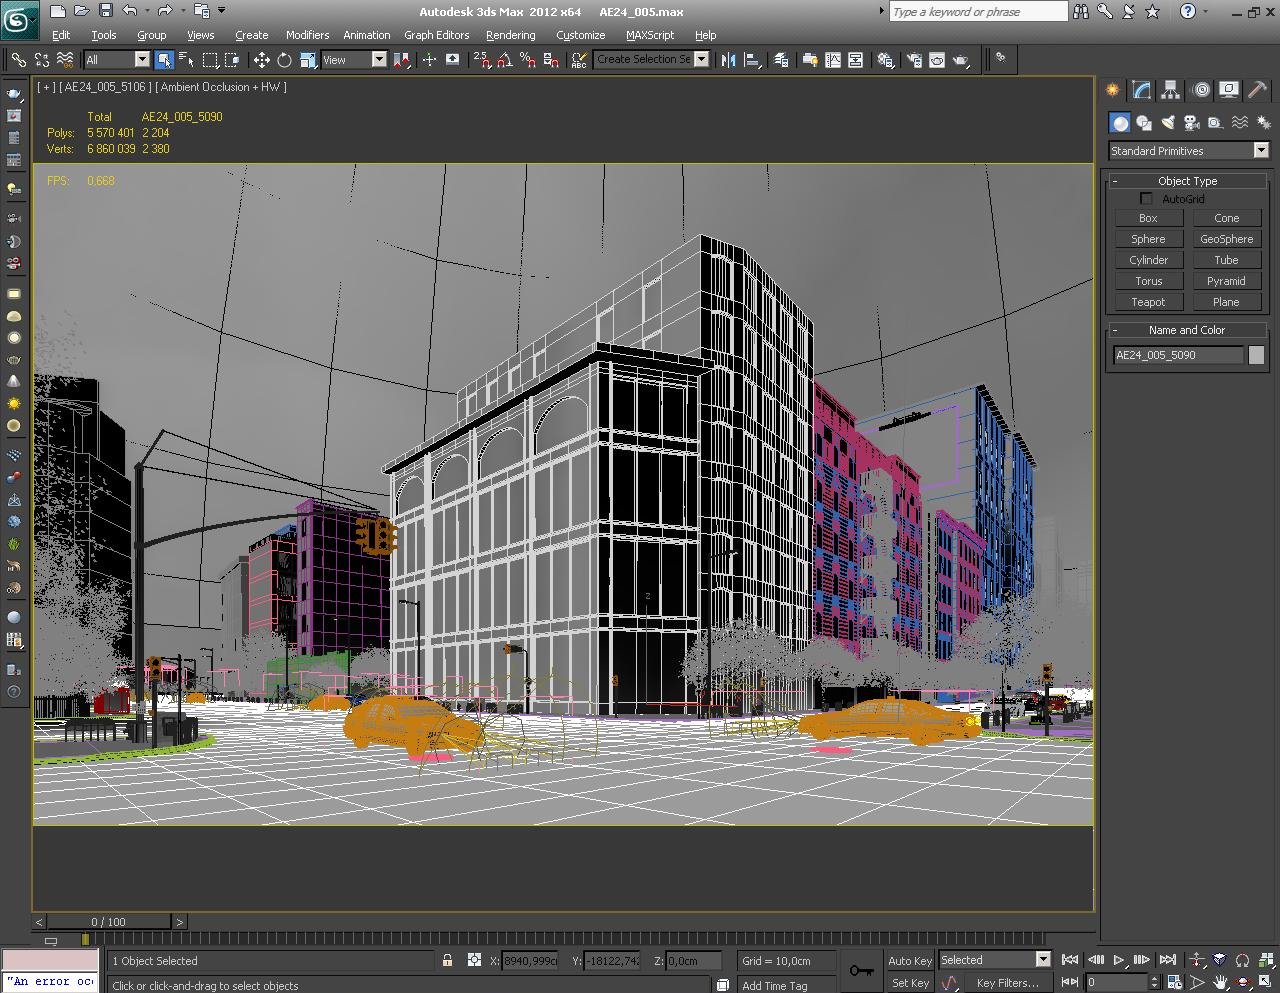
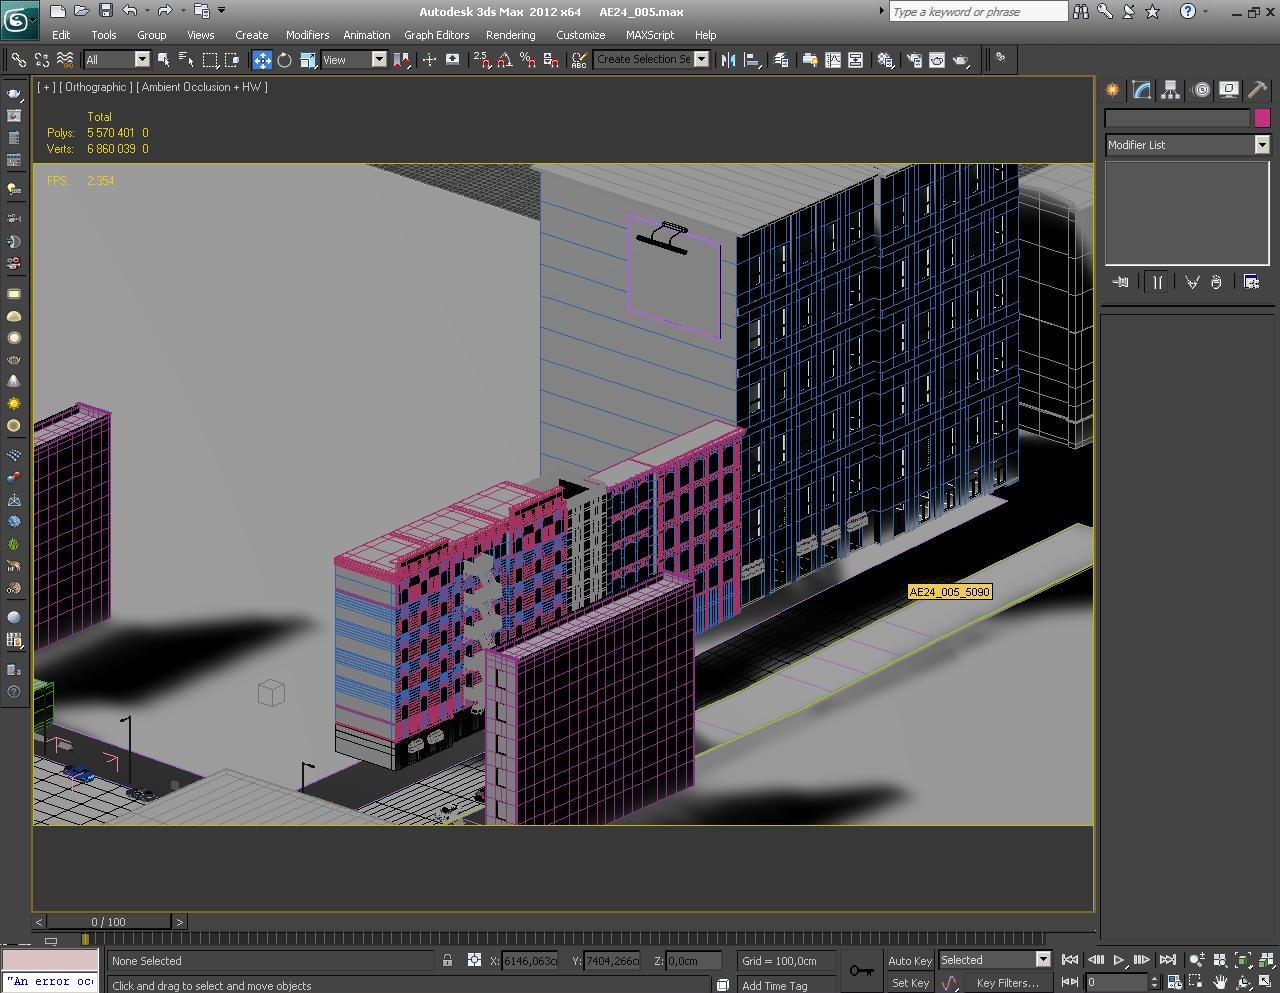
A "template" building. Archexteriors vol. 24 is a collection of template scenes. In each scene we put template building that uses VrayEdgeTex with opacity set to 70%. You simply replace it with your own model and everything else is already in place, correctly lit and textured.


Click on image to enlarge 22_transparent_nr_2769.jpg
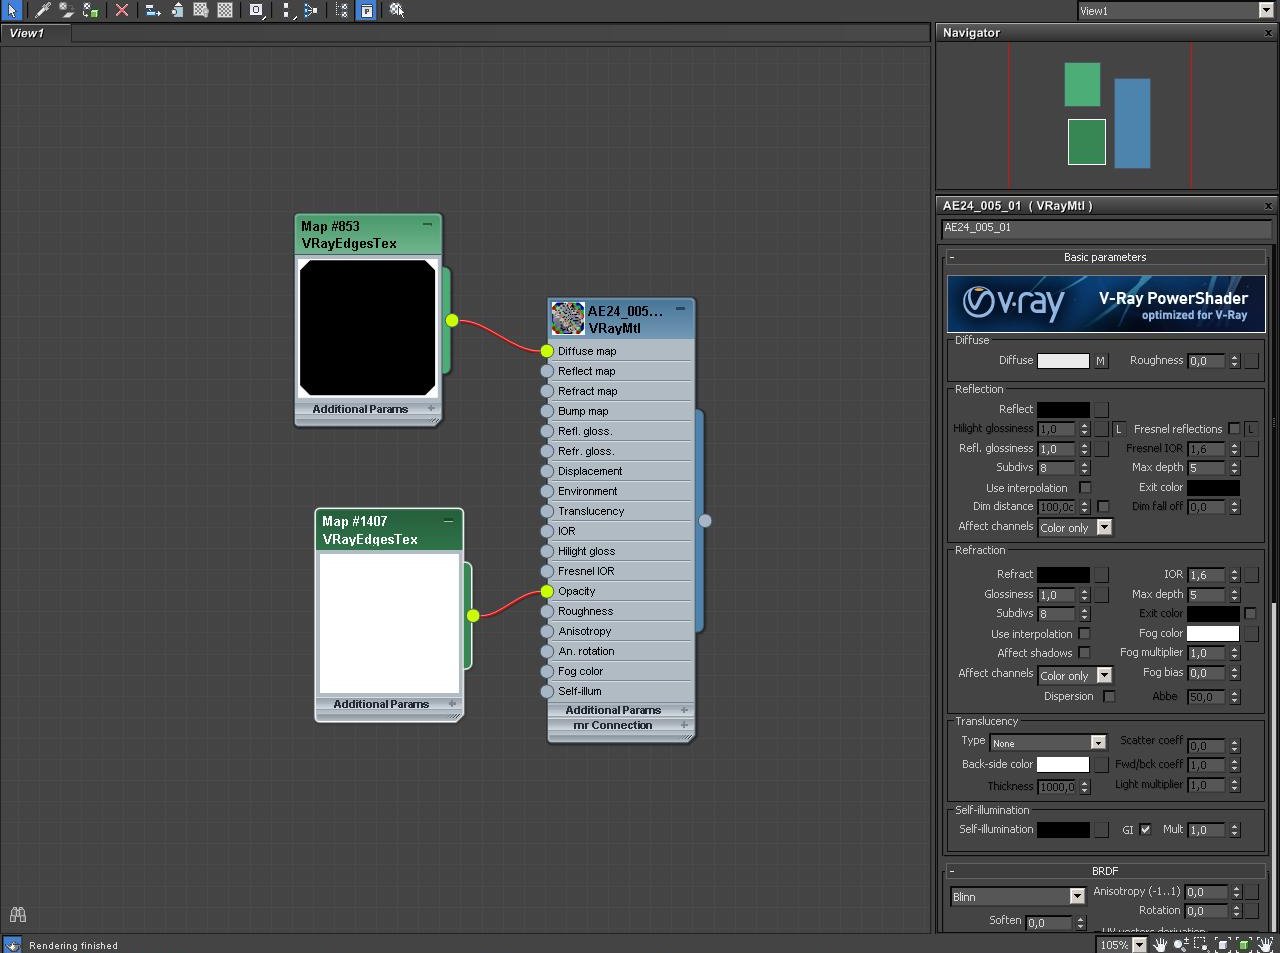
Material of template building - a simple VrayEdgeTex material.


Lighting and environment

Click on image to enlarge 4_nr_2795.jpg
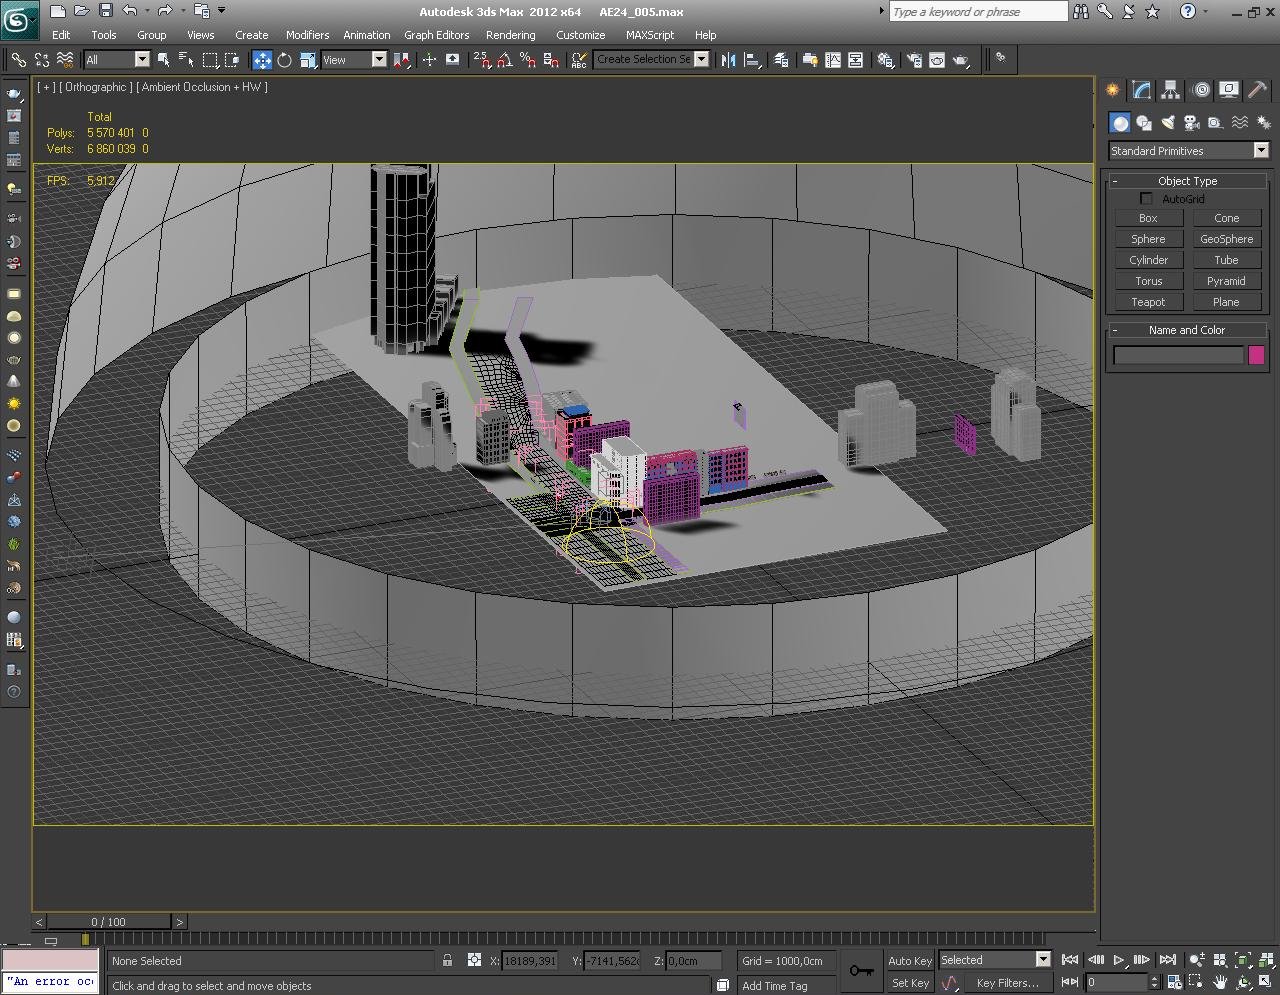
Overview of the scene. There is a main plane with buildings surrounded by cylindrical and dome objects that are used for environment / sky and dome light and target direct light for lighting system.


Click on image to enlarge 41_nr_2788.jpg
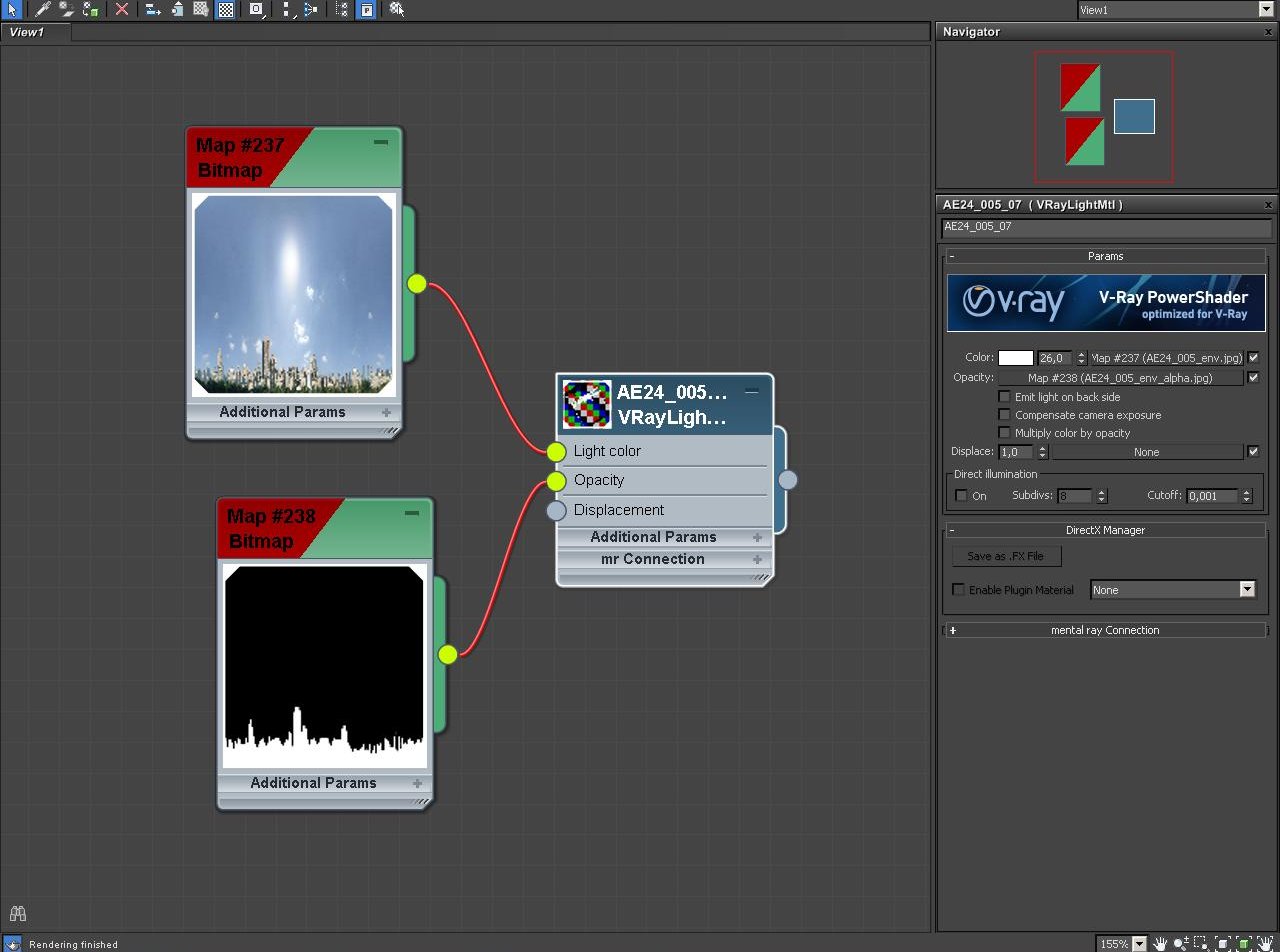
Cylindrical plane has a VrayLightMaterial with a texture that simulates far environment / horizon. Cast shadows = off, not visible to GI.


Click on image to enlarge 42_nr_2789.jpg
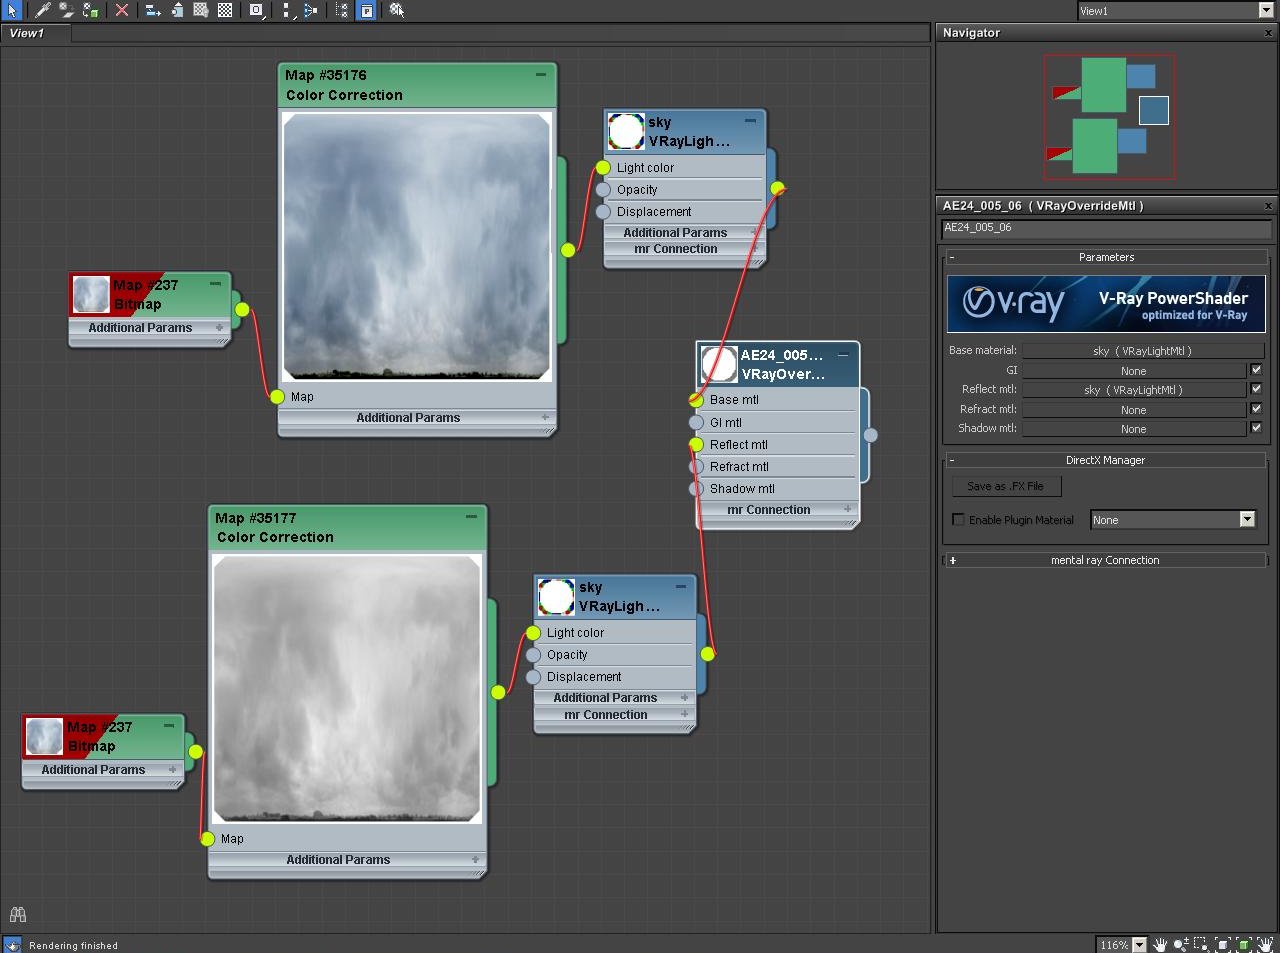
Dome with VrayLightMaterial acting s a sky, not casting shadows, not visible to GI.


Click on image to enlarge 43_nr_2790.jpg
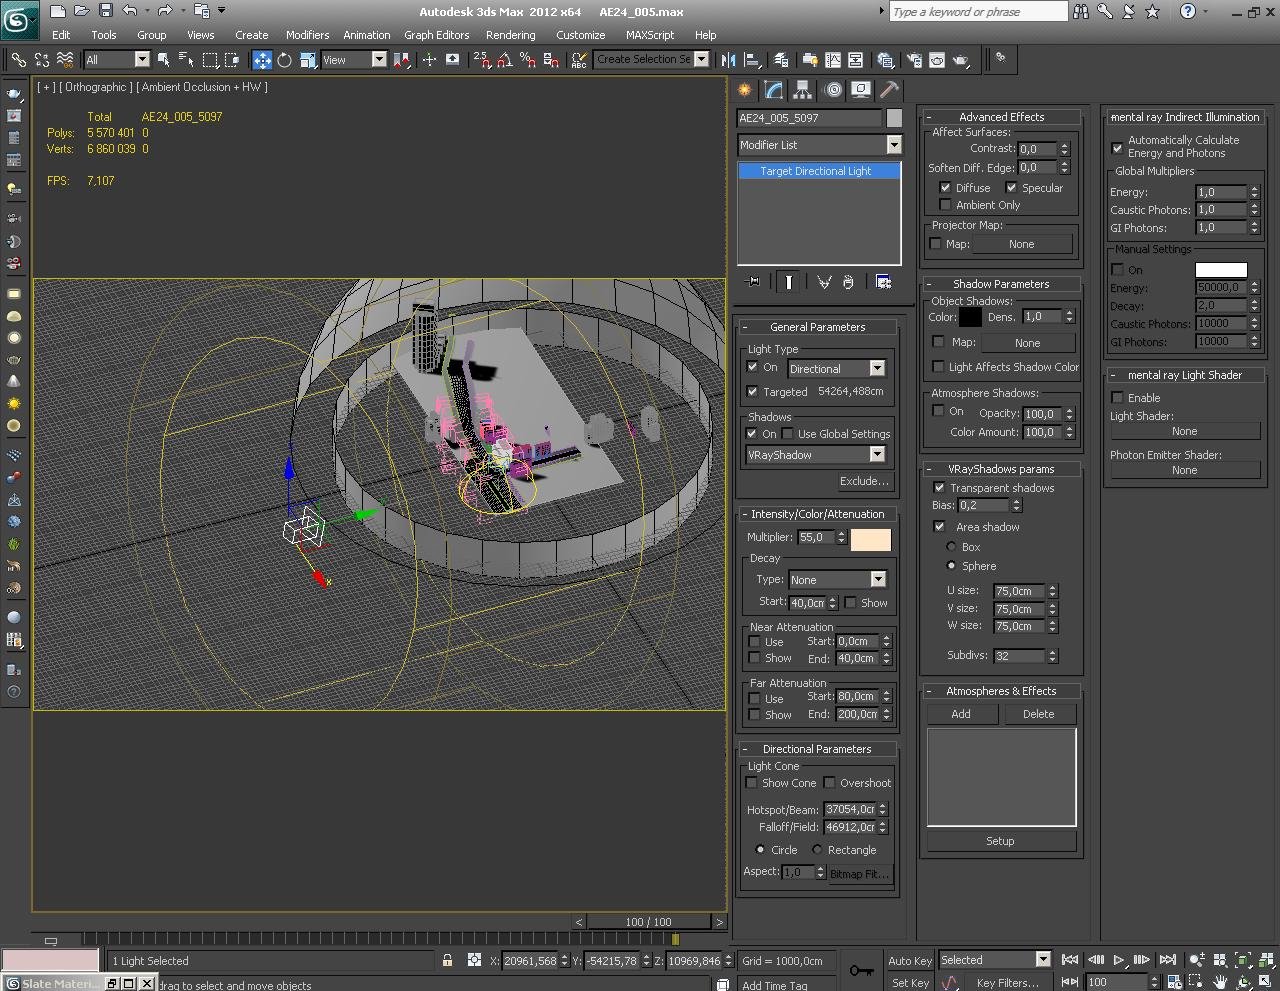
Target Directional Light imitating sun


Click on image to enlarge 44_nr_2791.jpg
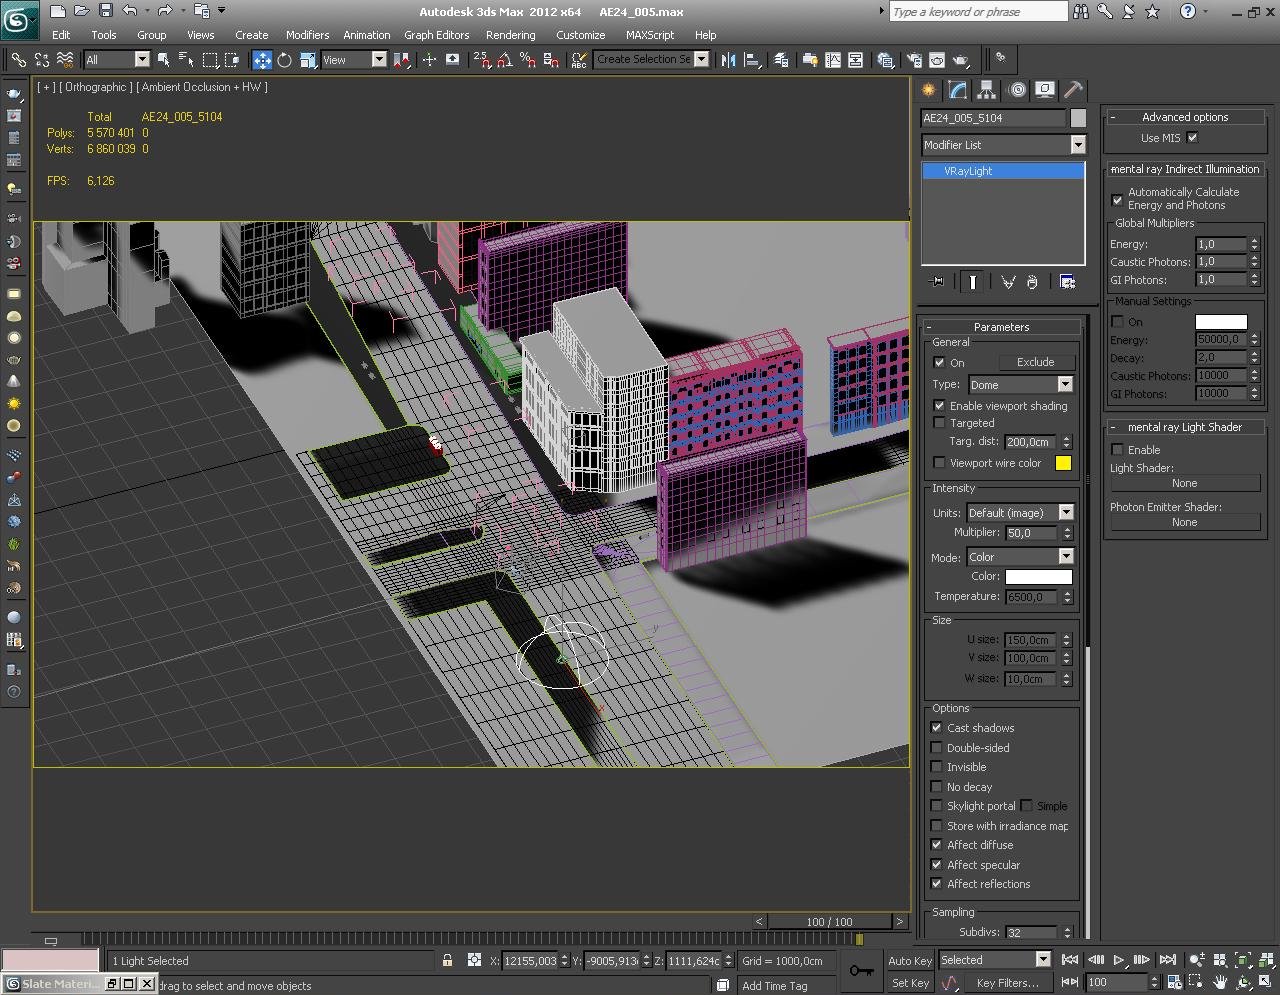
Dome light, giving overal lighting of the scene.


Camera settings

Click on image to enlarge 6_nr_2797.jpg
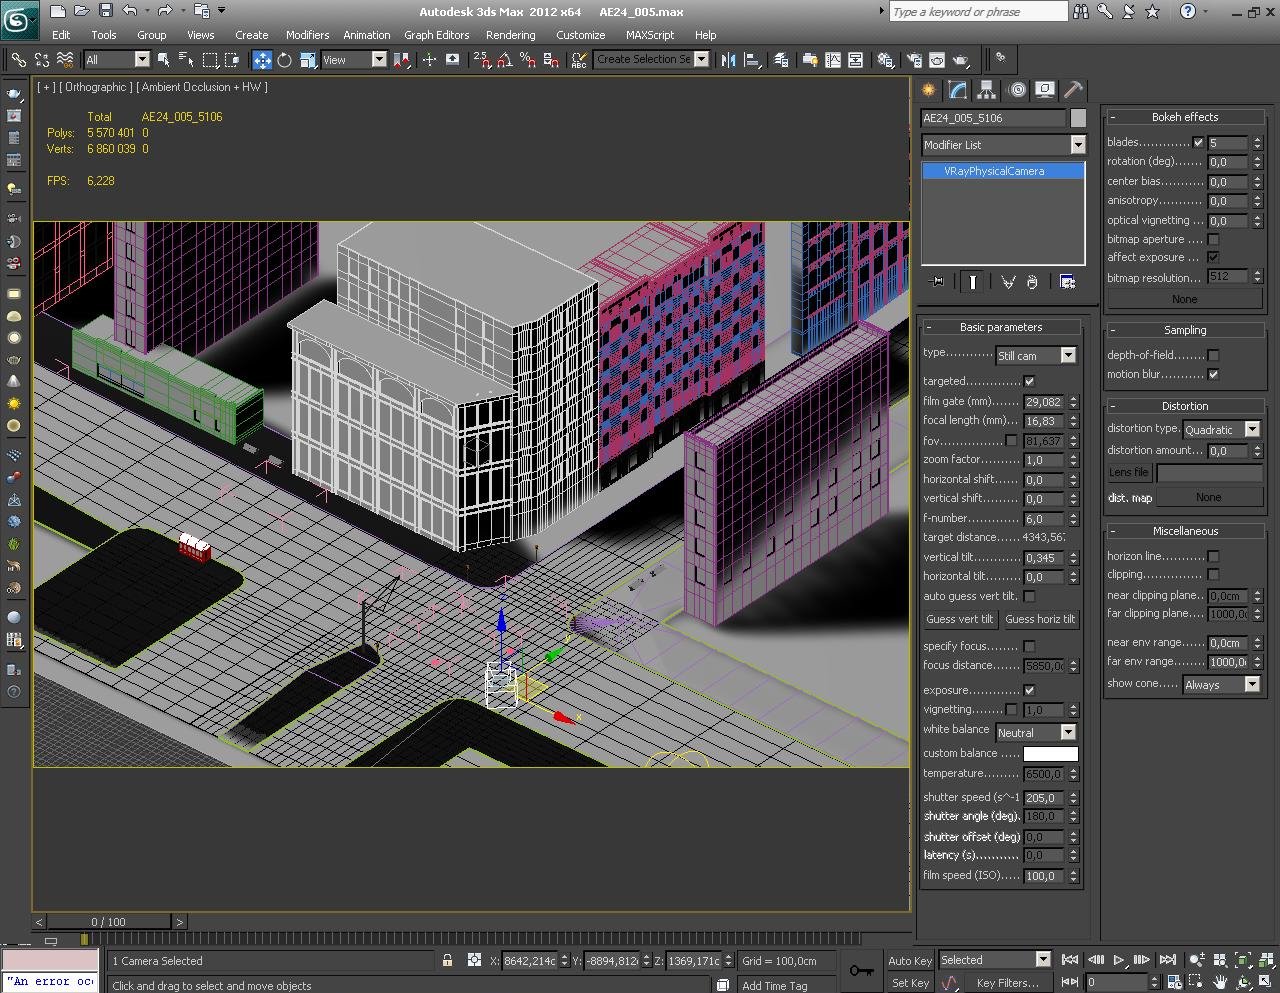
Camera settings


Materials

Click on image to enlarge 8_nr_2799.jpg

The most effort was put into buildings on the right of template building (hidden in this image).


Click on image to enlarge 9_nr_2800.jpg
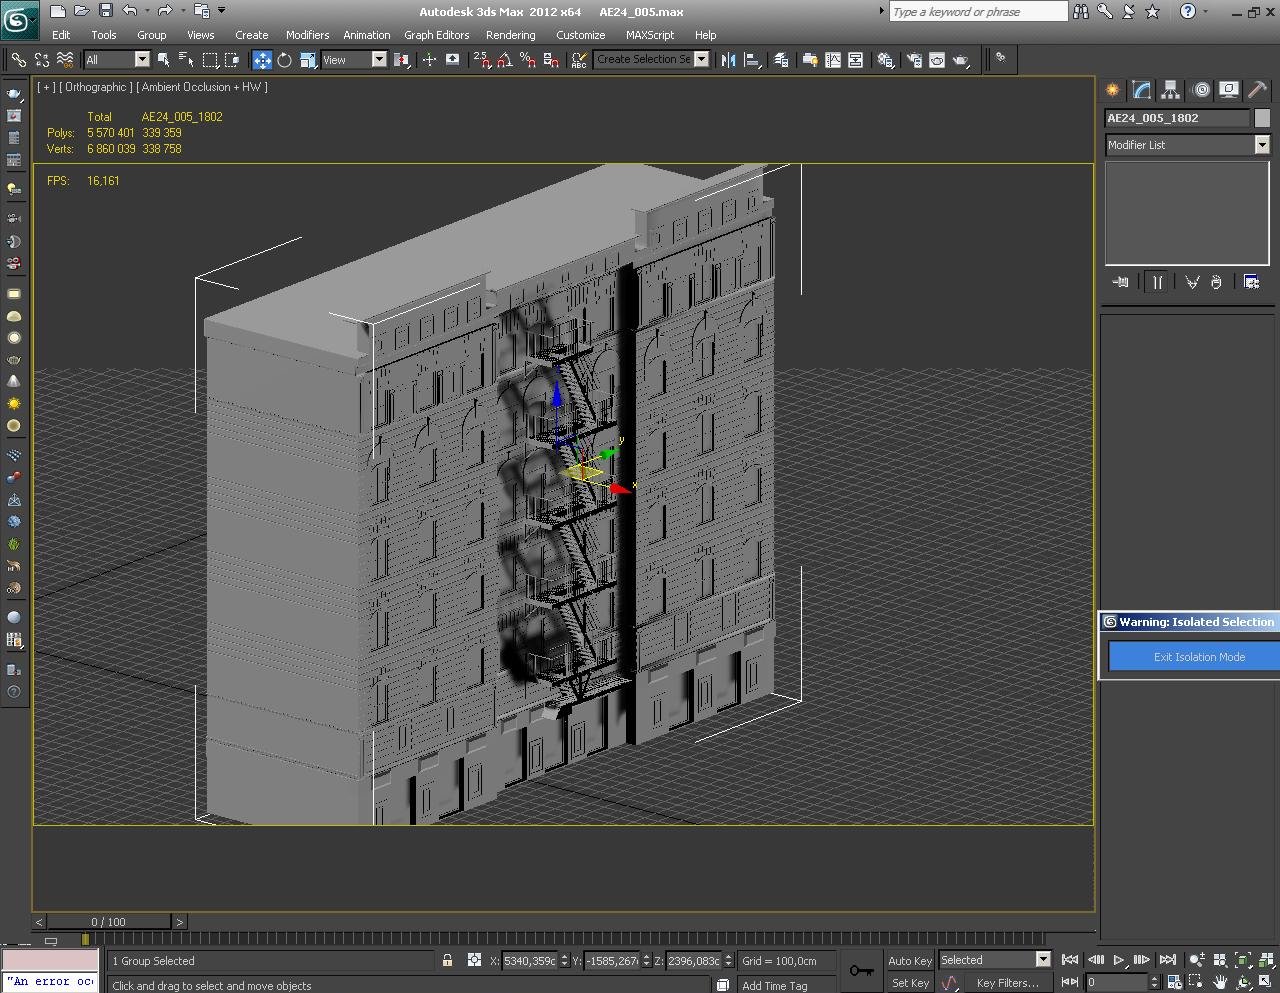
The building next to template building with staircase. Let's call it "building 1".


Click on image to enlarge 10_nr_2801.jpg
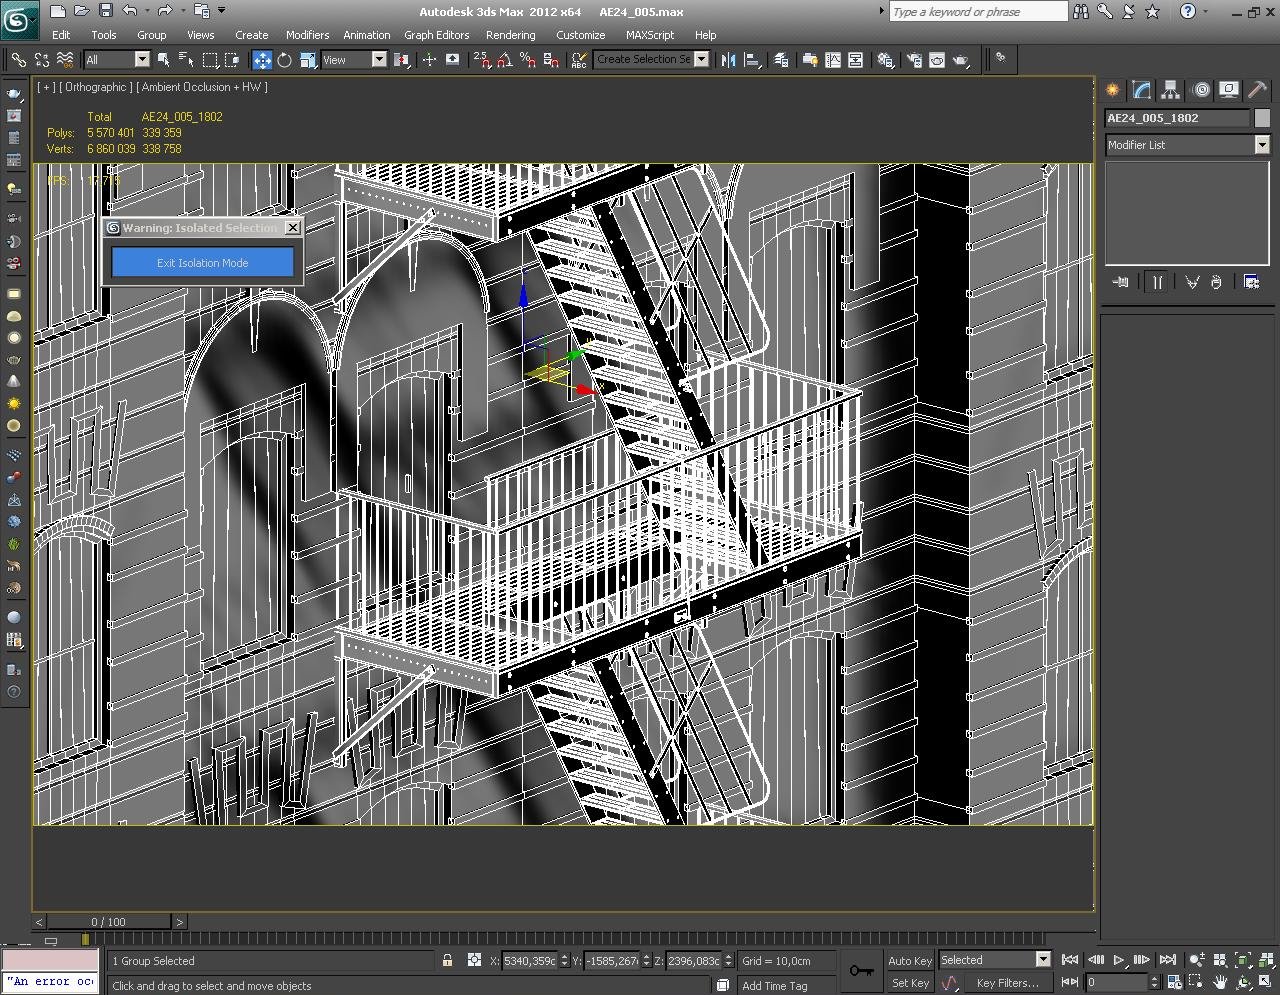
The staircase is quite detailed as for model that is quite far from the camera.


Click on image to enlarge 11_nr_2802.jpg
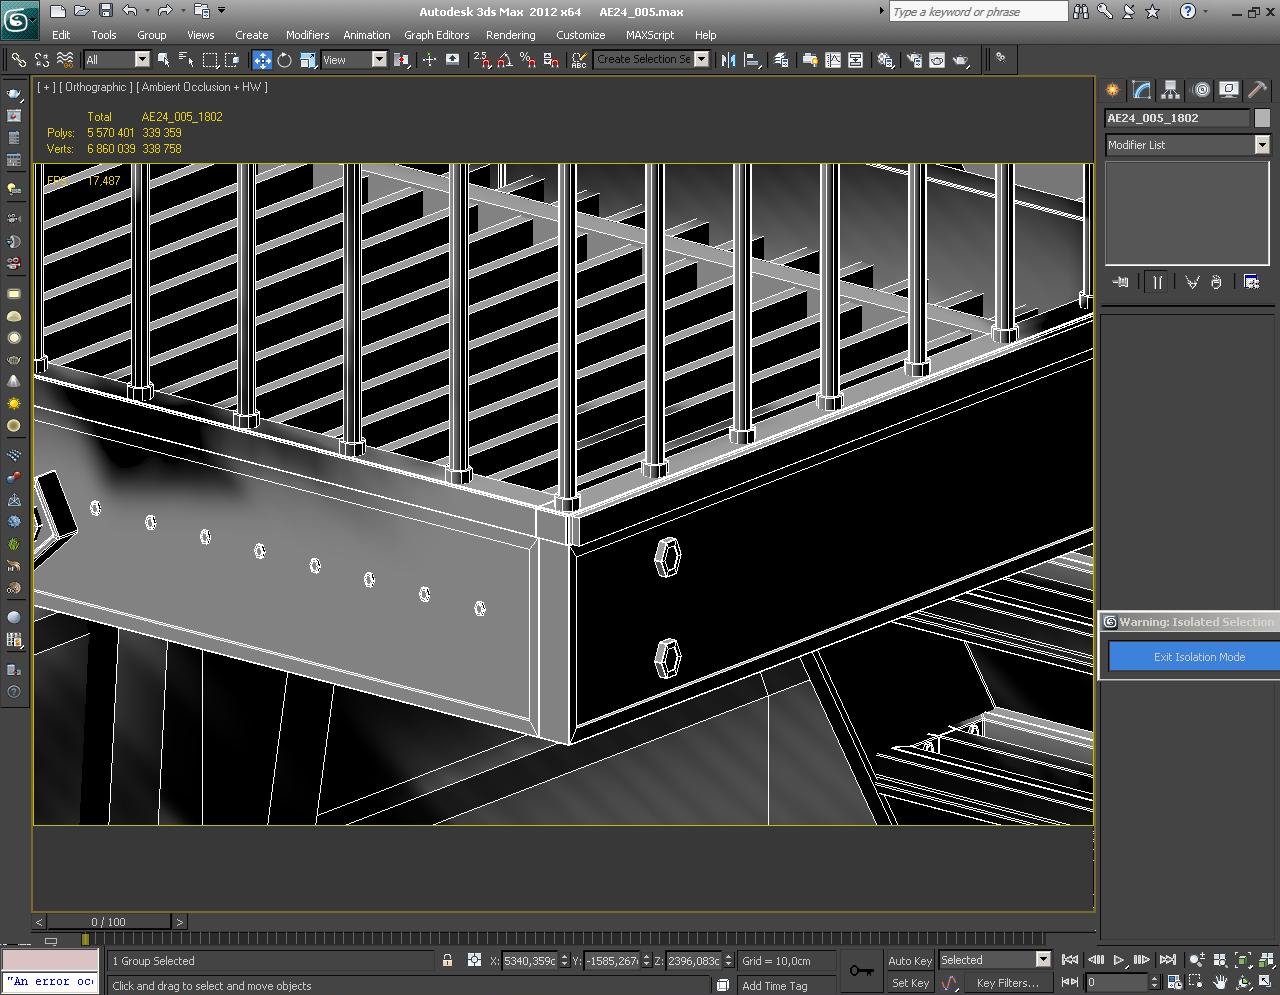
Stairs - close up.


Click on image to enlarge 12_nr_2758.jpg

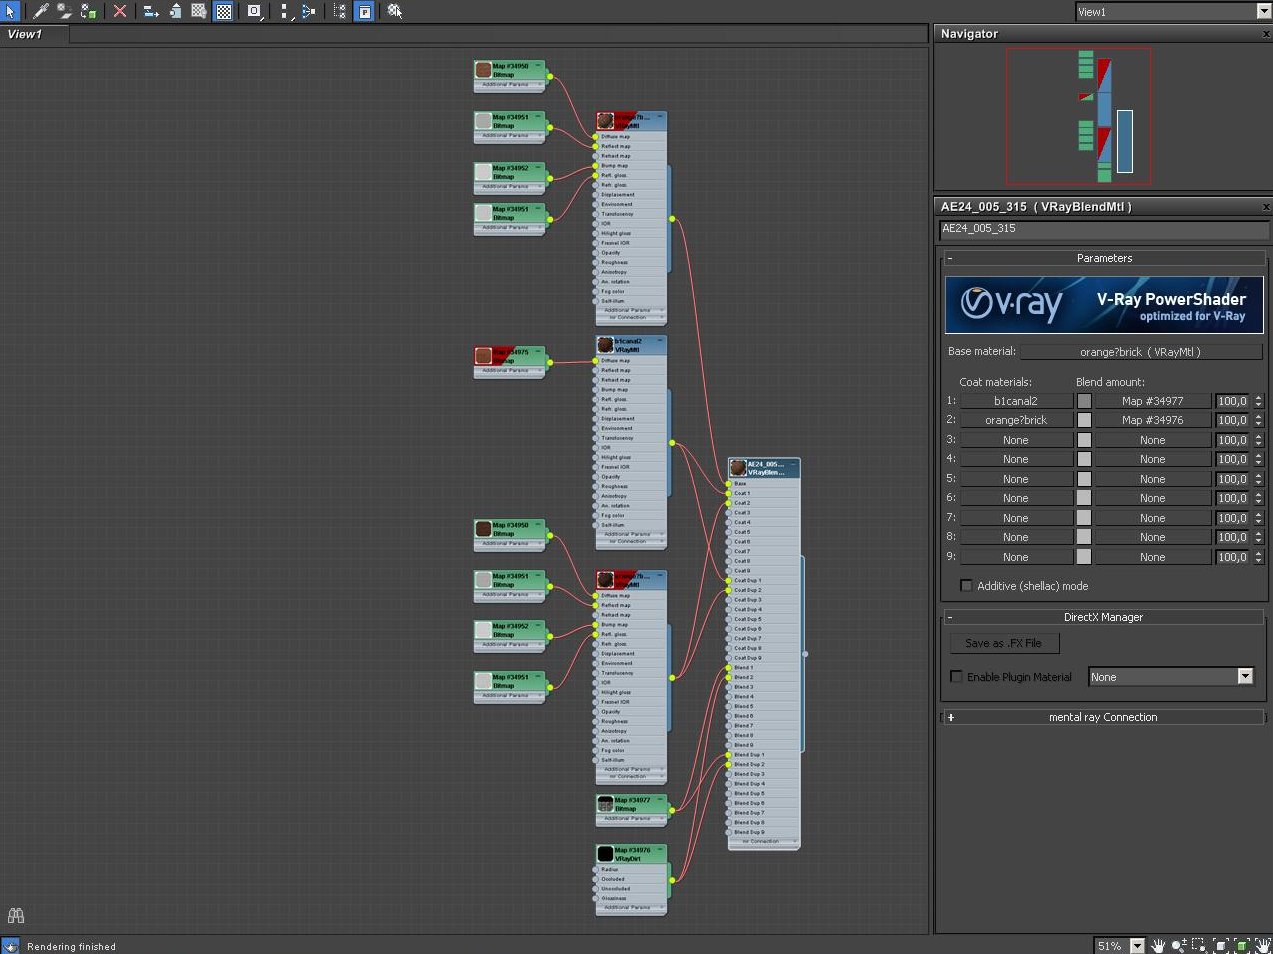
Material of the building 1 consists of base material and two coat materials that are blended with VrayDirt map.


Click on image to enlarge 13_nr_2759.jpg
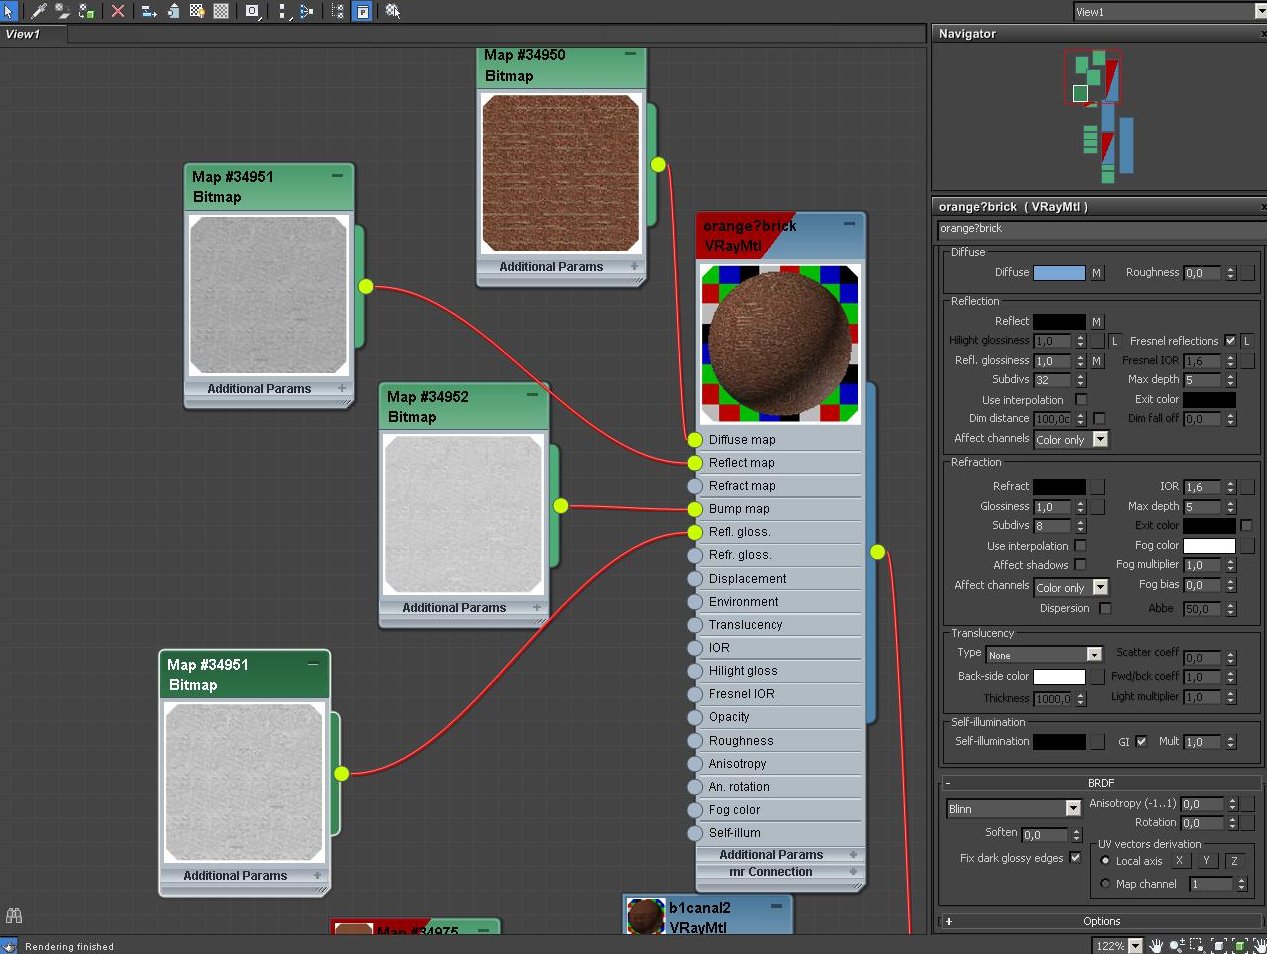
Building 1 - base material settings


Click on image to enlarge 14_nr_2760.jpg
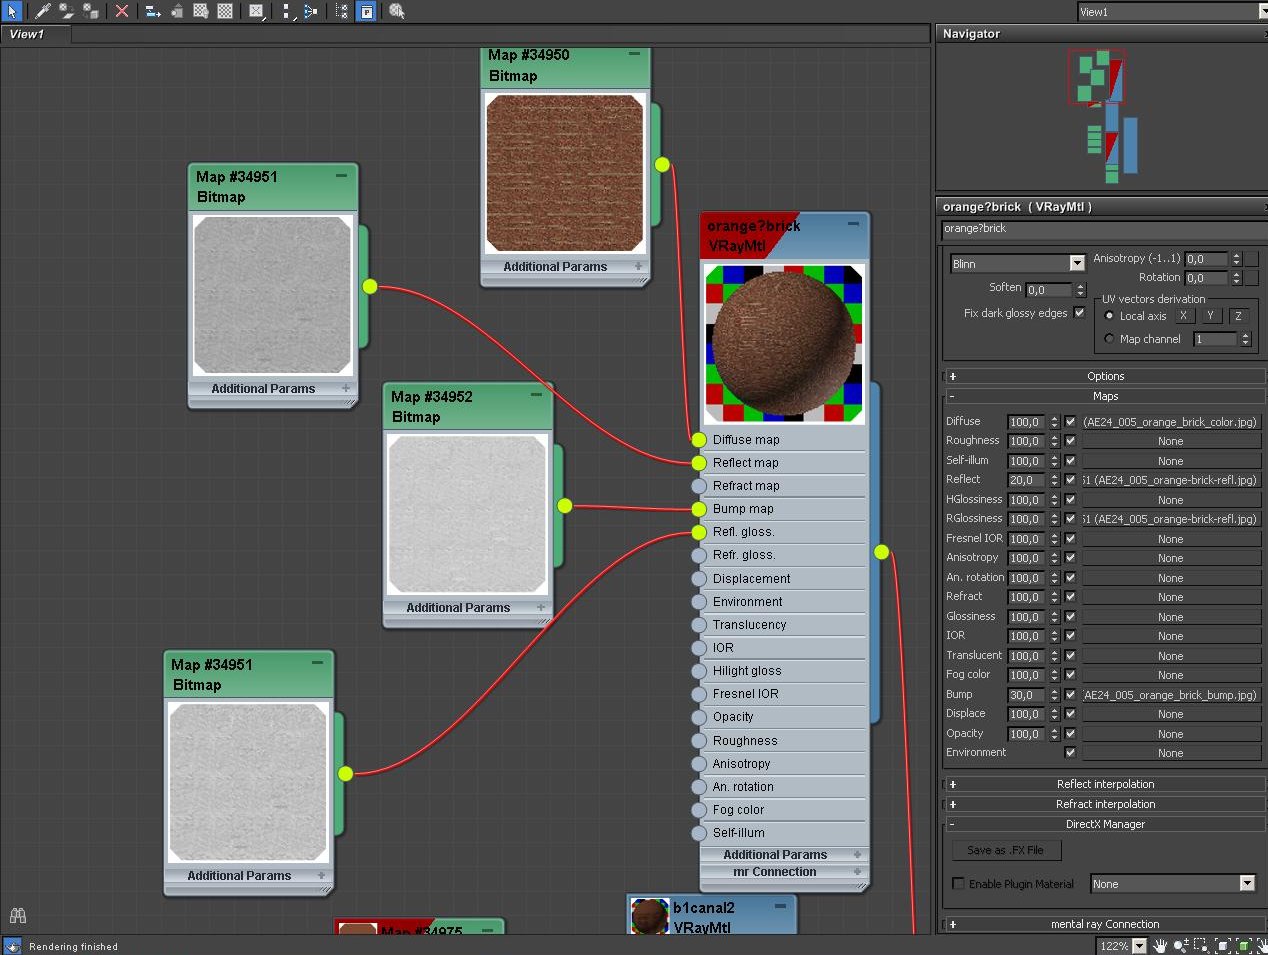
Building 1 - base material maps settings


Click on image to enlarge 15_nr_2761.jpg
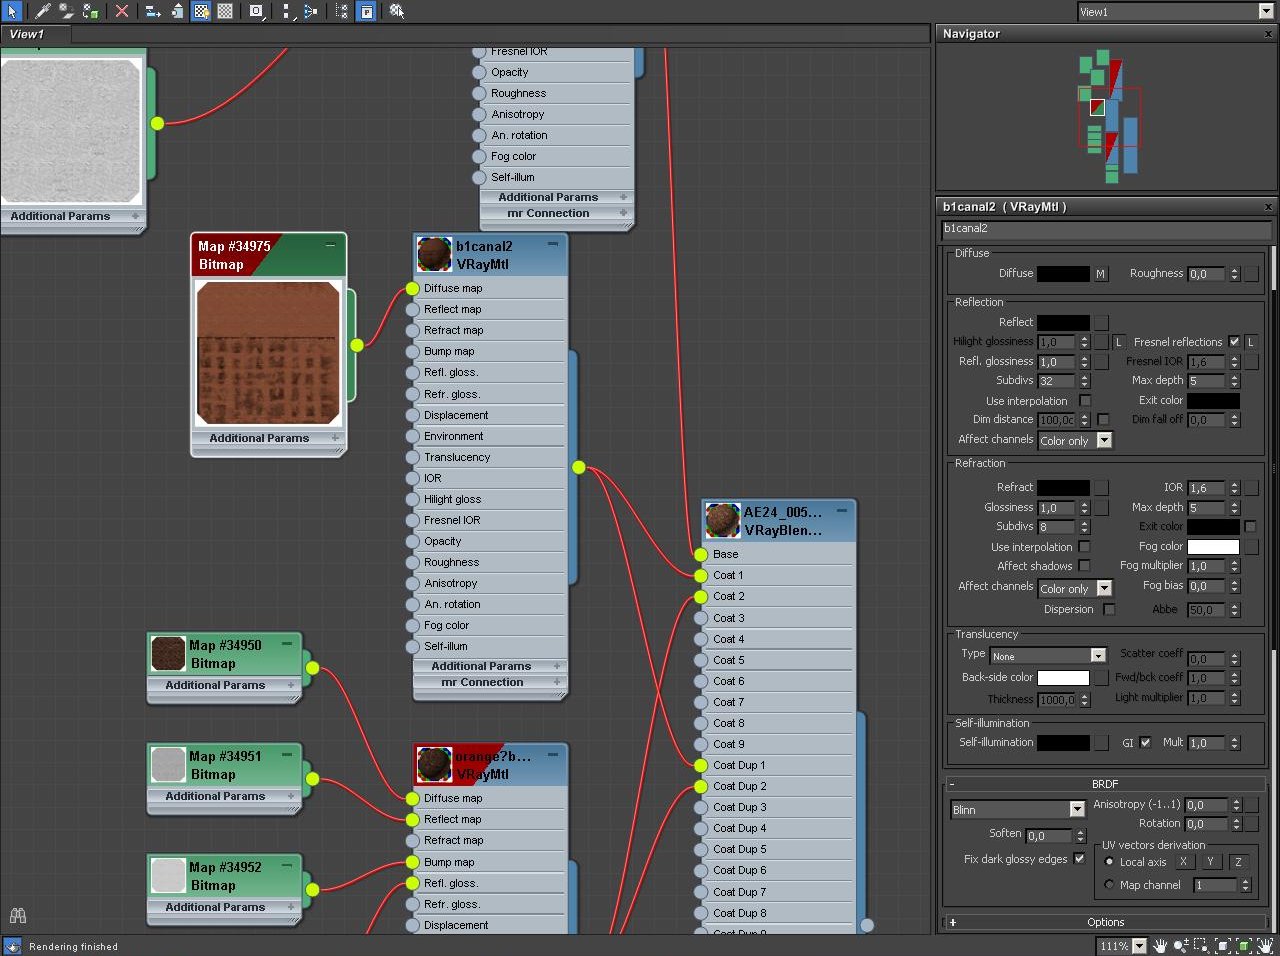
Building 1 - coat 1 material settings


Click on image to enlarge16_nr_2762.jpg
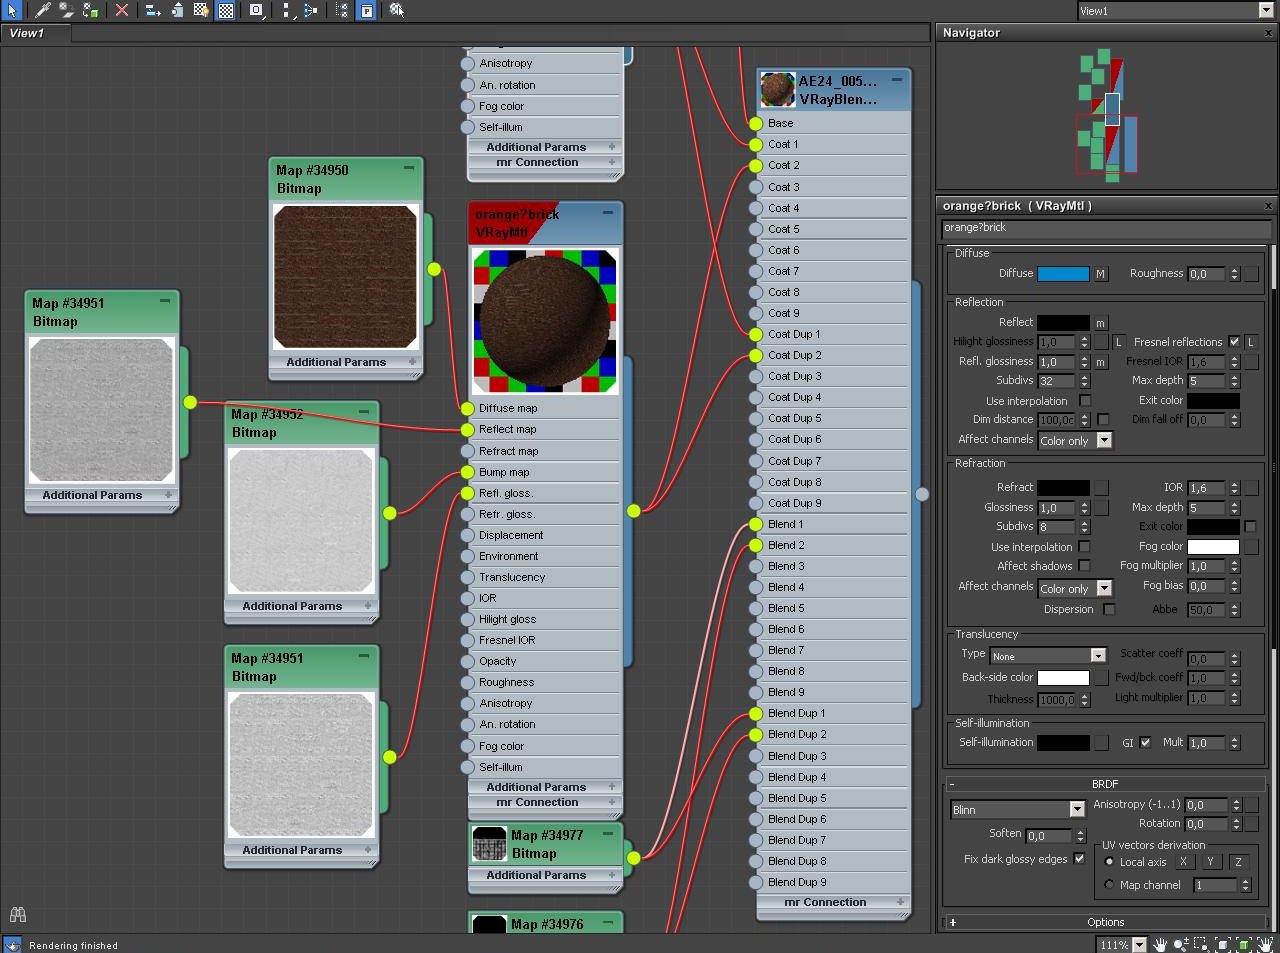
Building 1 - coat 2 material settings.


Click on image to enlarge 17_nr_2763.jpg
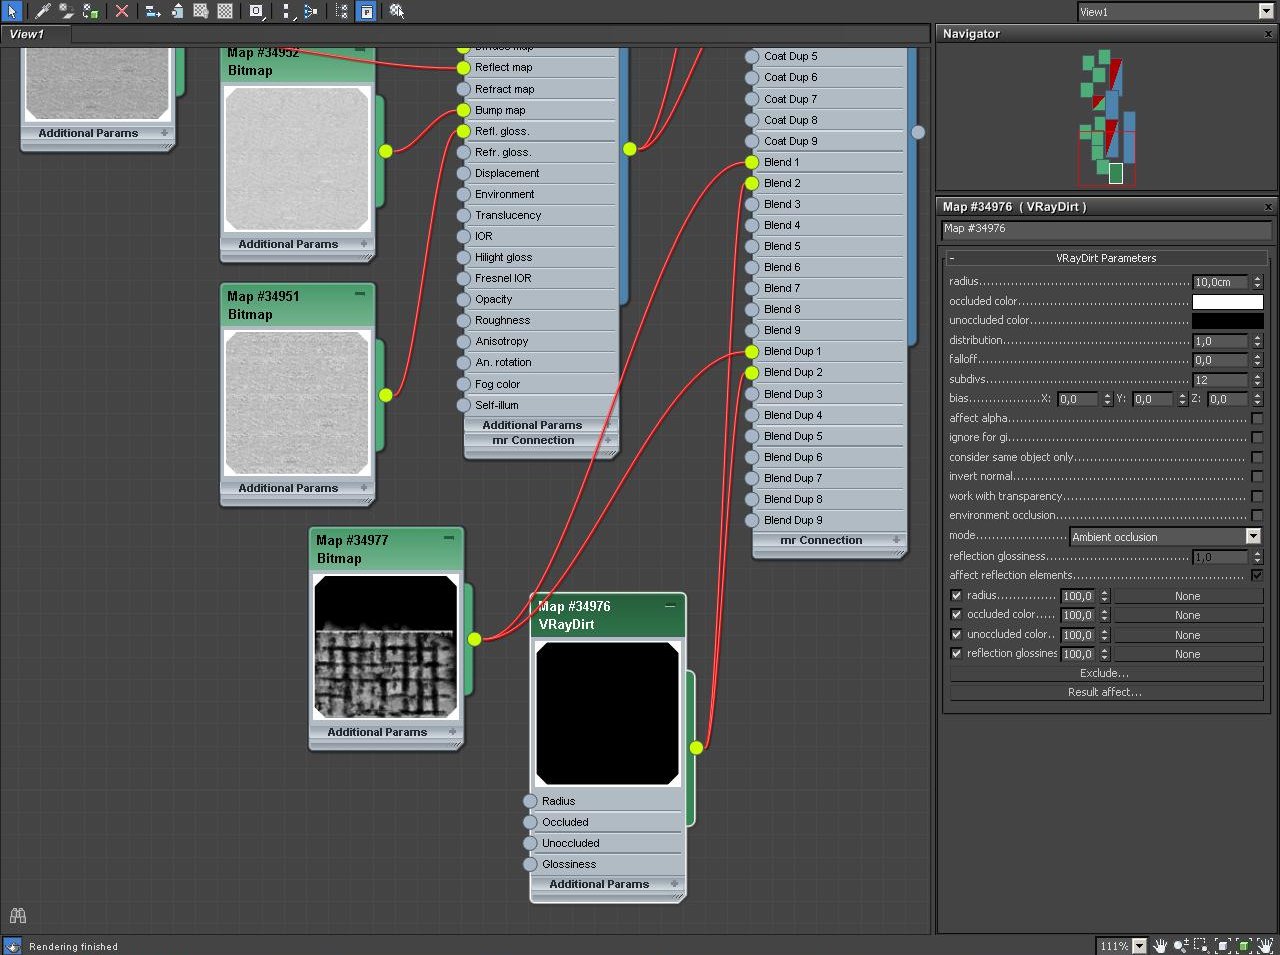
Building 1 - VrayDirtMap Settings


Click on image to enlarge 18_nr_2764.jpg
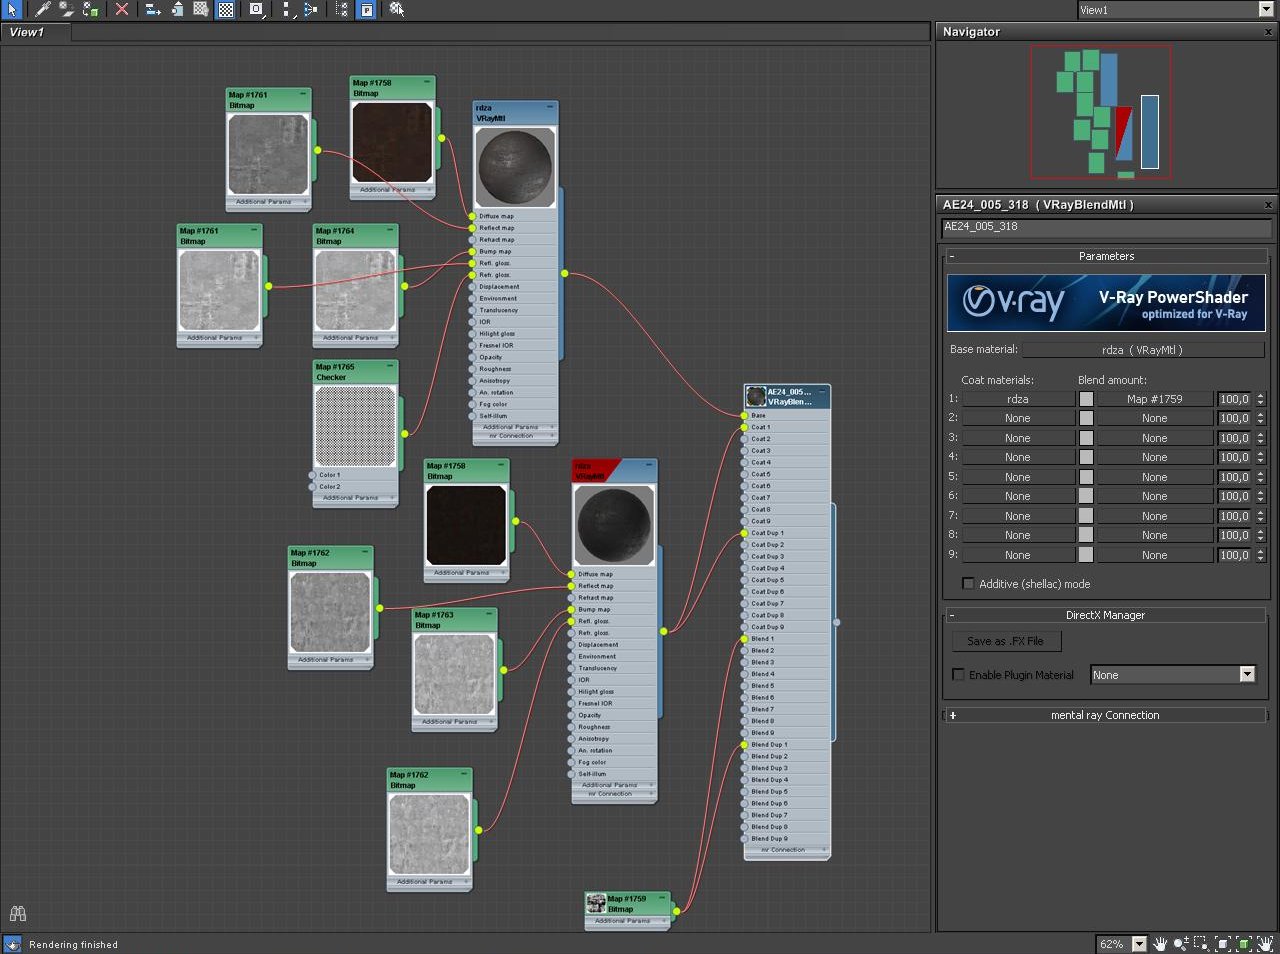
Staircase material (rusty steel) consists of one base and one coat material.


Click on image to enlarge 19_nr_2765.jpg
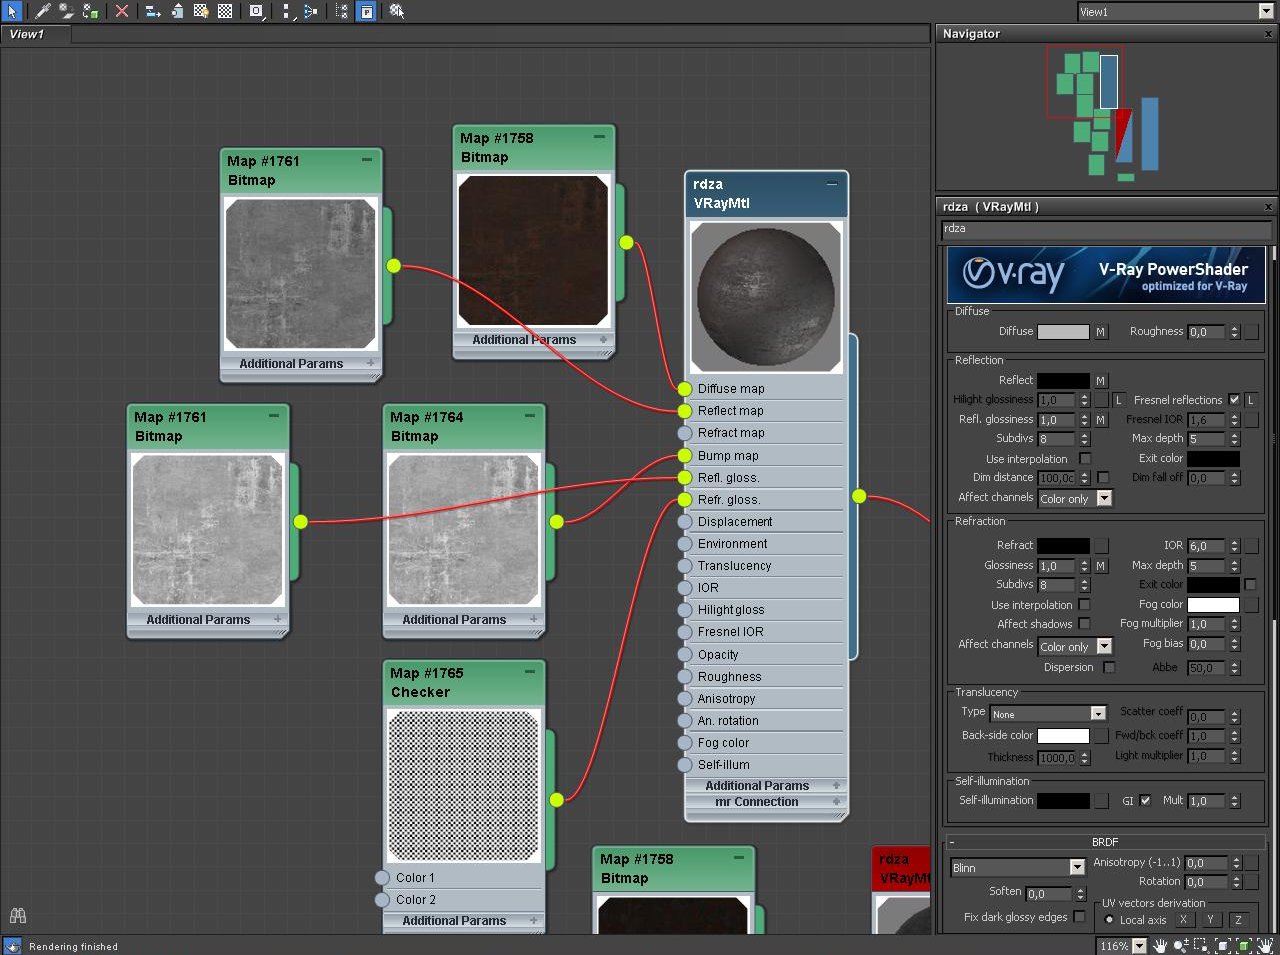
Staircase - base material settings


Click on image to enlarge 19b_rdza_coat_1_maps_nr_2766.jpg
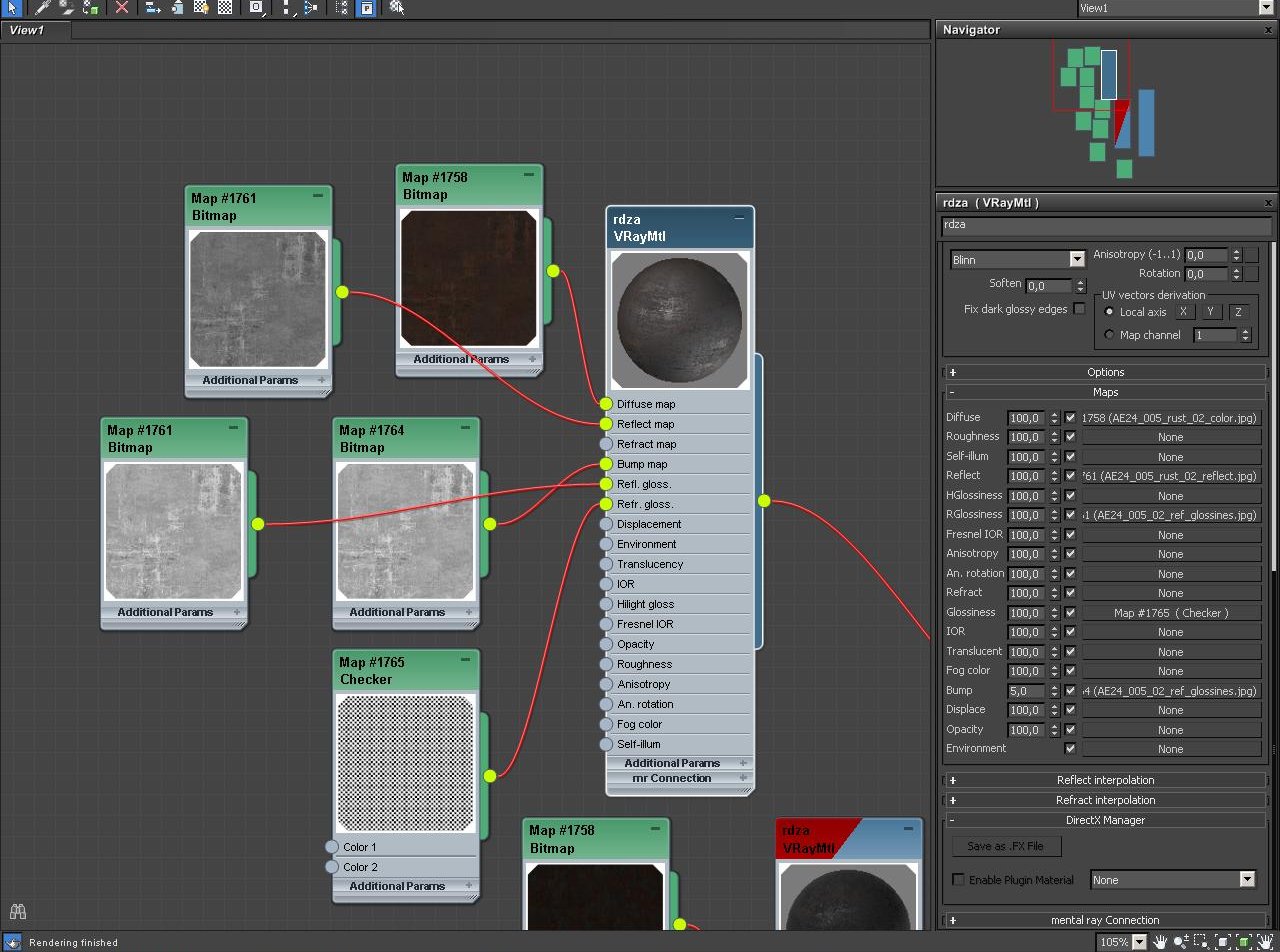
Staircase - base material maps settings


Click on image to enlarge 20_nr_2767.jpg
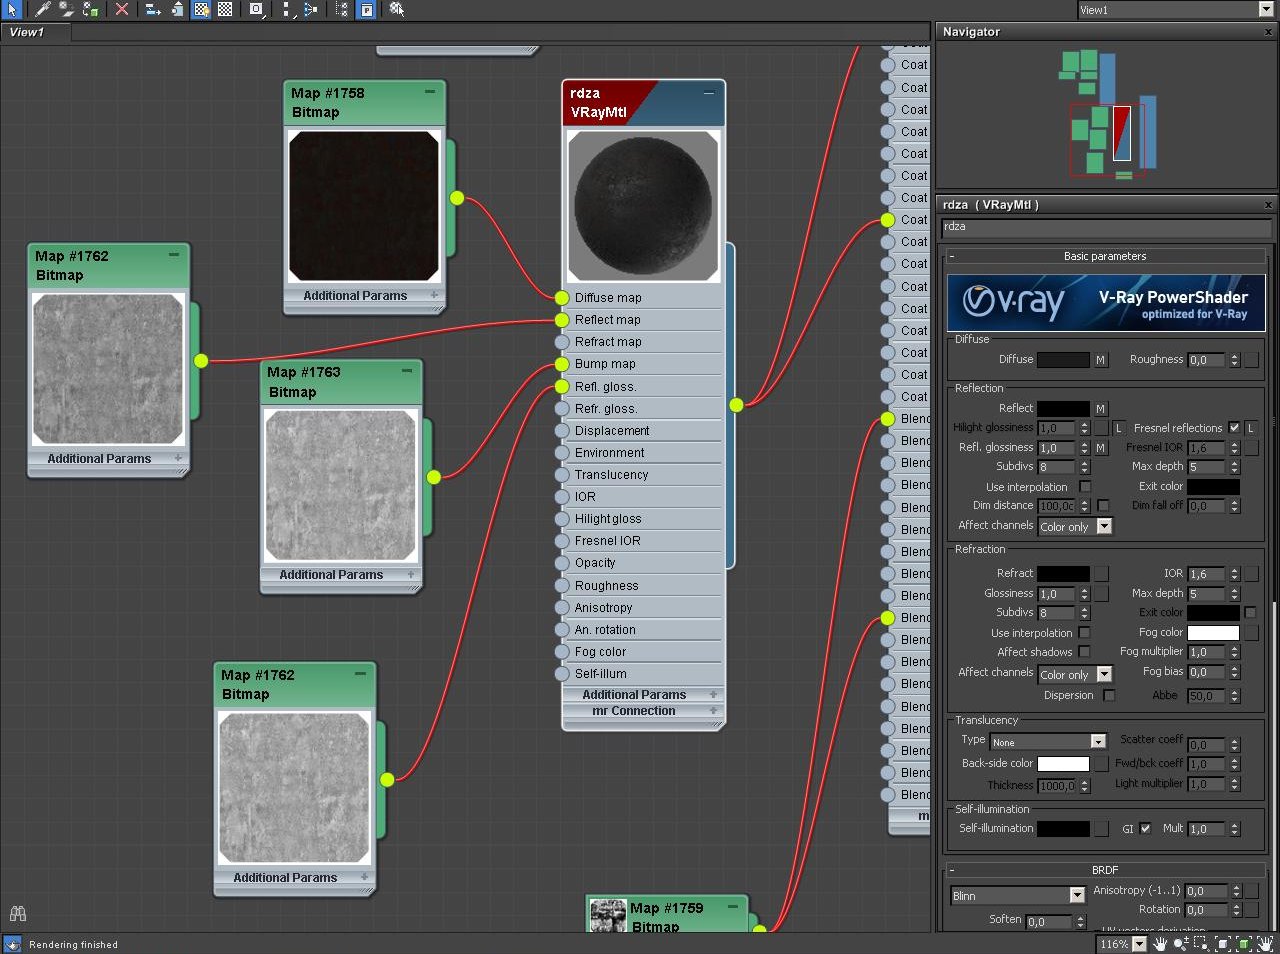
Staircase - coat material settings.


Click on image to enlarge 21_nr_2768.jpg
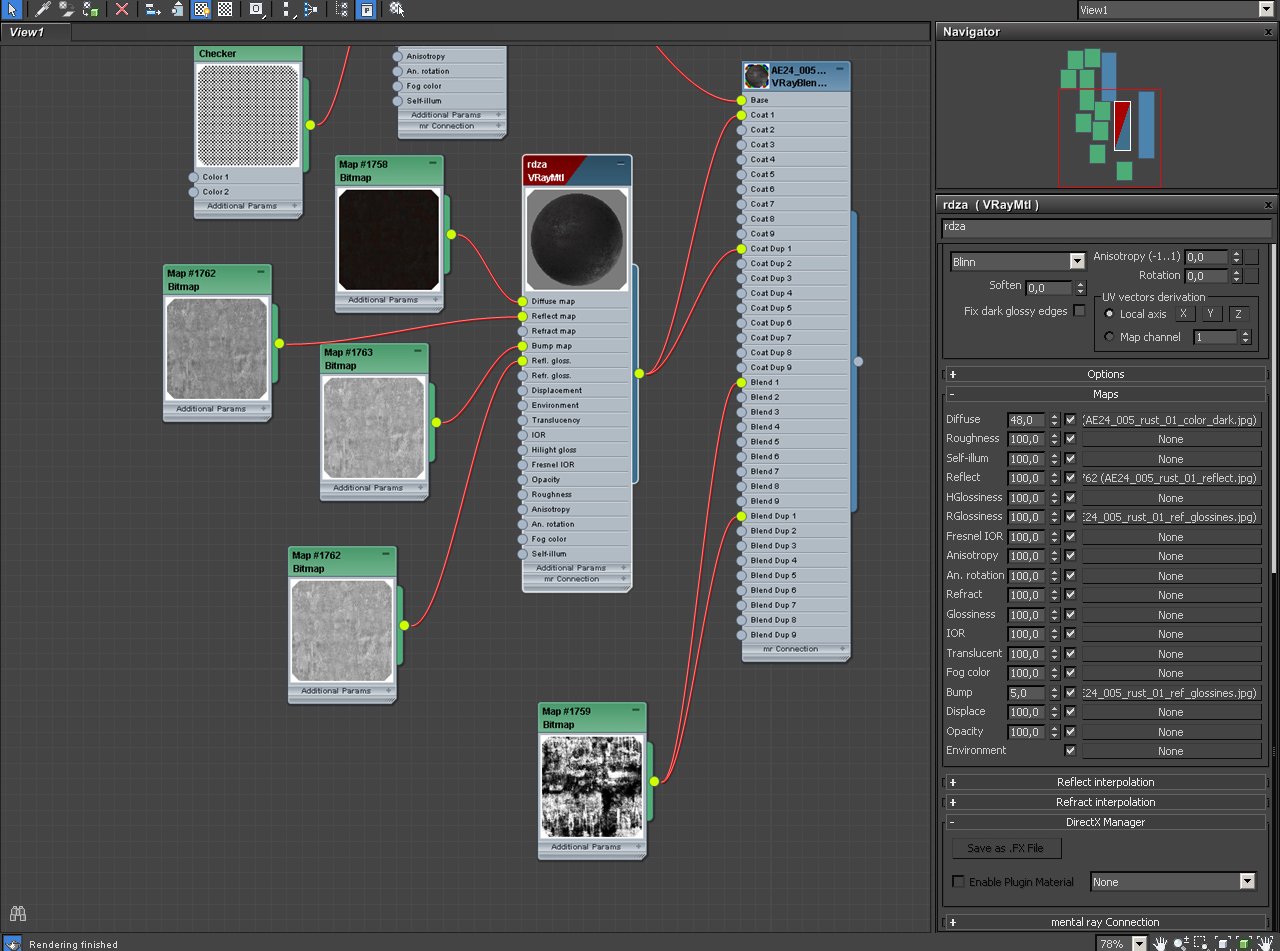
Staircase - coat material maps settings


Click on image to enlarge 23_nr_2770.jpg
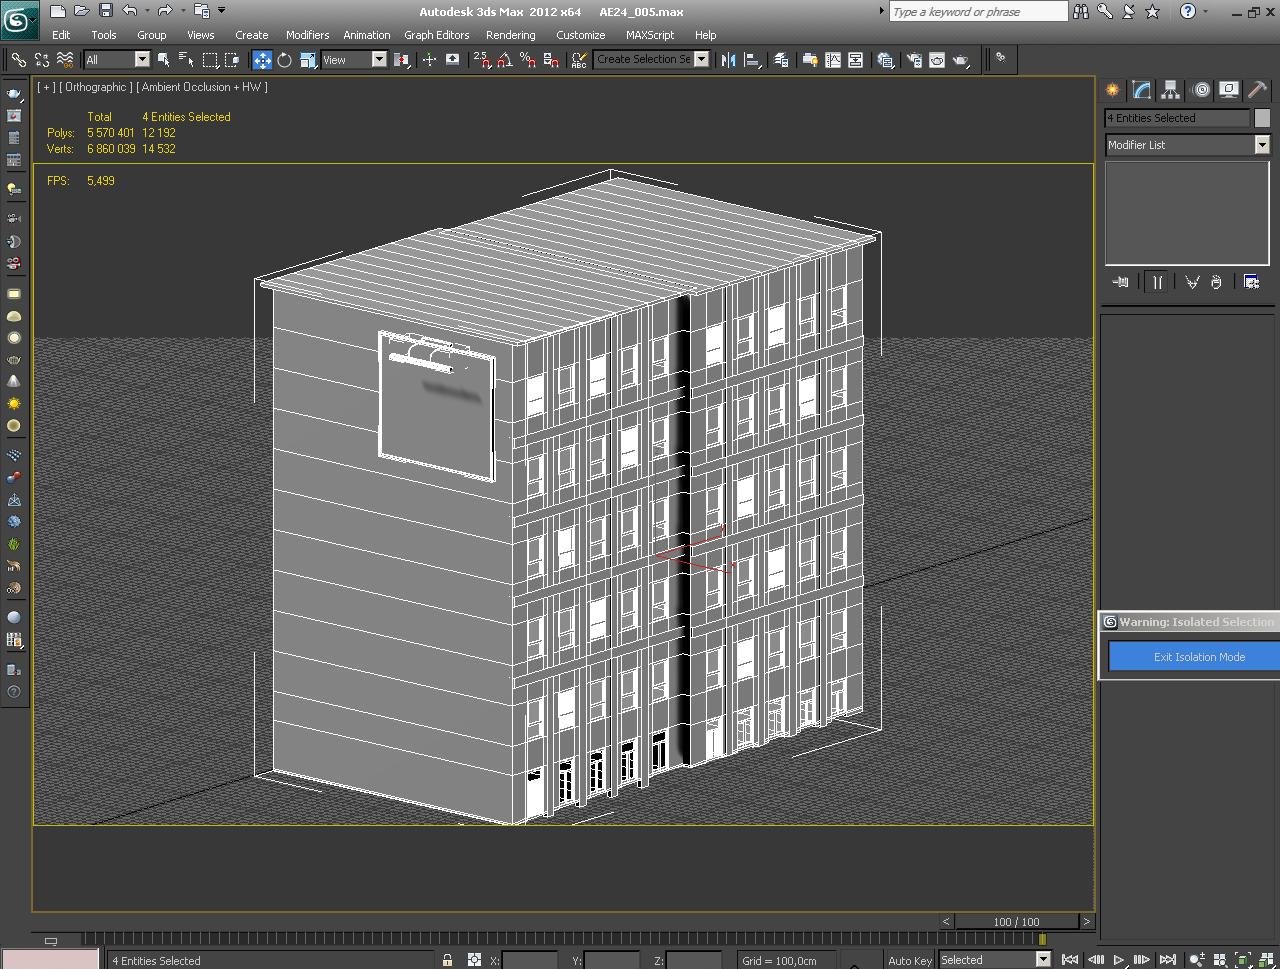
The building behind the building 1, let's call it "building 2" with a billboard on its side.


Click on image to enlarge 24_nr_2771.jpg
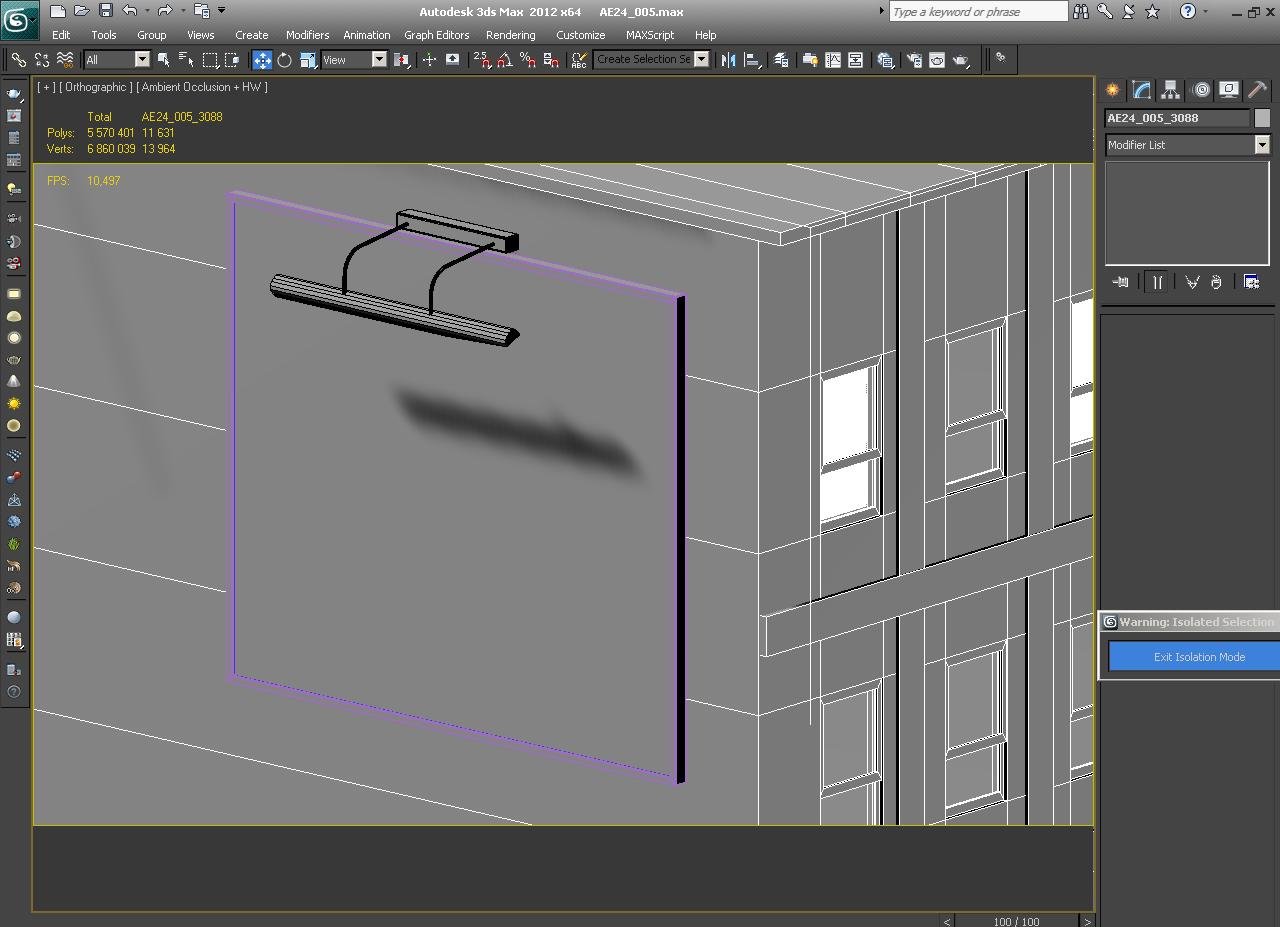
Billboard - close up


Click on image to enlarge 25_nr_2772.jpg

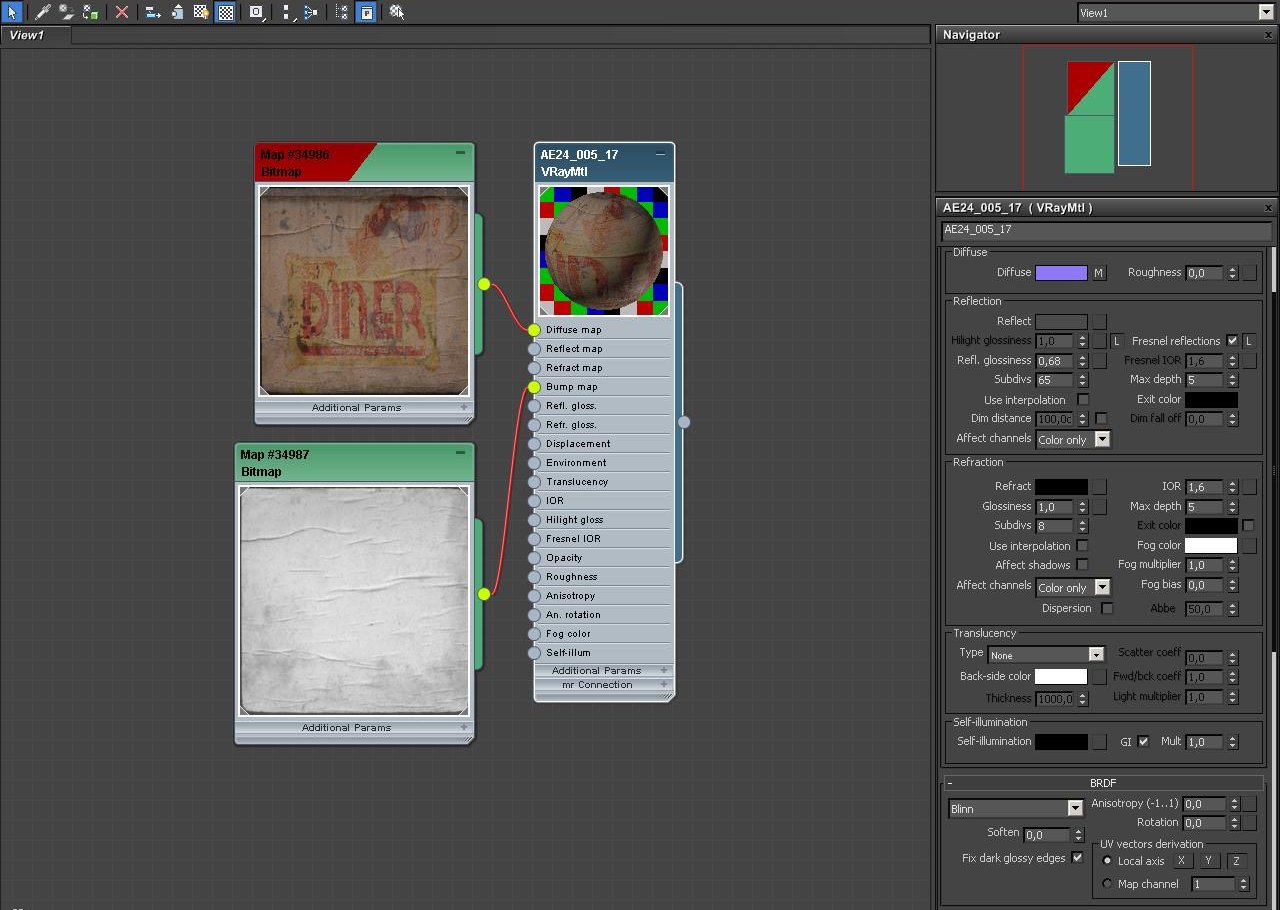
Billboard material. Diffuse map is set to 100%, bump map is set to 30%.


Click on image to enlarge 27_nr_2774.jpg
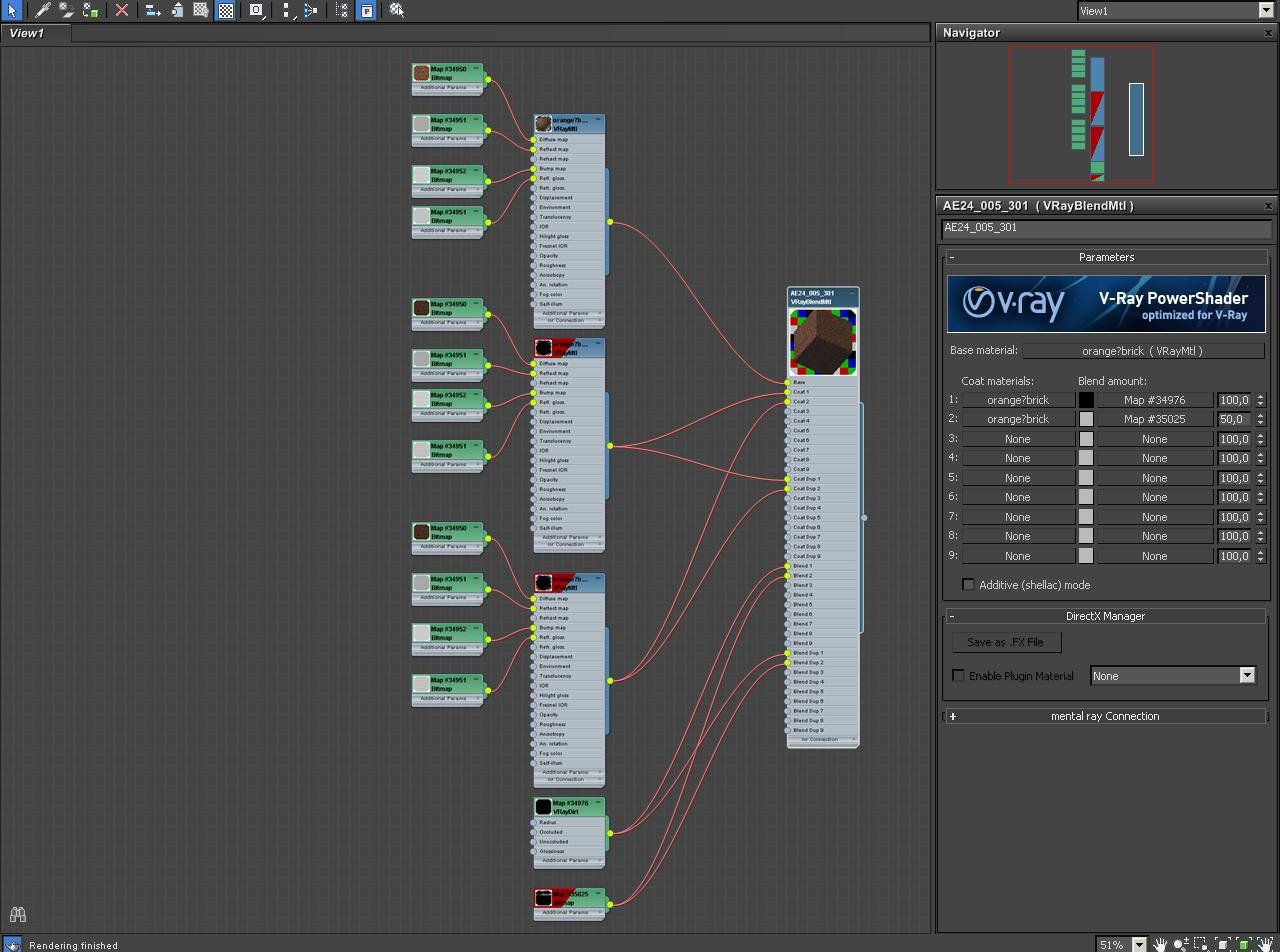
Building facade material.


Click on image to enlarge 28_nr_2775.jpg
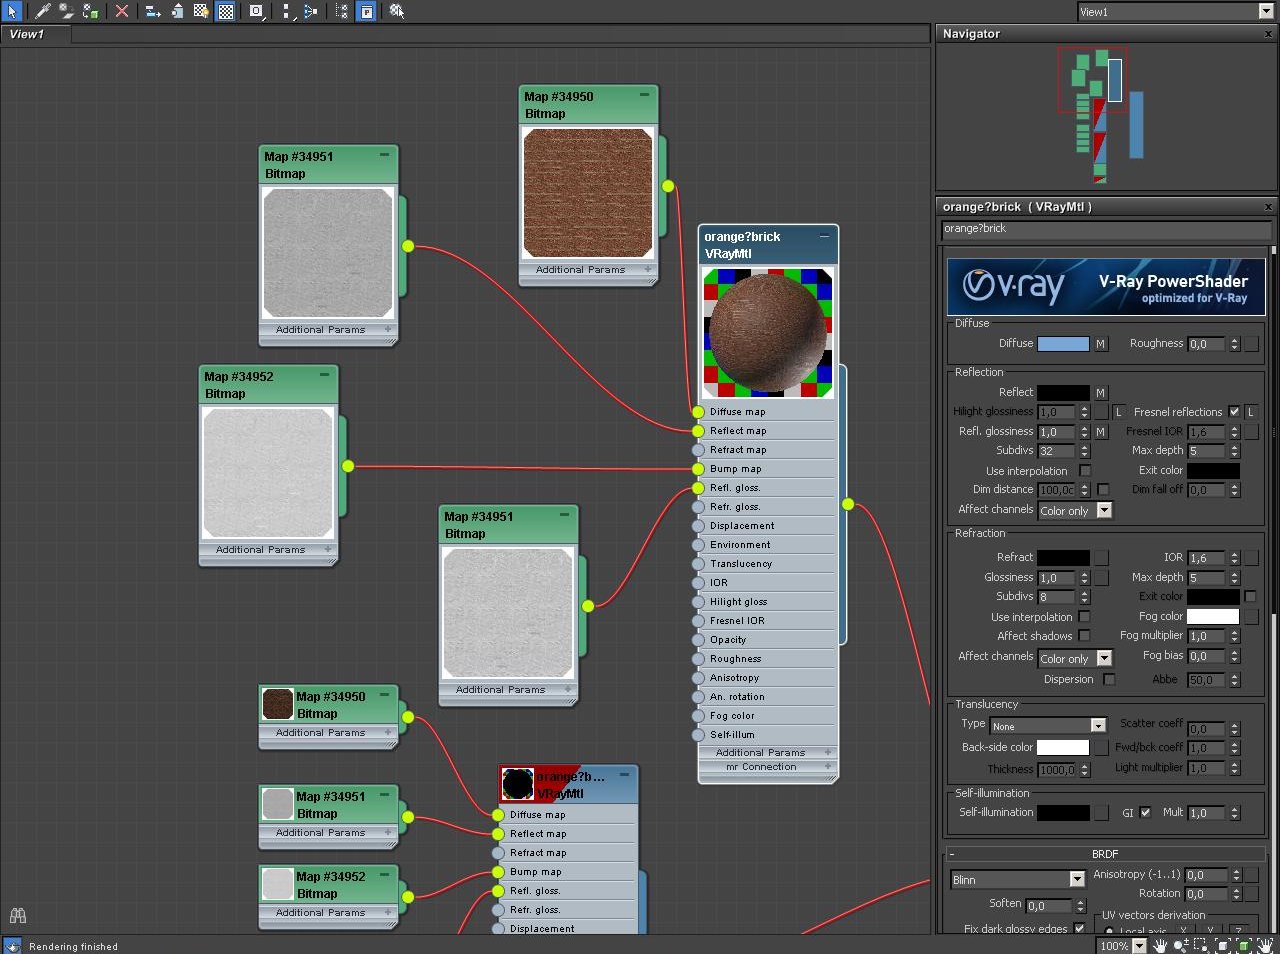
Building 2 - base material settings


Click on image to enlarge 29_nr_2776.jpg
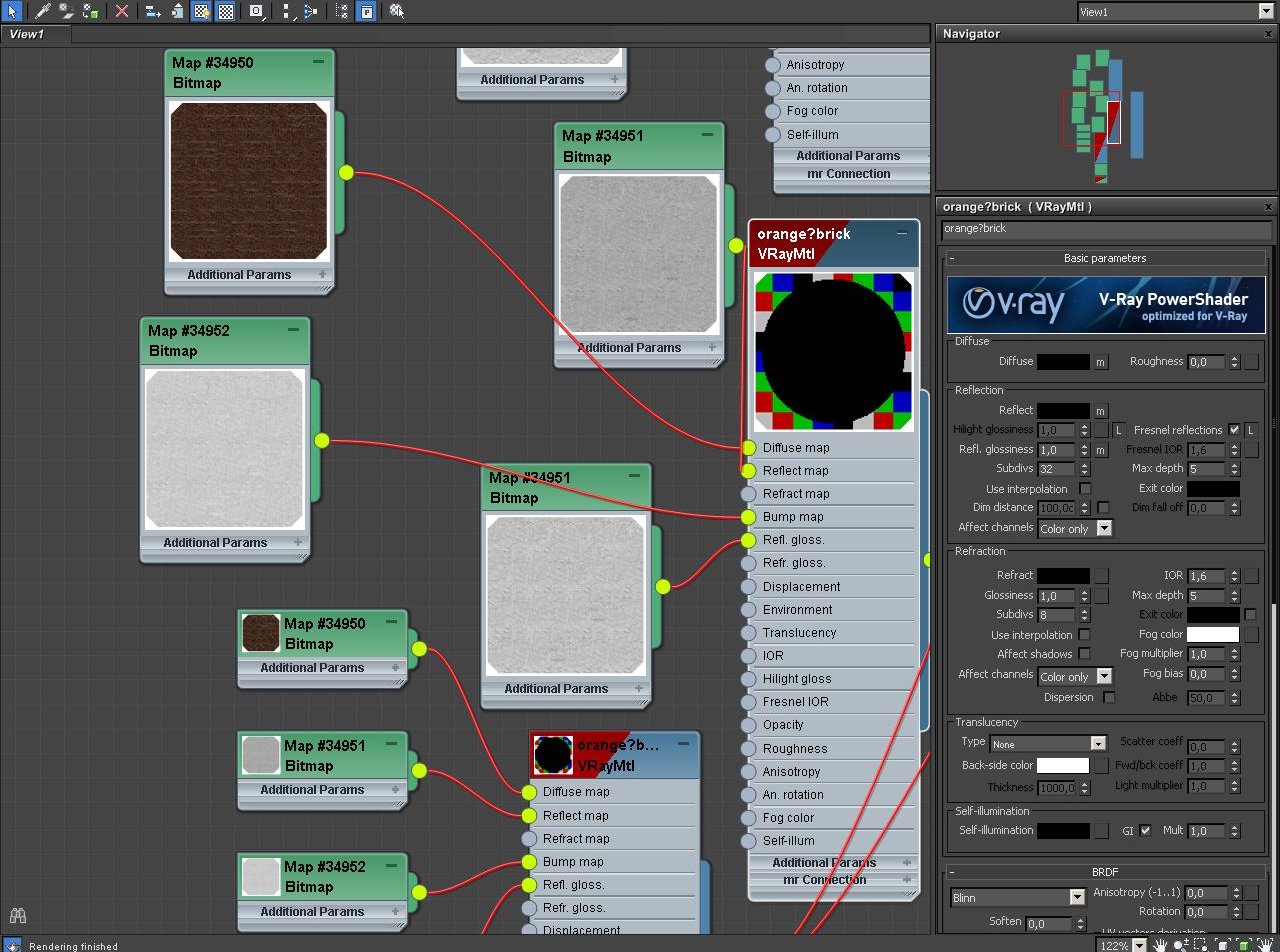
Building 2 - coat material settings


Click on image to enlarge 30_nr_2777.jpg
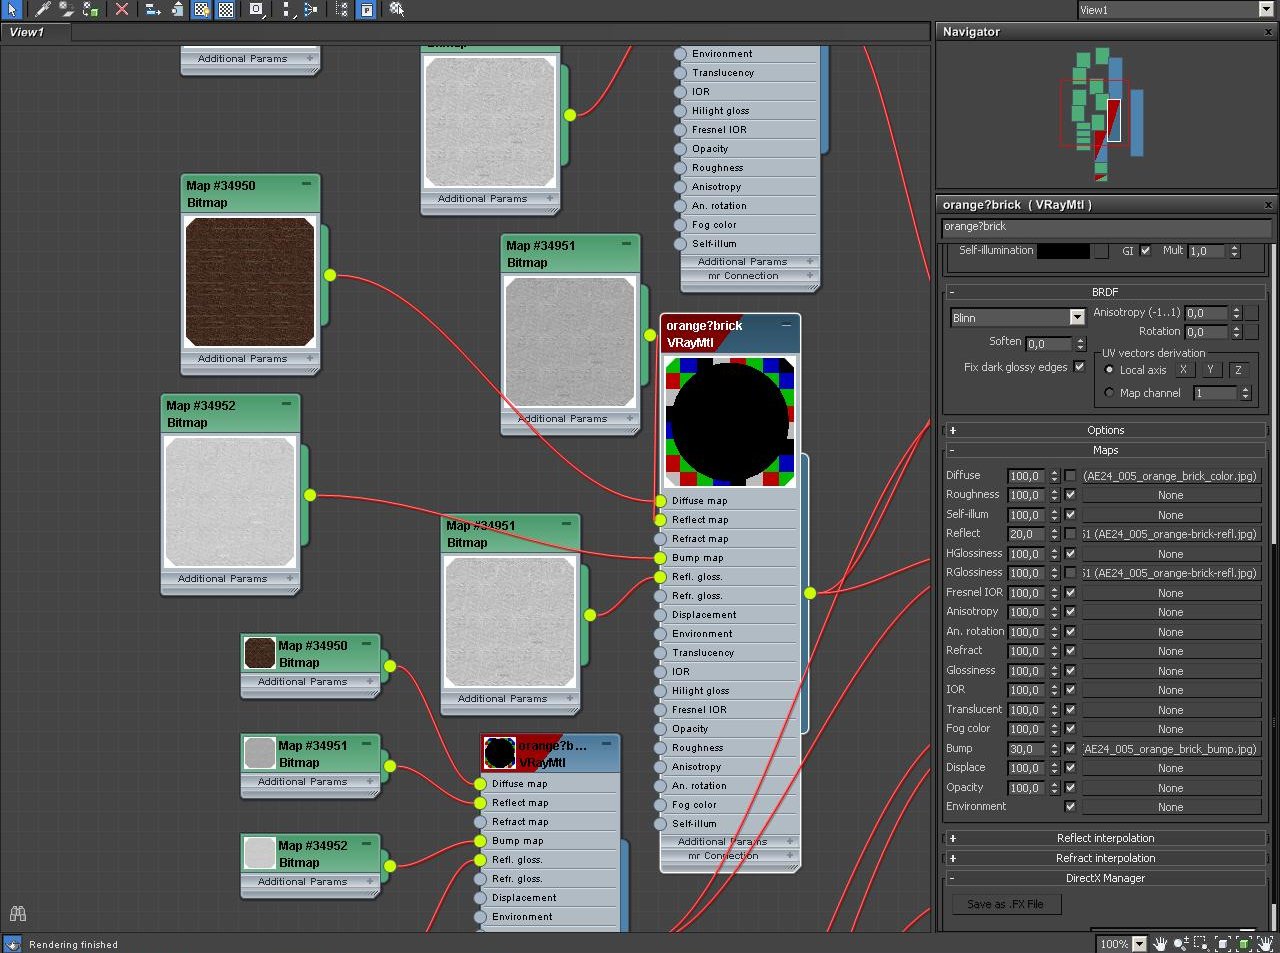
Building 2 - coat material maps


Click on image to enlarge 31_nr_2778.jpg
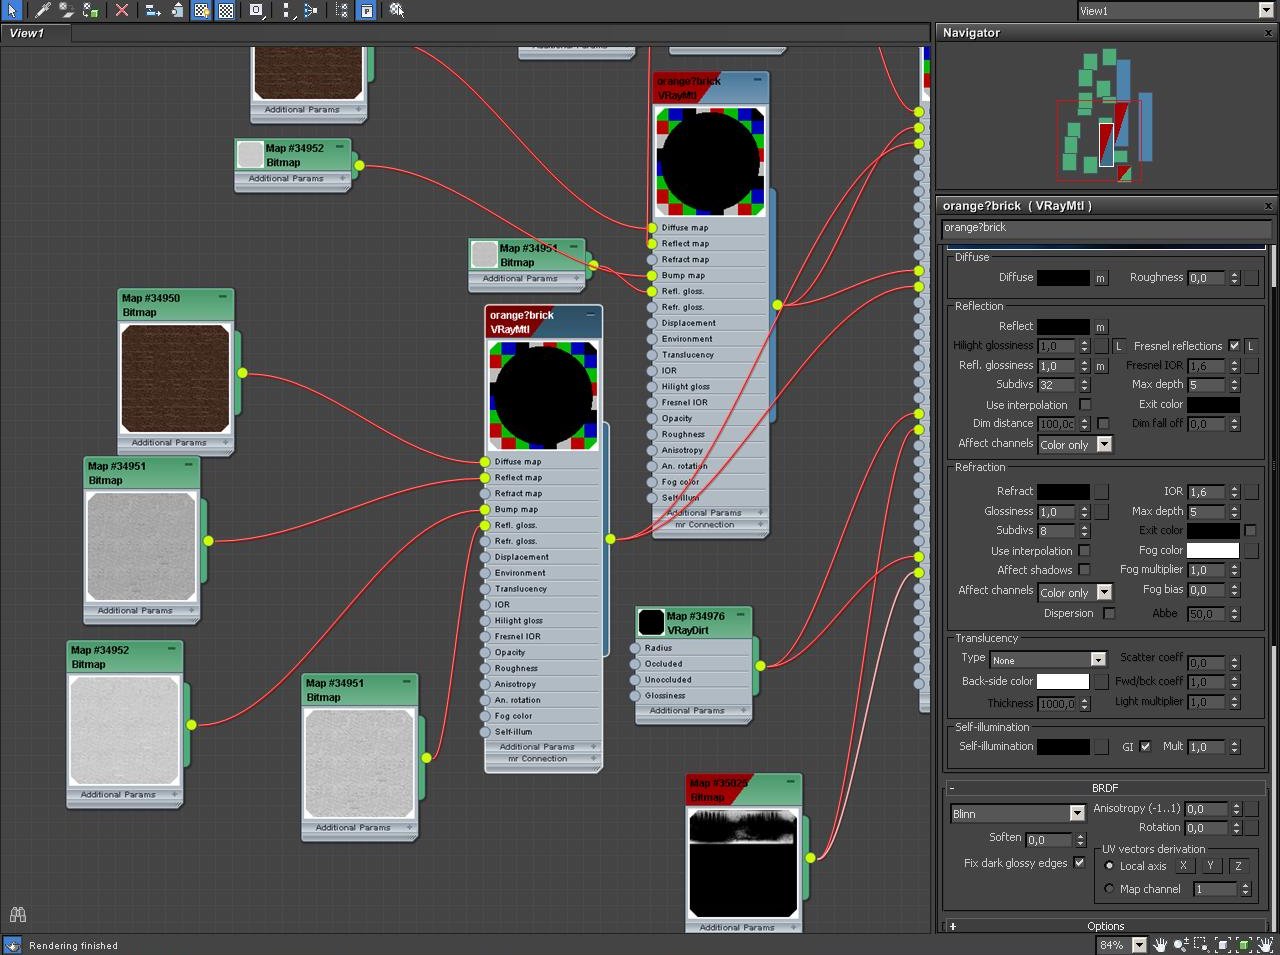
Building 2 - coat 2 settings


Click on image to enlarge 32_nr_2779.jpg
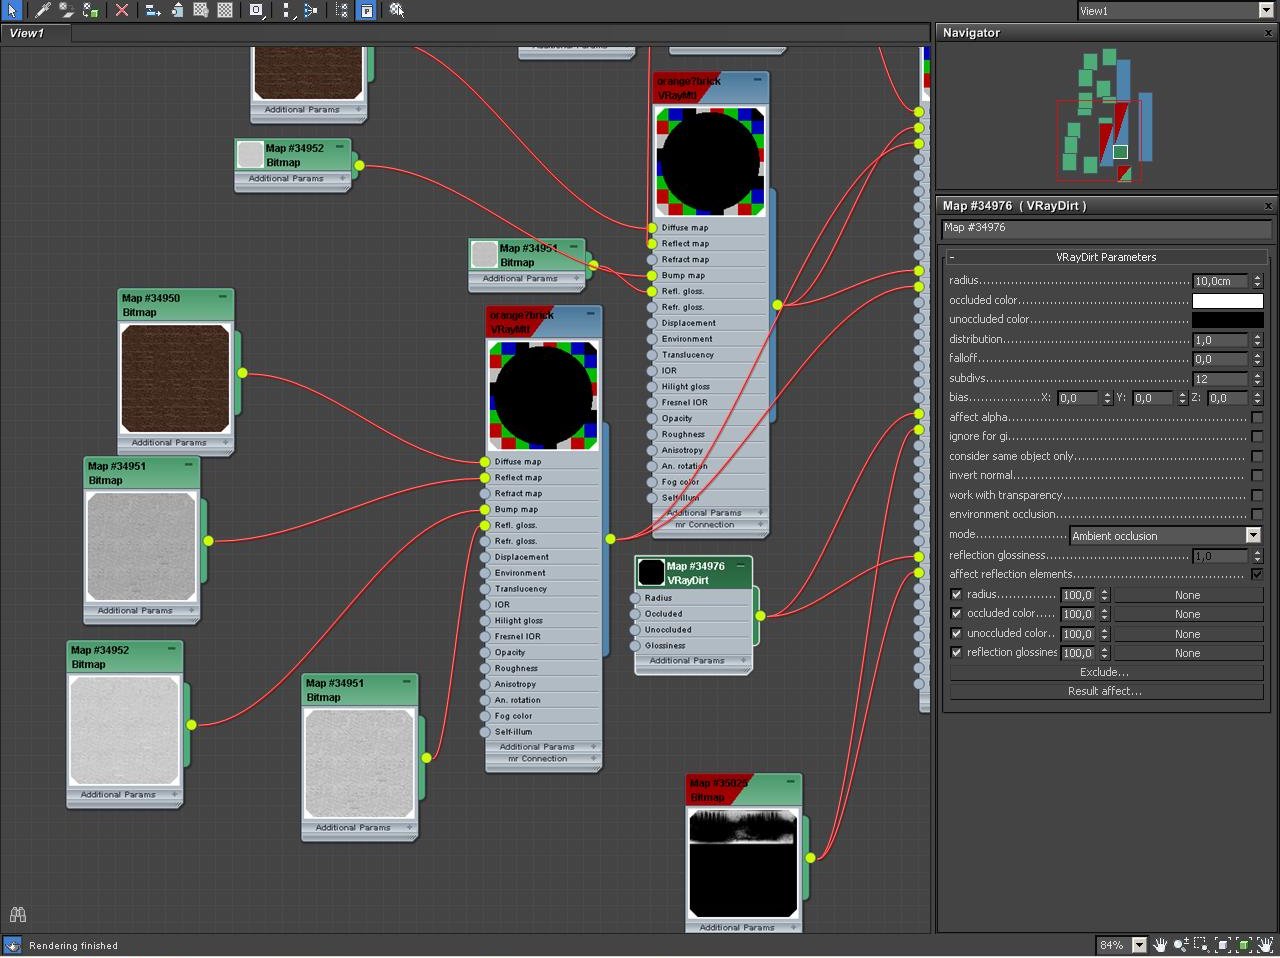
Building 2 - VrayDirtMap parameters


Click on image to enlarge 33_nr_2780.jpg
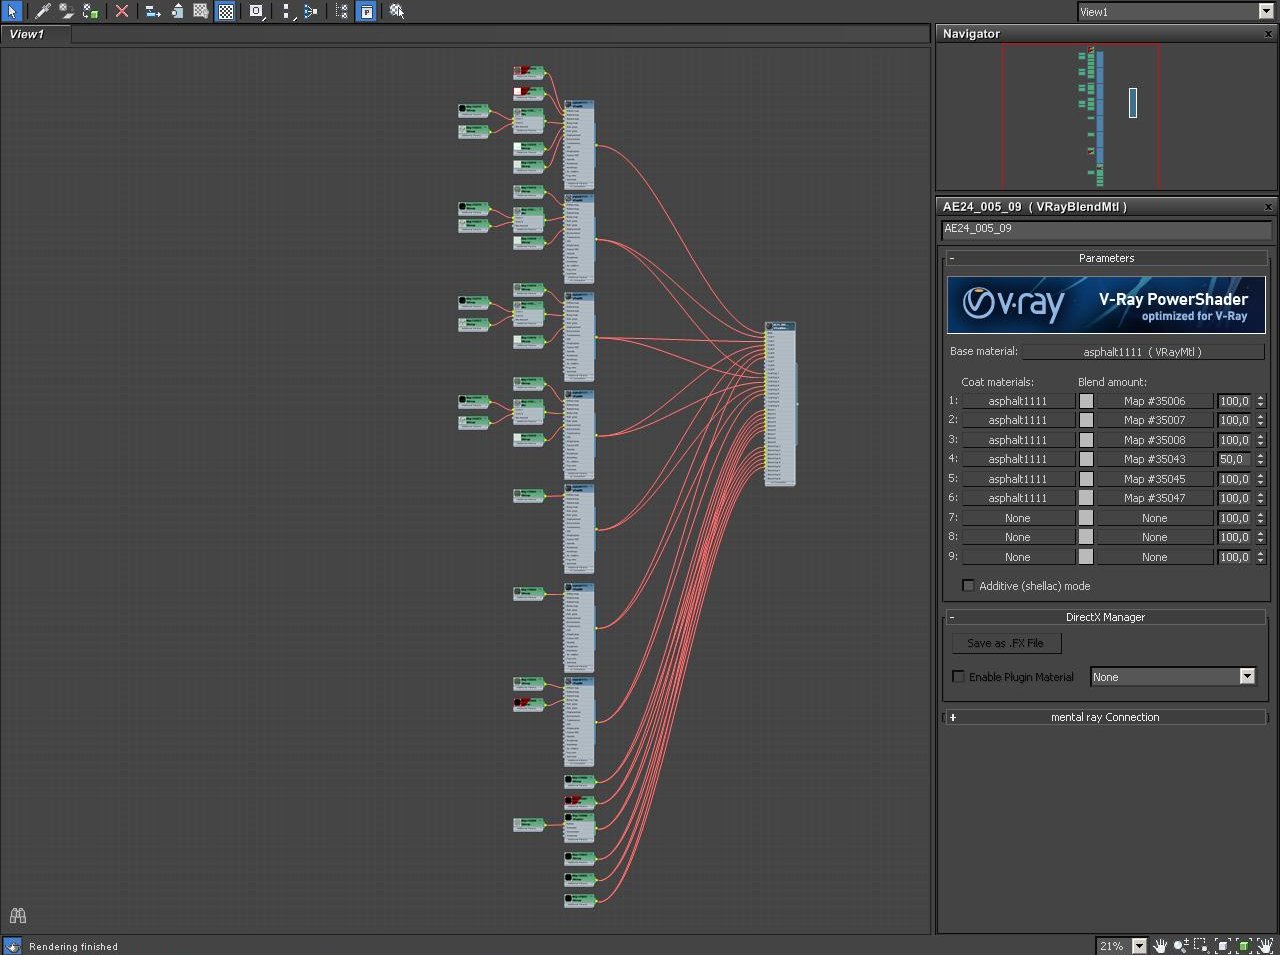
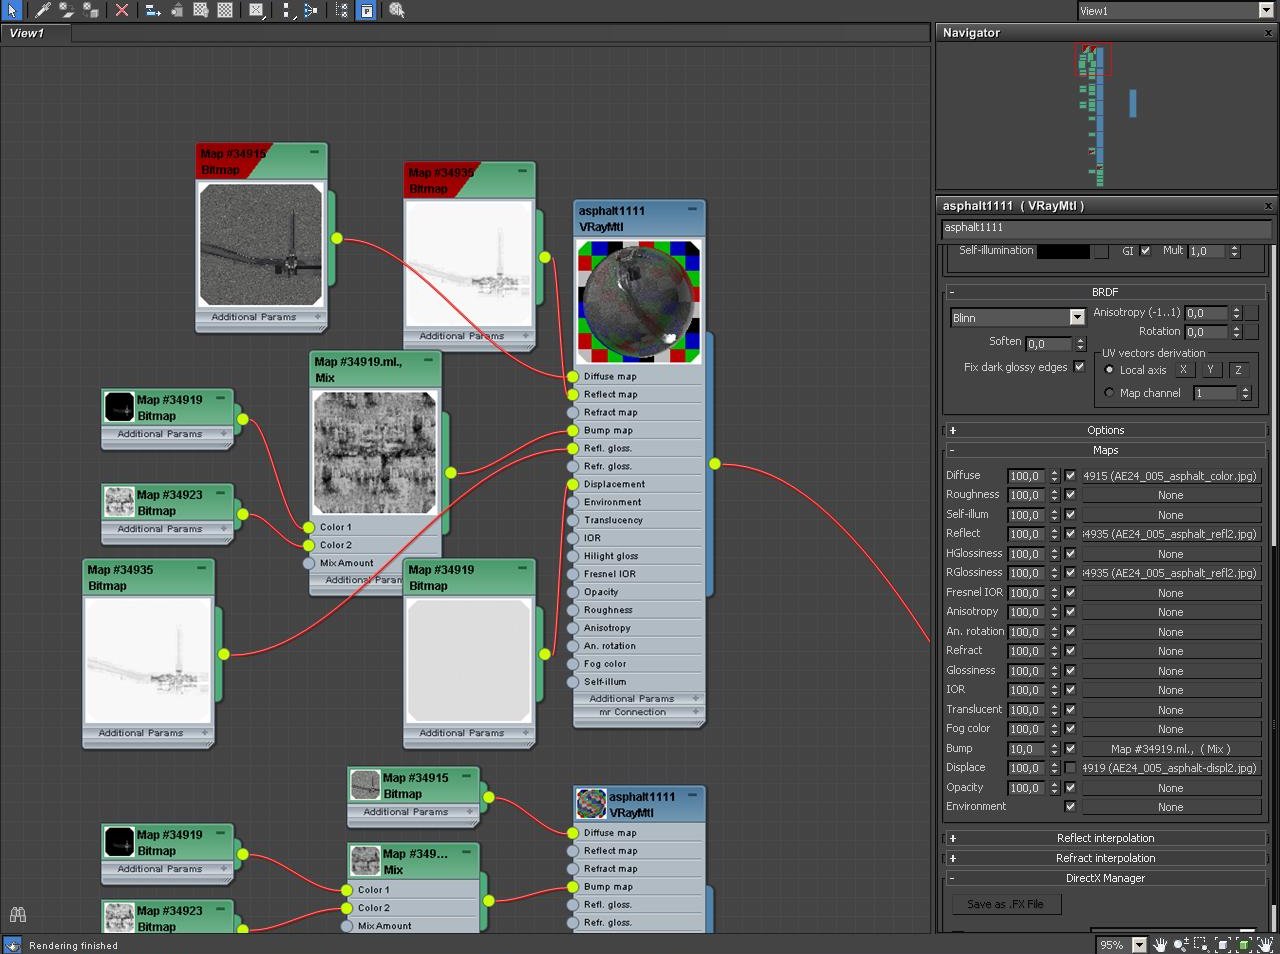
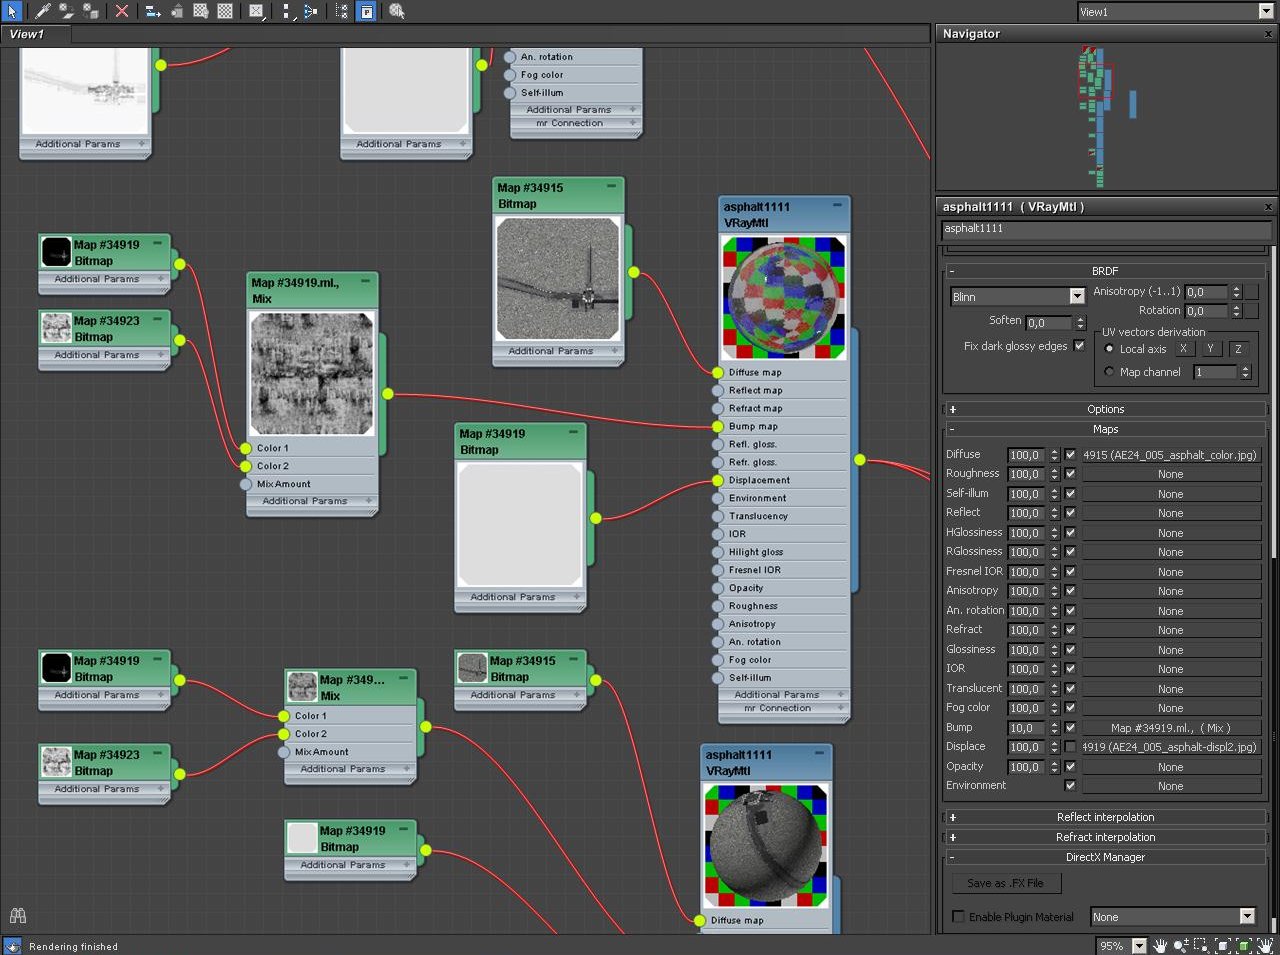
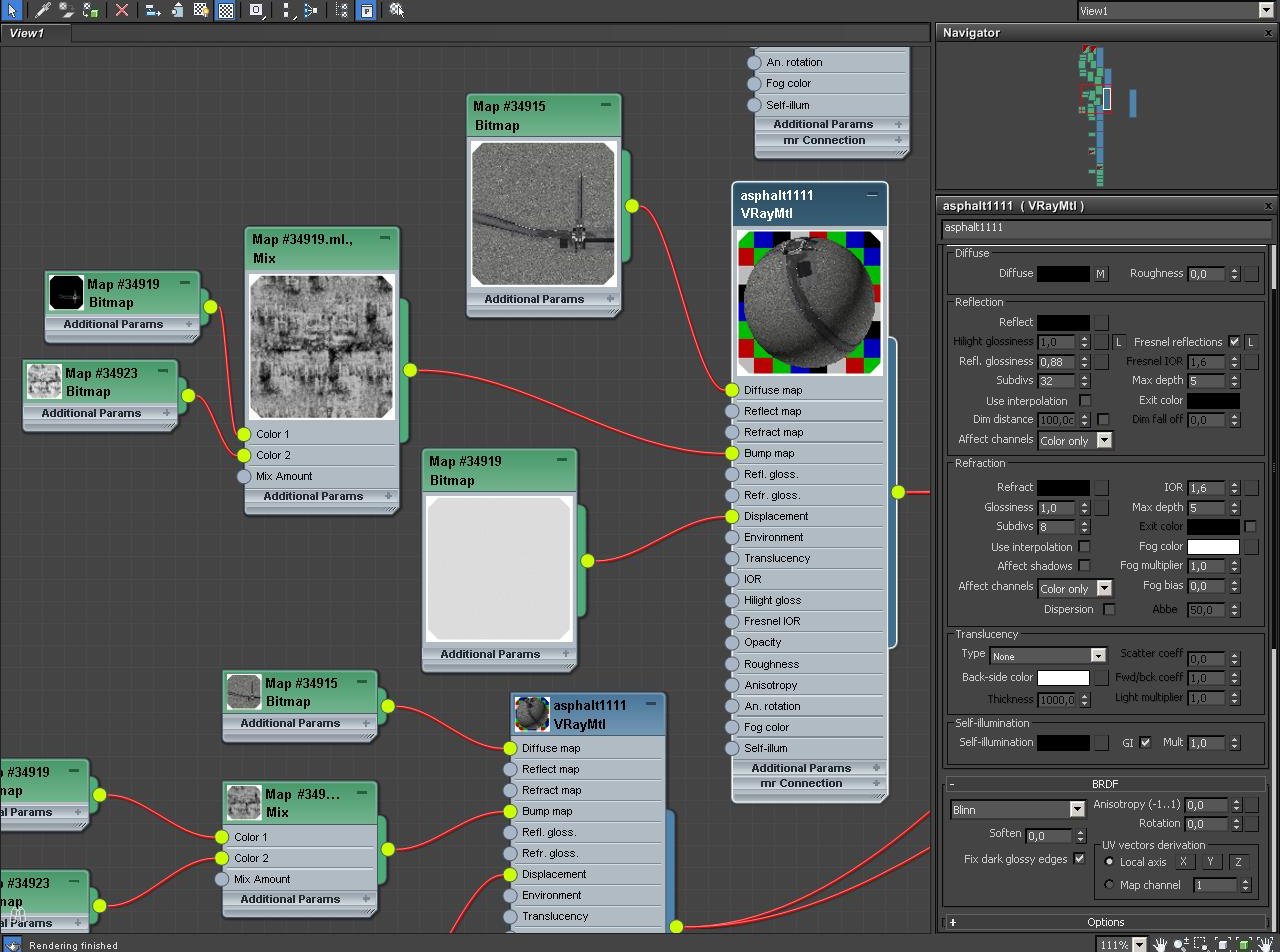
Asphalt has a very sophisticated material, because it has to take dirt, stripes and puddles into account. There is one base material and six coat materials. It could be done simplier (separate objects or alpha masks), but we decided to put everything in one material.


Click on image to enlarge 34_nr_2781.jpg
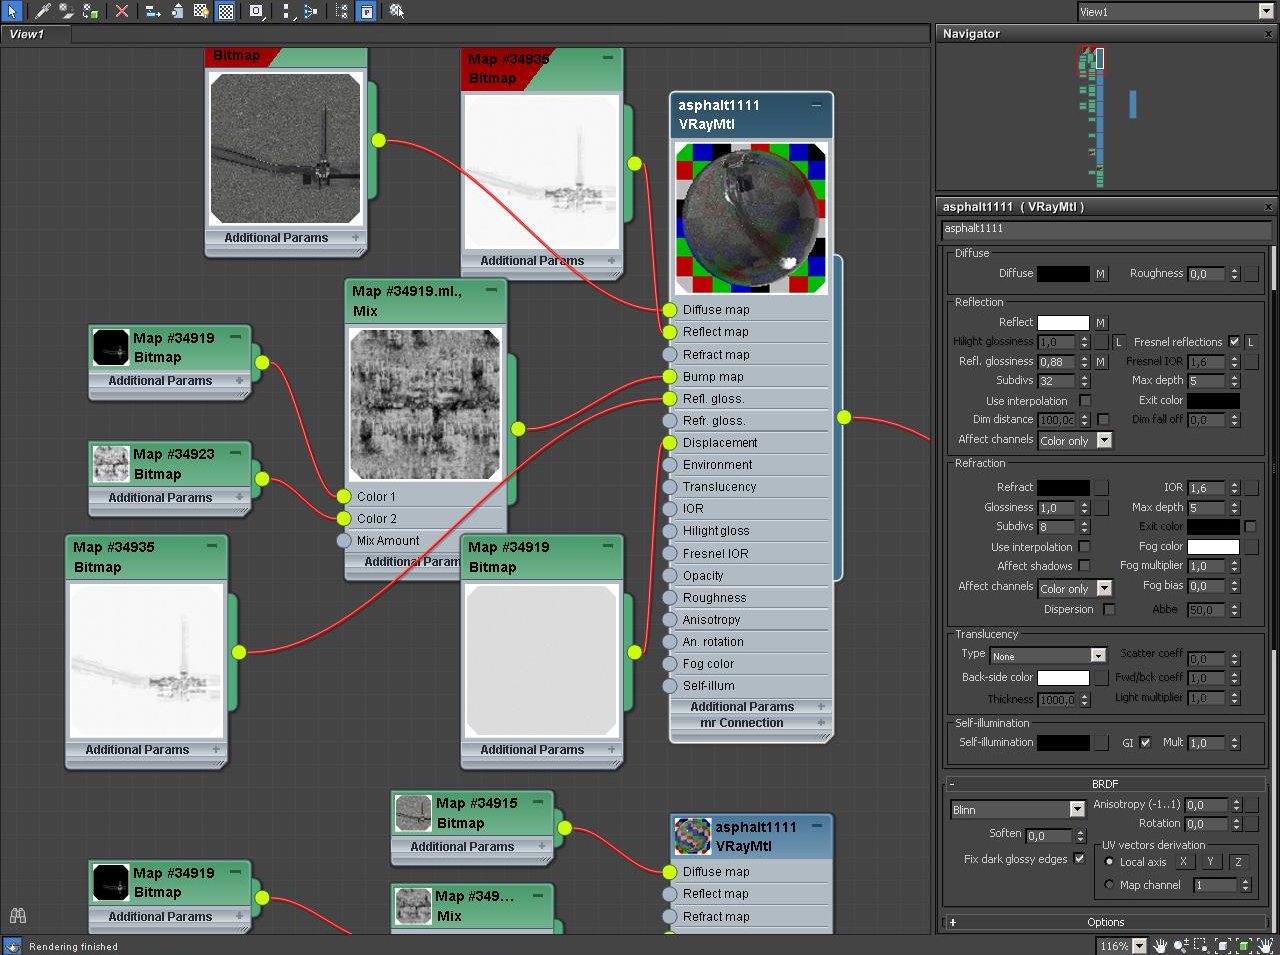
Base material settings.


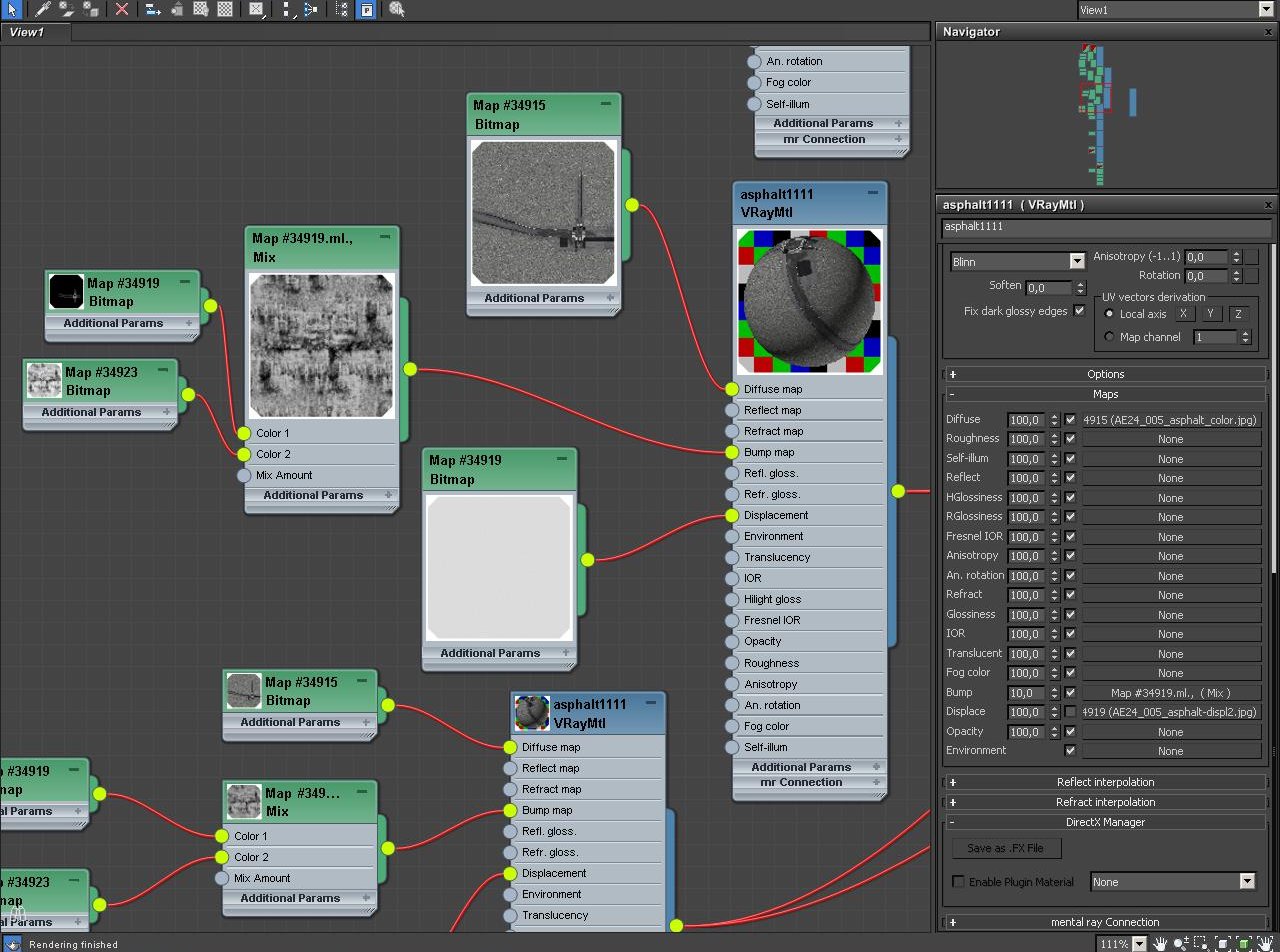
Click on image to enlarge 35_nr_2782.jpg

Base material settings (maps)


Click on image to enlarge 36_nr_2783.jpg
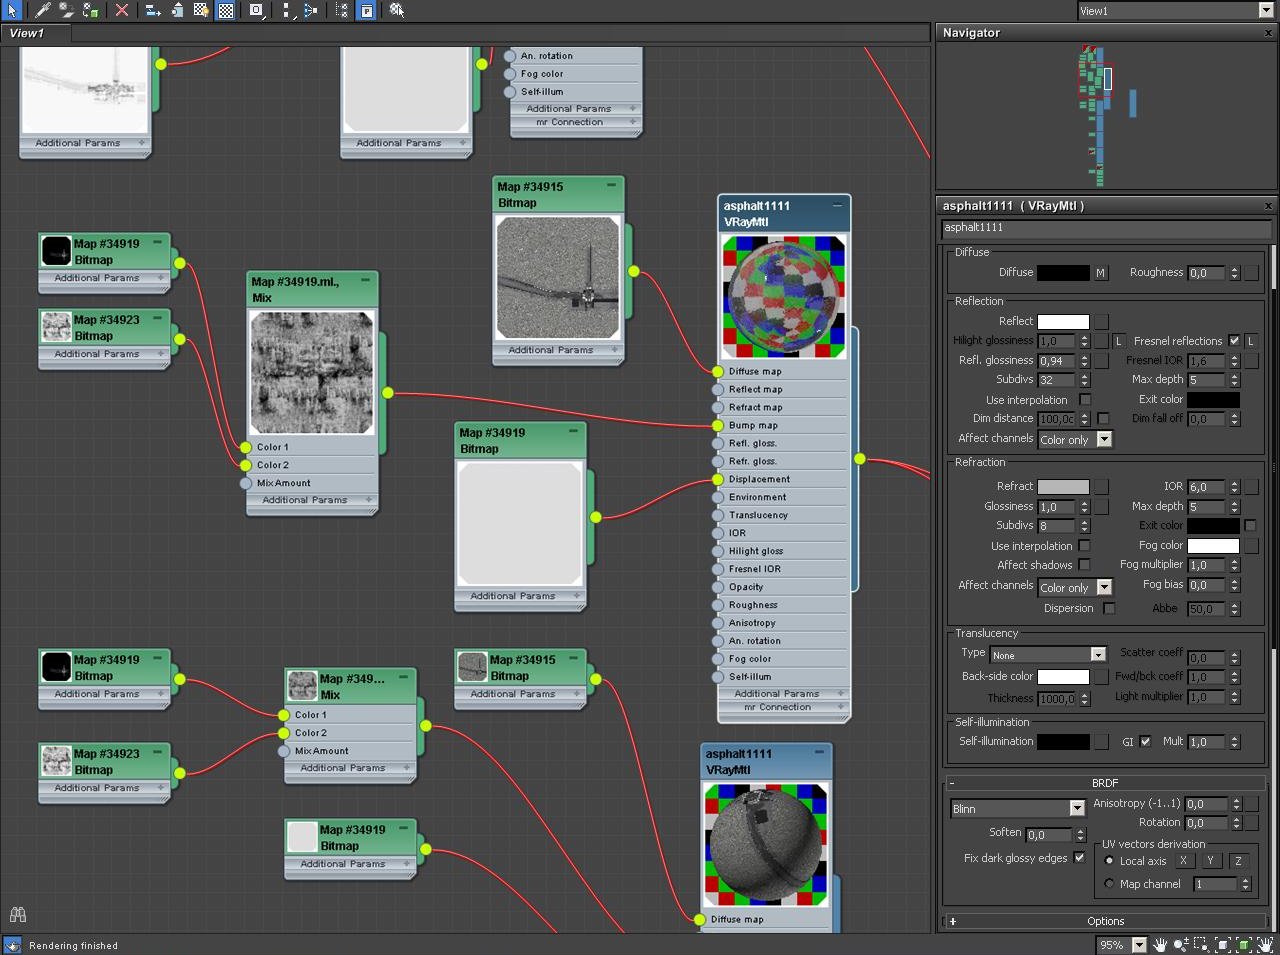
Coat 1 settings.


Click on image to enlarge 37_nr_2784.jpg

Coat 1 - maps


Click on image to enlarge 38_nr_2785.jpg

Coat 2 settings


Click on image to enlarge39_nr_2786.jpg

Coat 2 maps


Render settings

Click on image to enlarge render_settings.jpg
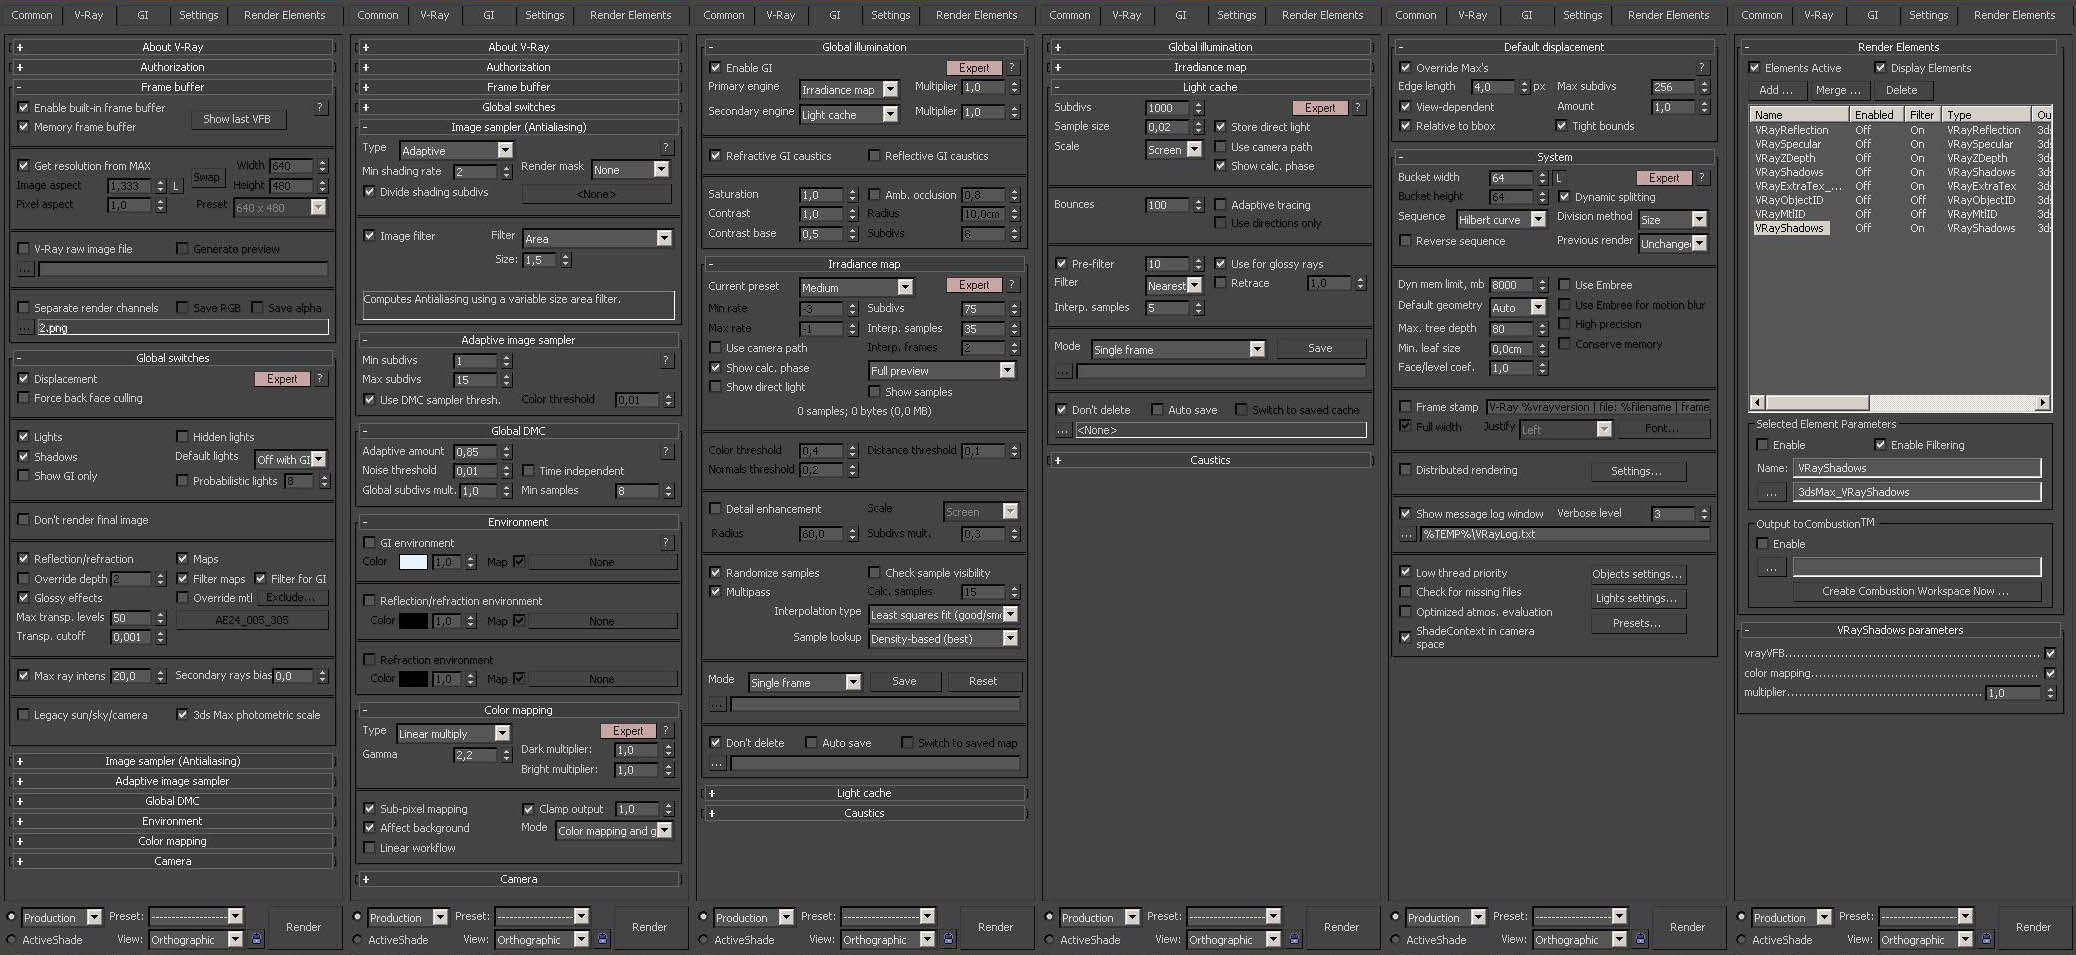
Render settings


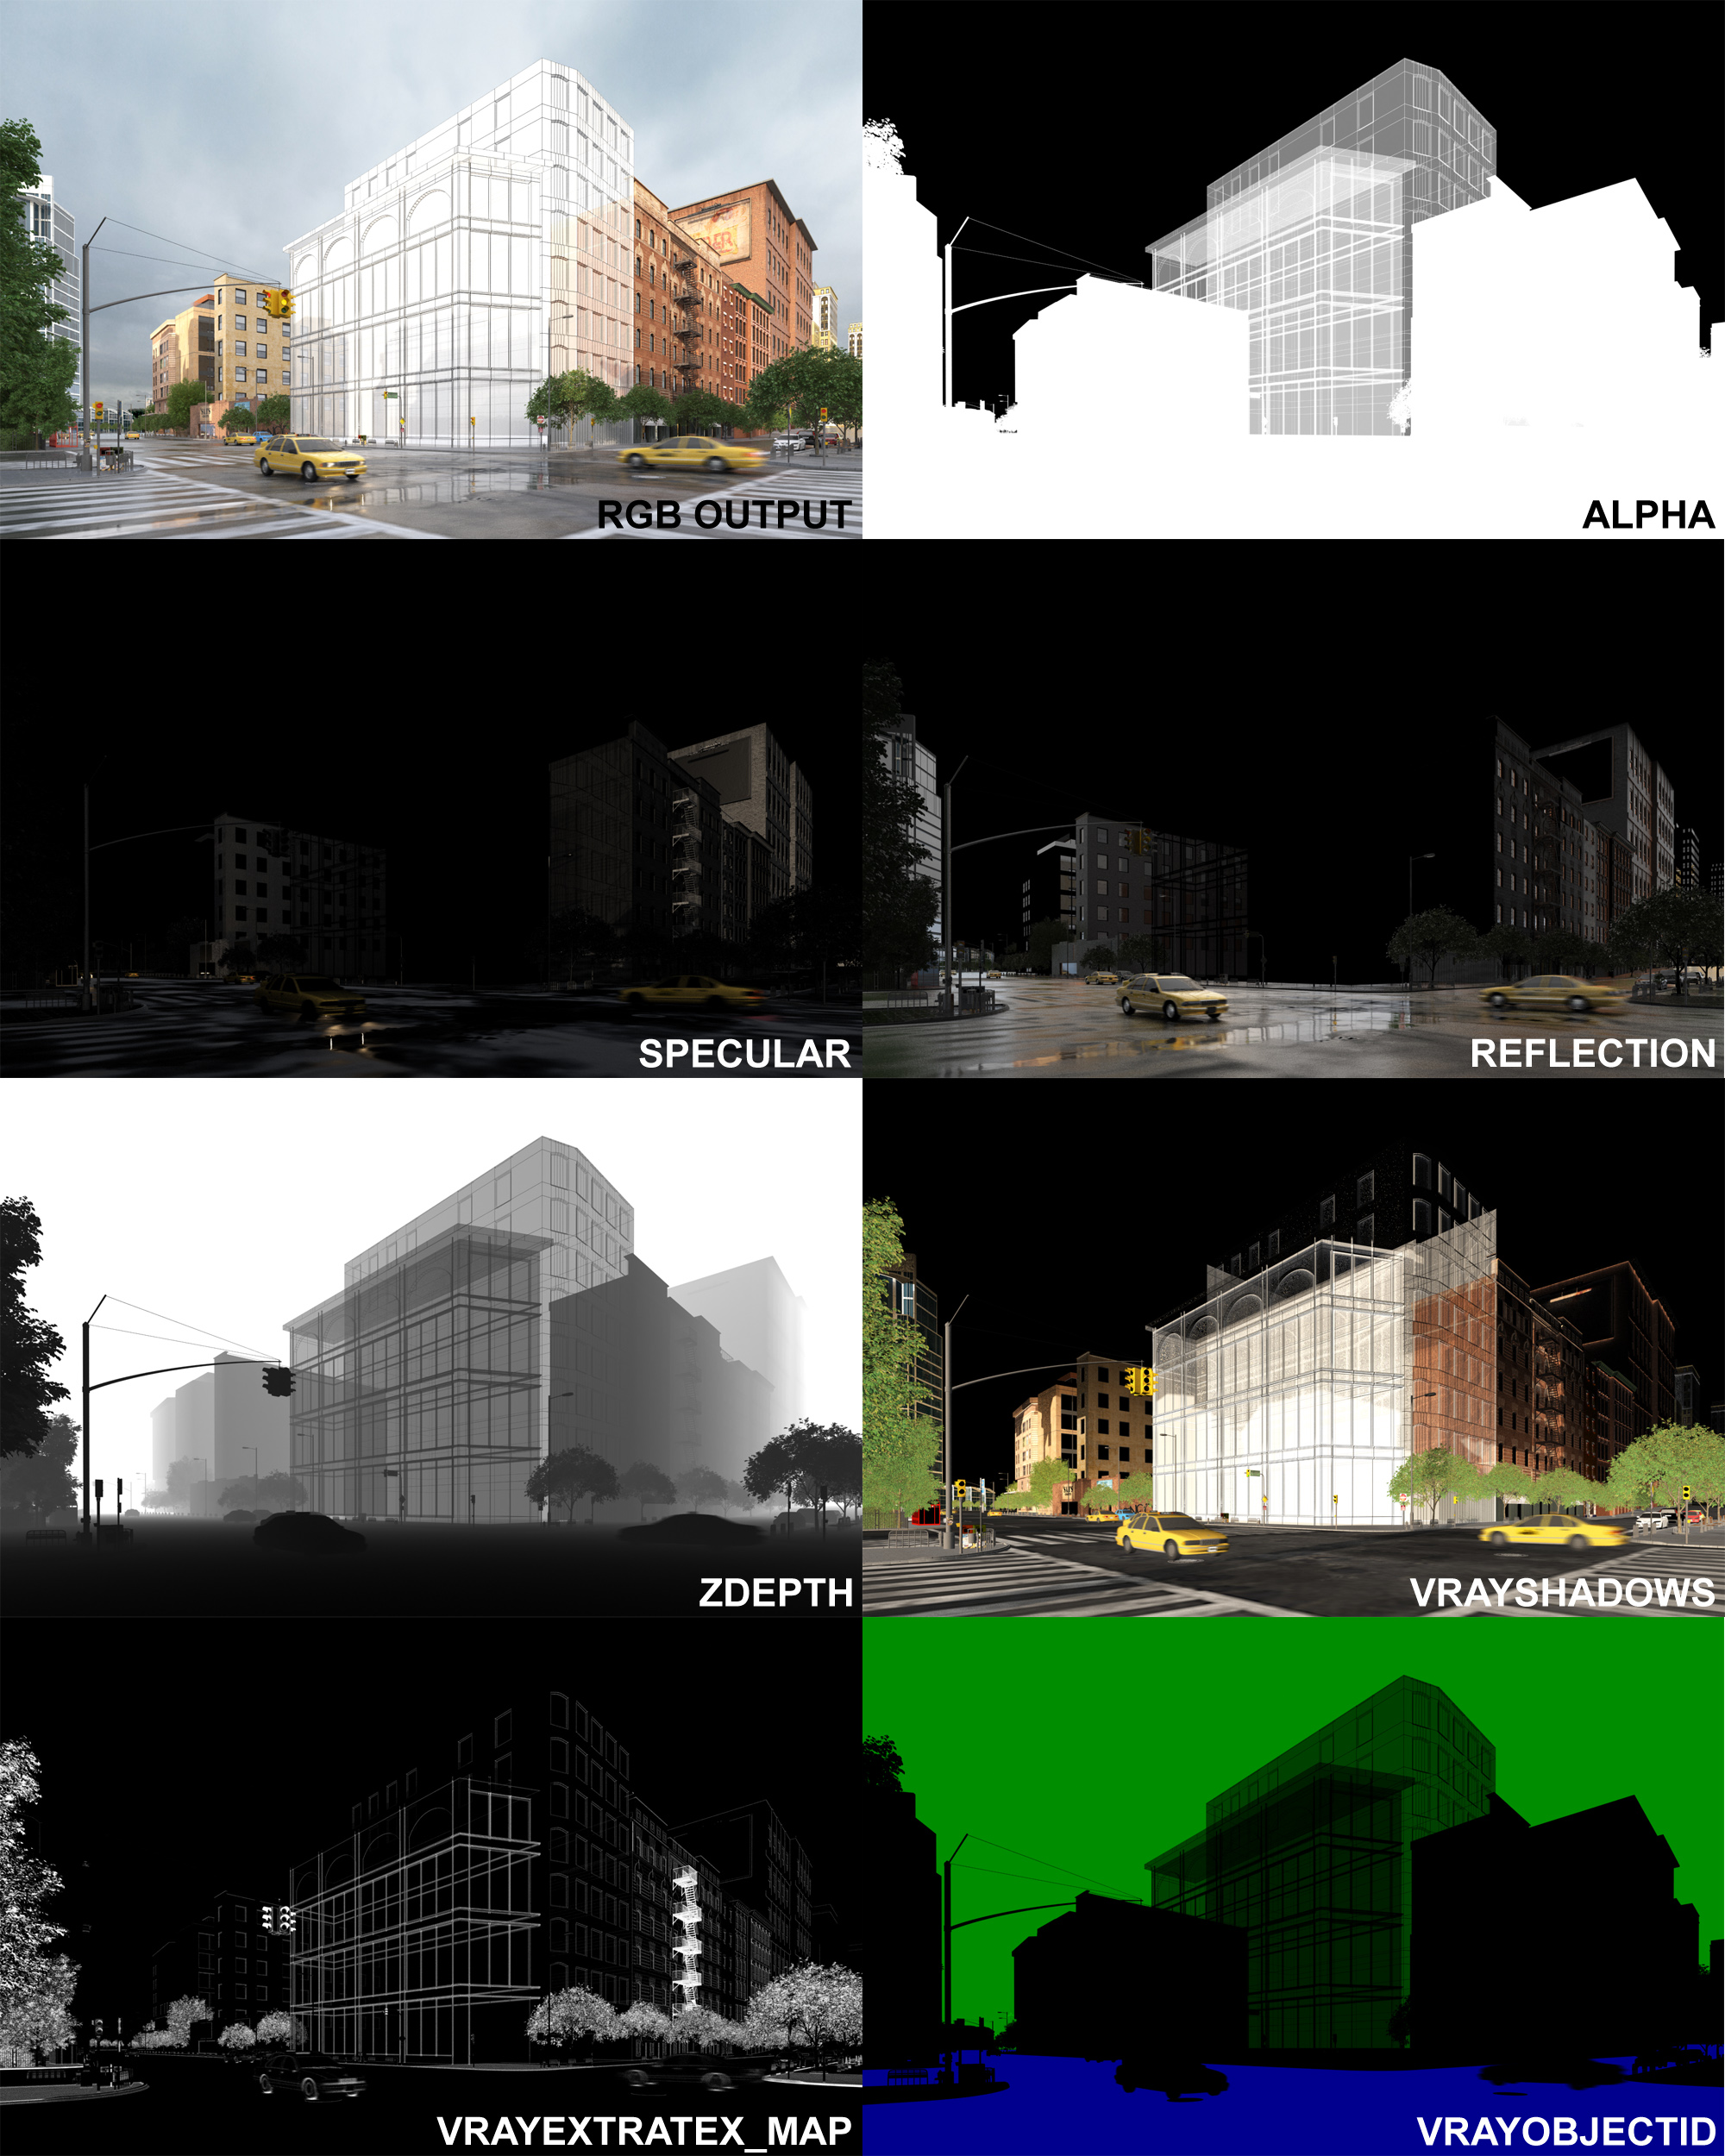
Click on image to enlarge PASSES_SMALL.jpg

Passes


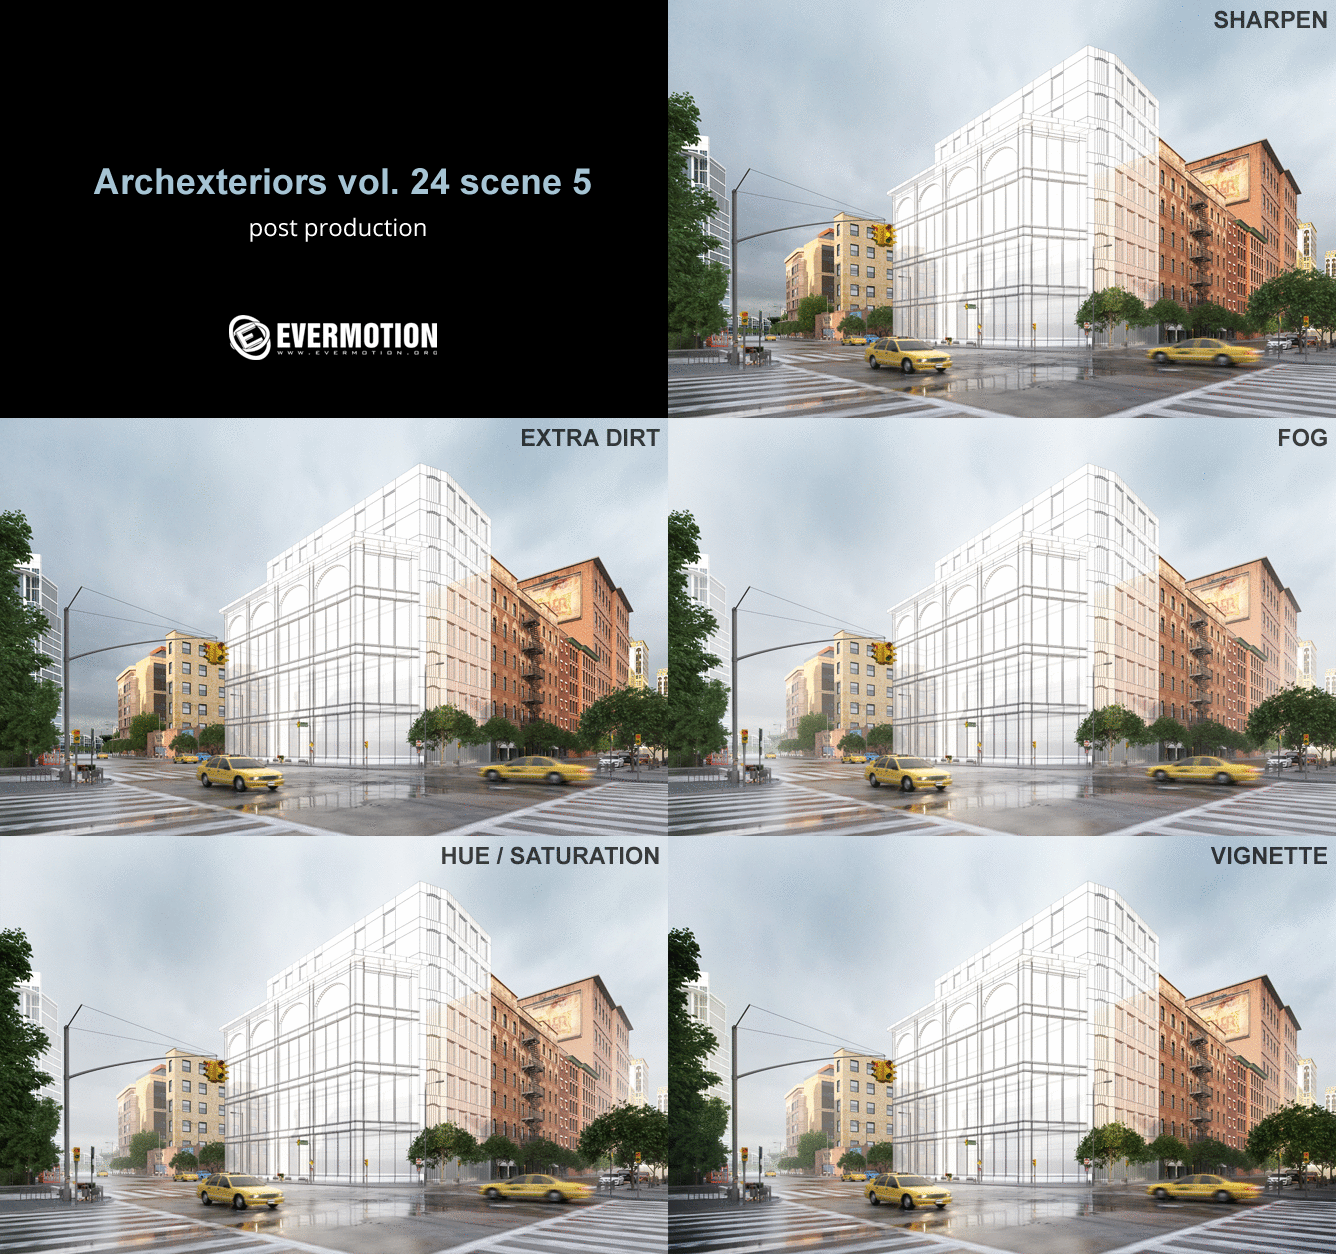
 15_levels_sky_nr_2668.jpg

Post production in Photoshop (GIF animation)


Click on image to enlarge photoshop_stack.JPG
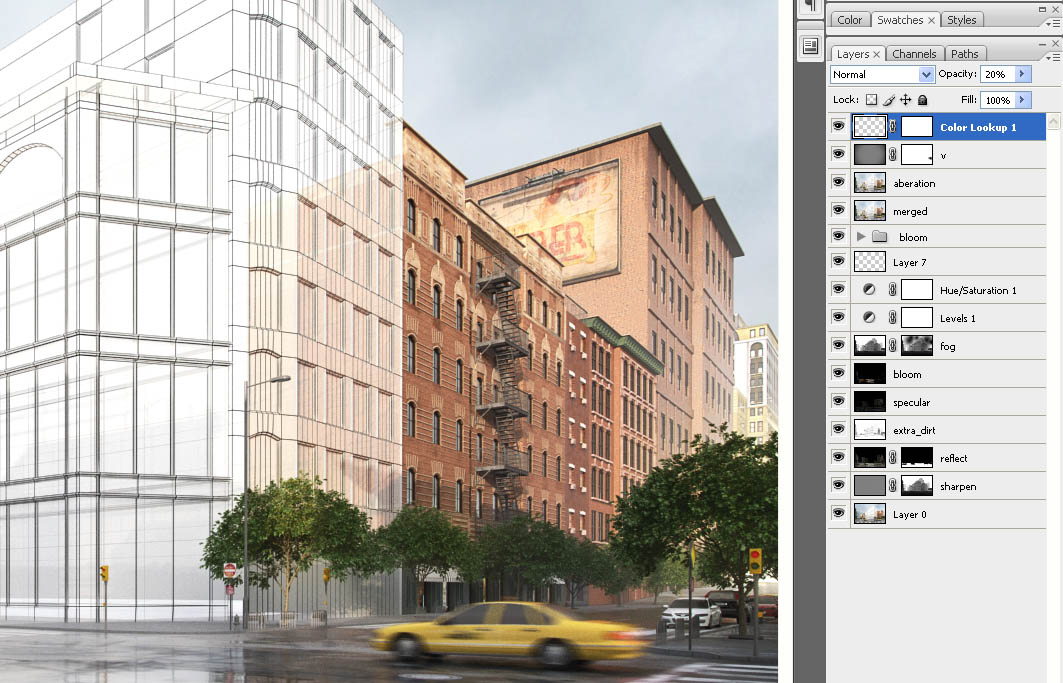
Photoshop stack


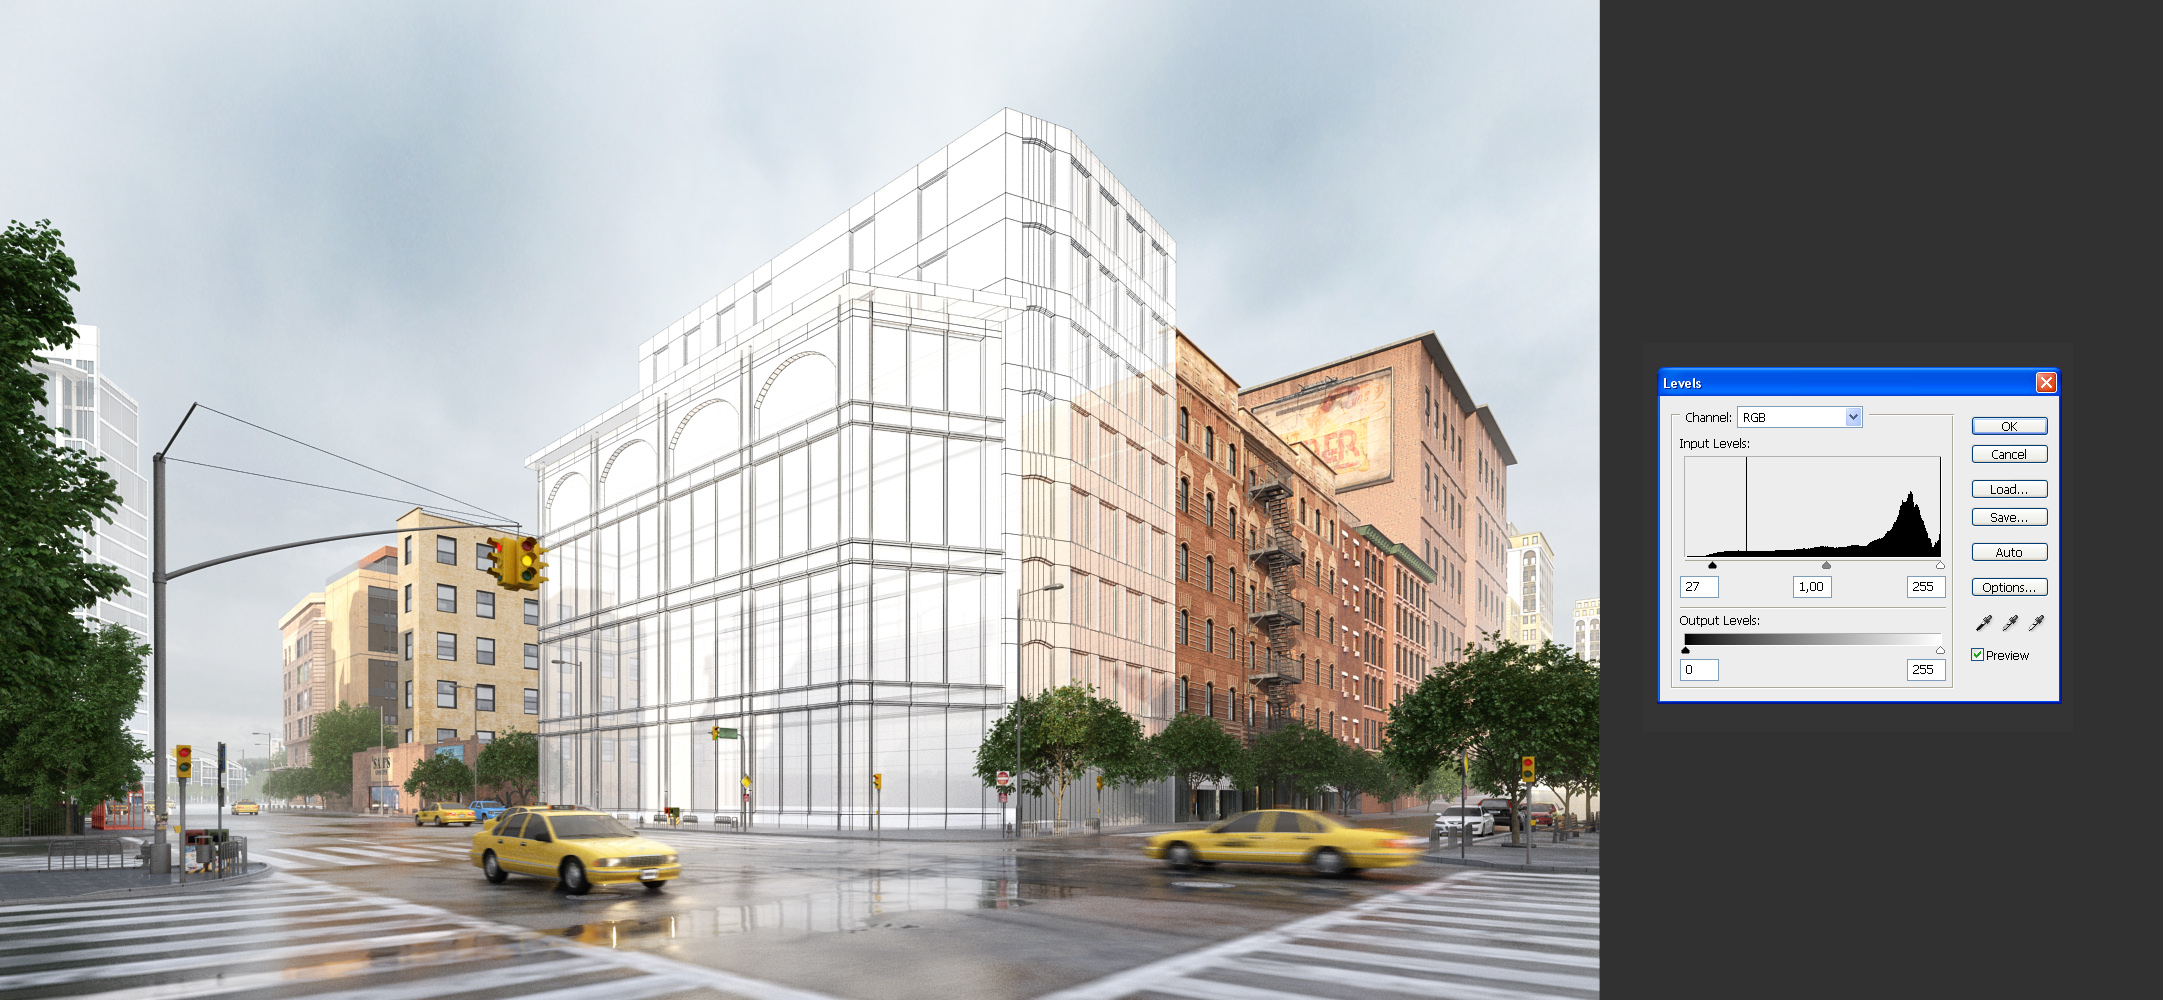
Click on image to enlarge pp_levels.JPG

Adjustment layer - levels (to add a bit more contrast).


Click on image to enlarge pp_hue_saturation.JPG
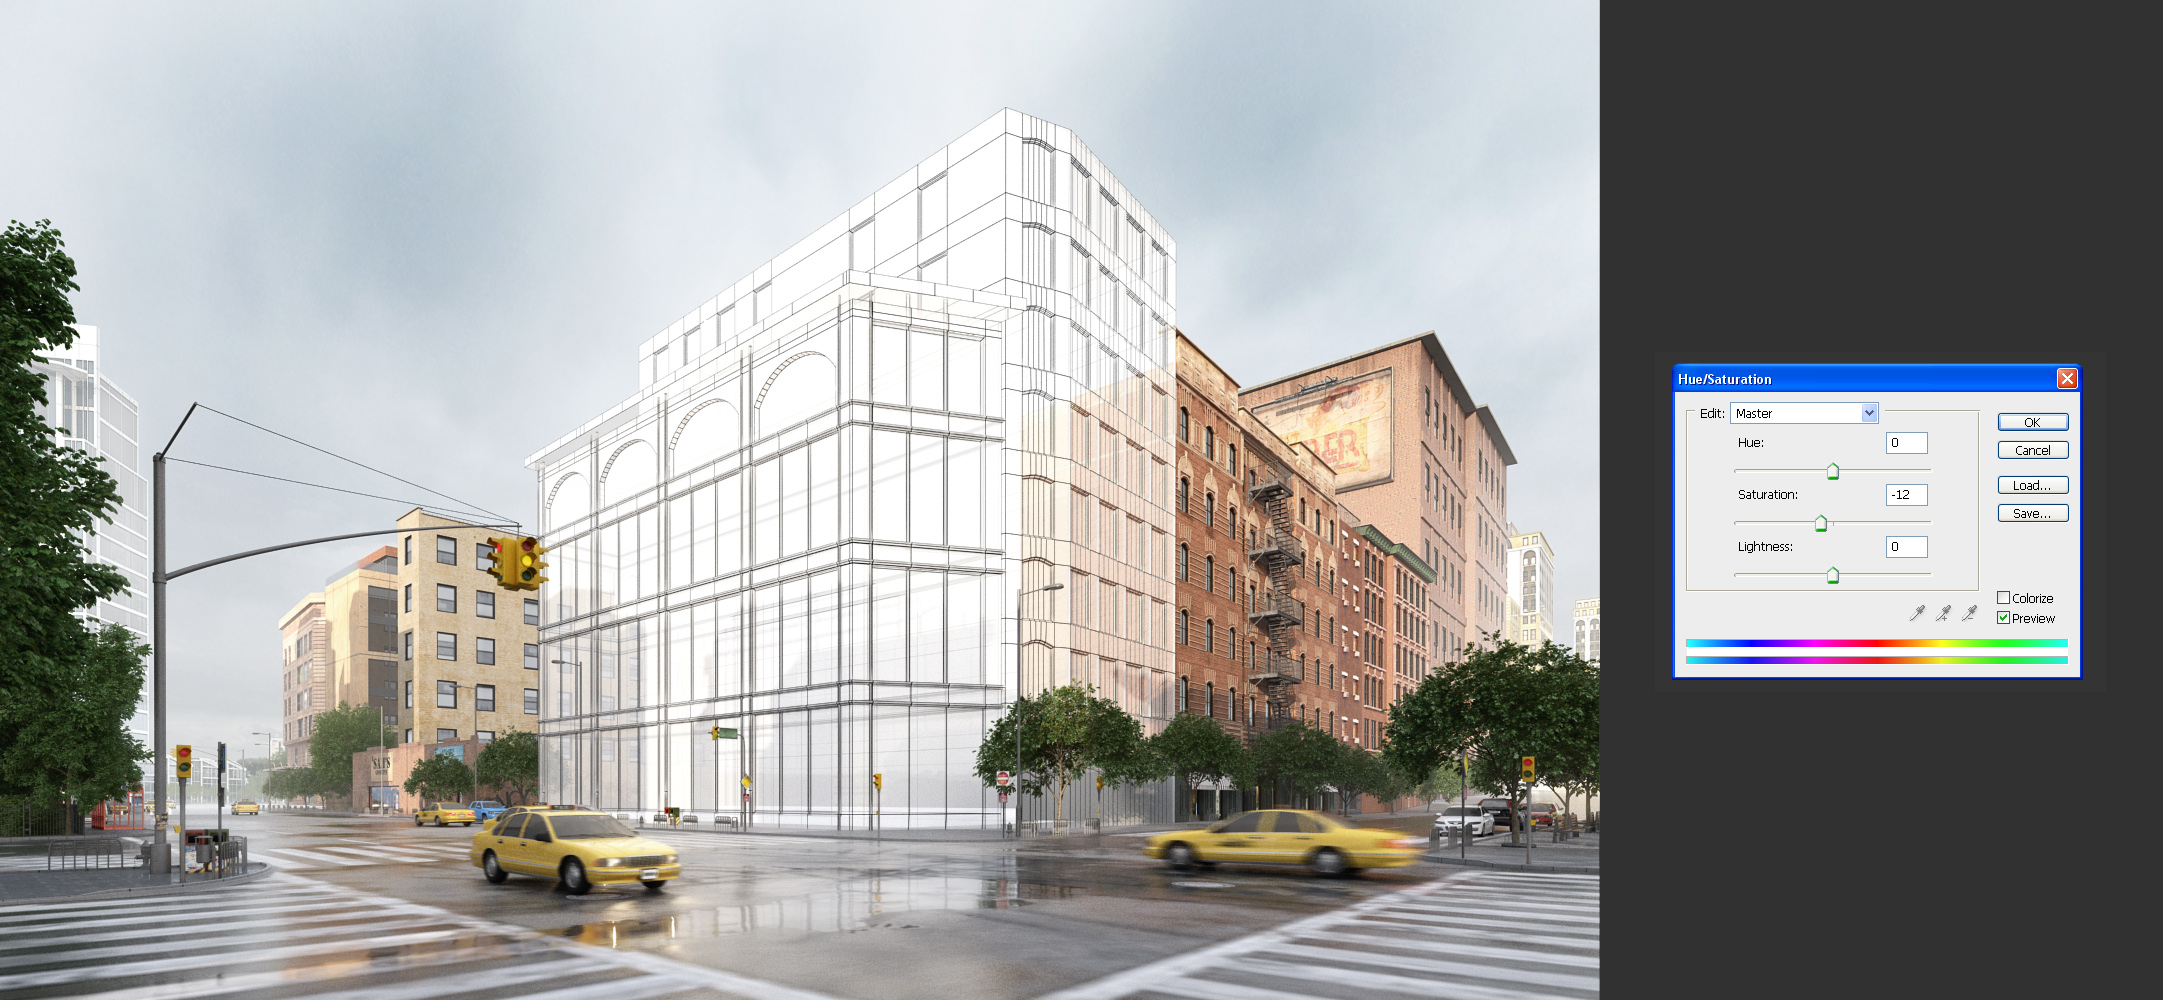
Adjustment layers - hue / saturation. we desaturated image a bit.


Click on image to enlarge 00_FINAL_nr_2803.jpg

Final image after post production.

Hope you enjoyed it! Thanks for reading! :)
 

Author: Michał Franczak Editor: Michal Franczak
Tags: archexteriors city exterior usa vol.24 ae24
You may also like...
Making of "Cloned to be Different"

Making of "Cloned to be Different"

Tutorial by Tamas Medve for 3ds Max + Vray and Photoshop.
×

LEAVE A COMMENT

You need to be logged in to leave a comment. Don't have account? Register now.

d7man2000 16:53:20  |  03-10-2014
Can you guys make rendering without a Vray Camera? (only with standard Camera and Standard direct light) I never liked Vray Camera. When I go take pictures in real life I always have it set to Automatic and take great photos. Before Vray camera was introduced, rendering were amazing too. I would like to buy a similar set but with a standard Direct light and standard camera, still in 2.2 gamma. by the way, amazing renderings. Quality feels a little different from a previous set (Miami renderings). Miami renderings looked more realistic in my opinion, what is different? It looks like every set has a different feel. but this set is realistic enough and a lot of work and detail beyond of most people can do. Congratulations to Polska team.
mikeeho 22:56:52  |  03-10-2014
the author is different, his approach and skills.that is the main difference.as for vray camera issue- it is really a natural thing to use vray's camera when working with vray:) it is a part of vray system so I think not using it would be like shootinh your knee. you can do a render without it but why?
d7man2000 23:41:47  |  03-10-2014
Thanks for a reply mikeeho. I just don't like using Vray Camera. I need an "automatic" camera without tweaking exposure, shutter speeds. I started using Vray before Vray camera was introduced, I never got used to it. I found a good flow between SketchUp - 3dsMax where I model everything in SketchUp and import into 3dsMax. Then I can bring cameras ( I don't want to convert into vray cameras). I discovered a good way to: convert materials from sketchup to vray and to save vray metarial library I can go back to SketchUp at any time and make the changes, then I import an updated model and materials are already applied (this saves a lot of time), it is a good flow. SketchUp is still a winner when time is an issue to get a model design right before jumping into rendering. When someone has lots of time, it is a different story but when time is limited. It is a different situation. I need the most efficient way to get things done with gamma 2.2, Standard Sun Light, Standard camera. (no extra steps with converting Standard camera to Vray camera) Look at ArchInteriors Vol.1 - those renderings where amazing (different setup, old different gamma - 1.0, no vray camera) and most import file sizes were really small ( less crashes and headaches)
peterx 14:06:52  |  06-10-2014
A quick question, the dome, is just a half a dome as shown above or is the entire scene inserted within a dome and then rendered?
bartb007 00:29:00  |  05-10-2016
Hi, can you or anybody explain how to put road material on street model ? i was try to understand that in archexterior vol20 scene 002 but cant find any simple answer how to do that. there isn't any uvw mod. when i'm trying applay in my model i got marks on all over model. many thanks for help regards