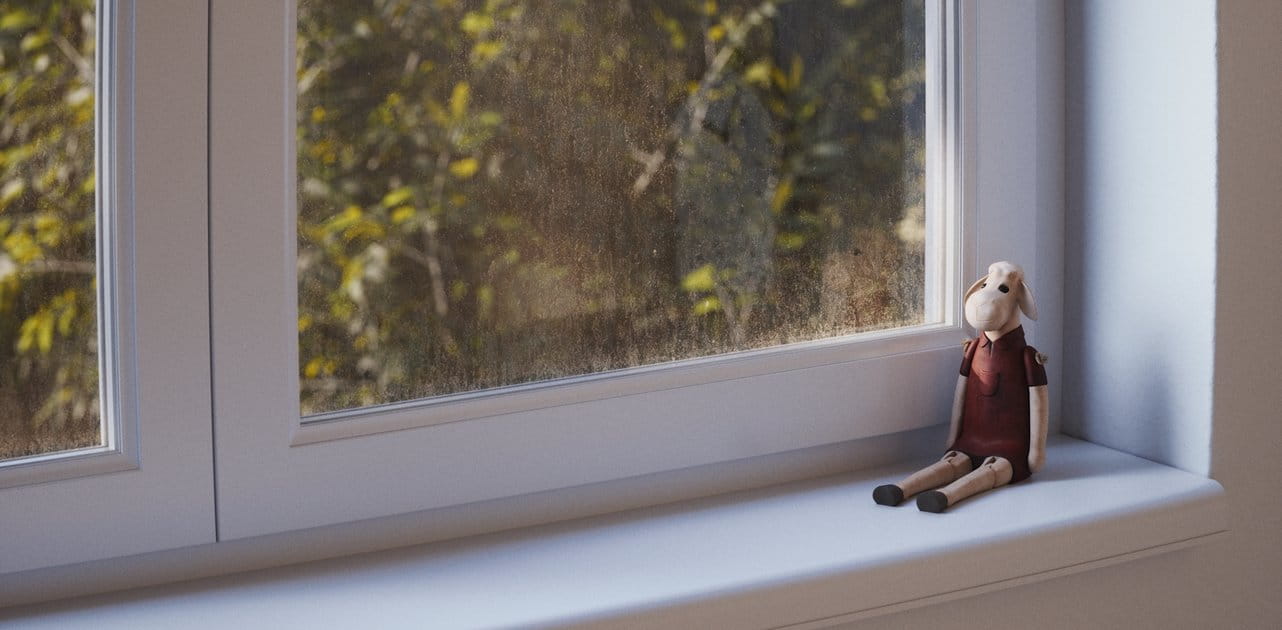
Create Dirty Windows - material tutorial
New tutorial by RenderRam.


In accordance with the art. 13 section 1 and 2 of the European Parliament and Council Regulation 2016/679 of the 27th April, 2016 on the protection of natural persons, with regard to the processing of personal data and on the free movement of such data, and repealing Directive 95/46/EC (General Data Protection Regulation), hereafter RODO, I hereby inform that:
1. EVERMOTION S.C., 8 Przędzalniana Str., 15-688 Białystok, Poland is the Administrator of your Personal Data (APD)
2. Data Protection Inspector can be reached through e-mail: iod@evermotion.org
3. Your personal data are to be processed on the basis of art. 6 section 1 letter a, b and f of RODO in order to:
a) prepare, conclude and execute the agreement and for other purposes approved by you,
b) to execute the legitimate interest like marketing of products and the agreement, claim assertion or defence against claims resulting from the law regulations.
4. Entities entitled to the reception of your personal data may be the authorised public bodies; mail providers; providers of the services covered by the agreement; responsible for debt recovery, keeping the archives, document utilization, legal consulting, technical services, IT services and accountancy.
5. Your personal data shall not be transferred to the third country, nor to the international bodies.
6. Your personal data shall be processed within the period of the agreement and upon your additional consent until you withdraw it. APD shall keep the data for the period of any civil law claim execution connected with the agreement.
7. You have the right to demand an access to your personal data, to correct or to delete the data if there is no other basis for the processing or any other purpose of such processing or to limit the processing of the data, to transfer the data to another administrator and to raise objections to the further data processing if there is no legal basis for further processing and to withdraw any previous consent.
8. You provide the personal data voluntarily, however they are necessary to conclude the agreement. The refusal of providing such data may result in the refusal of the agreement conclusion.
9. You have the right to lodge a complaint to the Personal Data Protection Office when in your opinion the data processing violates the regulations of General Data Protection Regulation of the 27 April, 2016 (RODO).
10. Your data will be automatically processed, including the form of profiling.
11. You are obligated to forward above mentioned information to your representative, especially if you appointed this person in the agreement as the contact person or as the representative for the agreement execution.

Hi, folks!
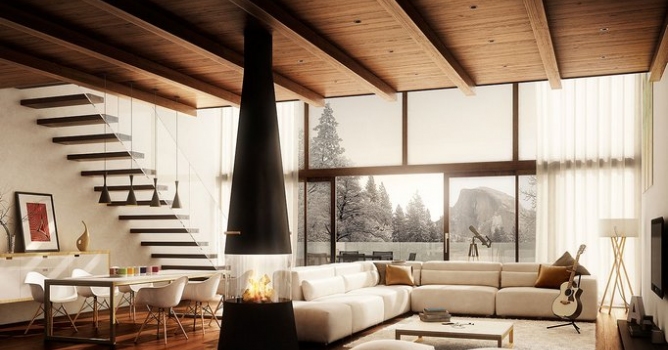
My name is Andrea, I am the owner of ADC Visualizations, and i'm gonna share with you the making of "Villa Bonafe - Living room" interior design concept. So let's start!
Visit ADC Visualizations Facebook profile
CONCEPT
This living room is a part of an interior design concept for a house located in Cortina D'Ampezzo (well known in Italy as nice location for winter holidays). The location has a nice mountain view outside so the main goal of the living room was to make this panorama the star of the house: cold outside but very warm and comfortable when you are inside the house.
So that was the main idea: a large open space for living/dining room, with a big window in the front to enjoy the wide terrace and nice panorama. So i decided for a double height room, wooden ceiling and floor. I put a modern fireplace in the center of the room. I'm not gonna go further on design choices because it's not the goal of this tutorial.
Click on image to enlarge
MODELING
To be honest, I dont like to waste time for modeling! I mean - not anymore! Many years ago I spent days and days modeling pretty much anything, but today I'm interested on other aspect like lights setup, finding a good point of view, postproduction, etc... So whenever it is possible, I use 3d models built by someone else ;). If you don't want to buy 3d models, you could find a lot of free stuff online, starting from producers' websites, arch-viz websites. A good source I use pretty often is... Google 3d models warehouse! You can also get models from packages like those from Evermotion or other companies. So for this scene, I modeled walls, floor, ceiling, stairs and windows. This is the result:
Click on image to enlarge
Click on image to enlarge
Floor was modeled with a free tool called FloorGenerator, which is perfect for modeling any type of planks. I use it all the time, when I need to put wooden floor in my scenes.
Now that we have the base model of the open space, the interior design part goes tricky. I've choosen the furniture, downloaded the 3d models and then started importing them into my scene. I tried many layouts till I was satisfied with the final one, where fireplace in the center divides the living room from the dining room.
Click on image to enlarge
Click on image to enlarge
LIGHTING
Ok it's time see what happens when we hit render! Once we've found the point of view, it's time to put some lights on the scene. I used
- Vray dome light for ambient diffuse light
- standard Max direct light simulating the sun
- vray plane light outside the main window
- single vray sphere light for the fire.
Click on image to enlarge
Click on image to enlarge
MATERIALS
Rendering a scene with hyperrealistic materials makes the difference, this is obvious, but my advise is: try to find a good balance between a realistic material and rendering times. For example - I don't use value higher than 12-16 in the reflection/refraction sample slot! The more you push these values, the less noise you get (which is good), but rendering times will make you wait forever (I hate when it happens).
In this scene I used basic vray materials with diffuse, bump and reflection textures - really simple ones. The "hardest" material for this scene is for the floor. Here's my settings for the floor:
Click on image to enlarge
Last thing to say about materials is that I really don't care too much about reaching the perfect effect at the end of the rendering process. There's a lot of things you can do in post production, the really interesting part! We'll talk later about this.
Click on image to enlarge
RENDER SETTINGS
Original render size was 5000x3000 px. Vray has many options on GI tab which depend on the resolution of the final image. Irradiance map was set to "medium" preset (no changes from defaults) and lightcache was set to 800 samples with a couple of flags checked (see image). Other settings are unchanged from default values!
Click on image to enlarge
Click on image to enlarge
POST PRODUCTION
Many people are wasting a lot of time to test and render until the render looks perfect. I'm not saying this is a wrong method, but... since I have to do a single shot (not an animation) there's a lot I can do to fix things in post production and I can make it look really cool compared to the raw render! The workflow I'm gonna to explain is very time saving! It consists of masking parts of the image and tweak it in Photoshop (my favorite part).
For the masking, I don't use "wirecolor" render element, but RENDERMASK, a free plugin which creates masks of the selected object(s). When I discovered this tool I was shocked! It's really cool.
Click on image to enlarge
So, I prepared all the masks and imported them as alpha channel in Photoshop so I could easily cut out them by selecting the alpha channel and creating a "layer via copy".
Click on image to enlarge
Click on image to enlarge
Now that I have all the elements cut-out, I can start tweaking them, adjusting their curves, saturation, levels and so on...
Click on image to enlarge
So, with this method, I have found the look I wanted for the floor in just ONE minute, without test-rendering it 10 times: I only had to set the diffuse and reflection textures right: color correction, saturation and exposure are refined in Photoshop.
Same for any other objects in this scene: walls, ceiling, sofa, lamps, curtains, etc - I have full control of the look of anything on the image! And on the other hand I could merge objects in the scene without rendering the full image once again. I can also change color of an object if it doesn't affect other objects or appear in reflections.
Click on image to enlarge
We are pretty done here. Just choose a nice looking background for the image. I had no real location so I could put a mountain background I liked the most, so I tried this one, after days of tests. (Yeah, while I'm saving time for rendering, sometimes I waste a lot of time choosing the right background :D)
Click on image to enlarge
Click on image to enlarge
Click on image to enlarge
Click on image to enlarge
I hope you've found useful tips and tricks in this making of. This is the workflow I use most of the time. If you have any questions, find me on Facebook: ADC Visualizations.
Andrea


LEAVE A COMMENT


|

|

|

|

|


COMMENTS