Create Dirty Windows - material tutorial
New tutorial by RenderRam.


In accordance with the art. 13 section 1 and 2 of the European Parliament and Council Regulation 2016/679 of the 27th April, 2016 on the protection of natural persons, with regard to the processing of personal data and on the free movement of such data, and repealing Directive 95/46/EC (General Data Protection Regulation), hereafter RODO, I hereby inform that:
1. EVERMOTION S.C., 8 Przędzalniana Str., 15-688 Białystok, Poland is the Administrator of your Personal Data (APD)
2. Data Protection Inspector can be reached through e-mail: iod@evermotion.org
3. Your personal data are to be processed on the basis of art. 6 section 1 letter a, b and f of RODO in order to:
a) prepare, conclude and execute the agreement and for other purposes approved by you,
b) to execute the legitimate interest like marketing of products and the agreement, claim assertion or defence against claims resulting from the law regulations.
4. Entities entitled to the reception of your personal data may be the authorised public bodies; mail providers; providers of the services covered by the agreement; responsible for debt recovery, keeping the archives, document utilization, legal consulting, technical services, IT services and accountancy.
5. Your personal data shall not be transferred to the third country, nor to the international bodies.
6. Your personal data shall be processed within the period of the agreement and upon your additional consent until you withdraw it. APD shall keep the data for the period of any civil law claim execution connected with the agreement.
7. You have the right to demand an access to your personal data, to correct or to delete the data if there is no other basis for the processing or any other purpose of such processing or to limit the processing of the data, to transfer the data to another administrator and to raise objections to the further data processing if there is no legal basis for further processing and to withdraw any previous consent.
8. You provide the personal data voluntarily, however they are necessary to conclude the agreement. The refusal of providing such data may result in the refusal of the agreement conclusion.
9. You have the right to lodge a complaint to the Personal Data Protection Office when in your opinion the data processing violates the regulations of General Data Protection Regulation of the 27 April, 2016 (RODO).
10. Your data will be automatically processed, including the form of profiling.
11. You are obligated to forward above mentioned information to your representative, especially if you appointed this person in the agreement as the contact person or as the representative for the agreement execution.
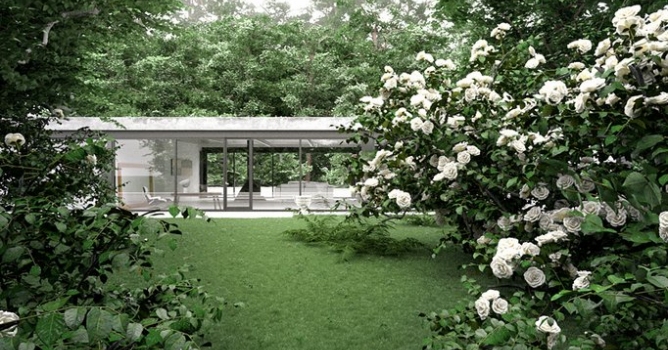

Hi everyone! My name is Federico Ciavarella, I’m an Italian Architect and a freelance 3D visualizer. Before beginning, I have to thank Evermotion for this great opportunity and I also have to credit Alex Roman and his book "From bits to the lens" that was essential for the vegetation that I created for this work.
Software used: 3ds Max, Vray, Photoshop, Marvelous Designer and Zbrush.
Final Images:
Click to enlarge image
Click to enlarge image
Click to enlarge image
Click to enlarge image
Click to enlarge image
Click to enlarge image
Click to enlarge image
Concept
Basically, I started this work to test some of the vegetation tips I found in "From bits to Lens" book by Alex Roman, which is an excellent reading for 3d visualization artists. The house, instead, was inspired by a Villa found on "Elle Decor Magazine - Italia" that in some way reminds me the Farnsworth House by Mies van der Rohe or the Glass House by Philip Johnson, but at the end I tried to create something personal and not just a copy. Let’s start!
Vegetation
Following the Alex Roman’s tips, I started with a plane, I applied the texture and then I added the subdivision to follow the shape of the leaf. This is useful, because opacity maps require lot of calculation time. If you leave only a few parts in ‘black’ the calculation time is acceptable and the leaf still maintains the fractal natural form.
Click to enlarge image
Click to enlarge image
After testing some specific software to create trees, I realized that, for my needs, the best solution was the most simple one. Branches and trunk are mostly hidden, so I modeled them by hand.
Click to enlarge image
I unwrapped them with Xray Unwrap plugin.This was very tedious but at the end I modelled only 2-3 branches and 1 trunk for the trees, and then I added symmetry modifier. Thanks to Multiscatter, I could get a lot of variations of bush structures that was made from just one model. All the leaves were scattered with this plugin and once I found a good setting it was very easy to change seeds and obtain different configuration of trees and bushes. Multiscatter was also used to place branches on the tree trunk, before scattering the leaves.
The other advantage of this method is that if the leaves and the branches have a noise rotation before scattering, it’s possible to achieve the ‘wind effect’ for animations.
Click to enlarge image
For the distribution I used Vertex Paint. In the future I’ll probably also use another good tip from Alex Roman - I will customize pre-made trees, available in collections such as those by Evermotion, to avoid the tedious process of creating the structure of the trees. In my opinion on what really worths to be customized: the leaves and the roughness of the bark (if visible).
Materials
Click on image to enlarge
Click on image to enlarge
To optimize rendering time I increased cutoff of the tree leaf material to 0,1 for all trees that are far from the camera.
Click on image to enlarge
Modeling
Nothing special to say here, Just a couple of things that someone can possibly find useful.
Click on image to enlarge
Click on image to enlarge
Lighting
For exterior and Interior light I used HDR skies inside of a Vray Dome light. The skies are completely desaturated with color correction inside 3ds Max, this is a thing that I usually do for the 90% of the interior images and rarely for the exterior. The gamma was left mostly at 1, some images have it at 0,9, this is because the skies in this scene are overcasted. I usually decrease it at about 0,8 / 0,75 with other types of skies. Skies used: 1044, 0902, 1008 by Peter Guthrie.
Click on image to enlarge
I added two Vray planes to give an extra touch to the homogeneity of the light. Similar settings were used for the other images, with or without extra Vray planes.
Click on image to enlarge
The Vray sphere was put inside the filament to avoid the ‘too perfect’ effect.
Click on image to enlarge
Render settings
Click on image to enlarge
Post production
The post production was very fast. As a lover of photorealistic rendering I tend to treat raw renderings as photographer treat raw photos. I start with Magic Bullet Photolooks to work at 32 bit and after I use common Photoshop tools included Photoshop Camera Raw (especially now that it has an easy access from the filter menu) mainly to check overexposed area, have an easy control of individual colors and to use the noise reduction tool.
Click on image to enlarge
Click on image to enlarge
Click on image to enlarge
Click on image to enlarge
Click on image to enlarge
That’s it! Thanks for reading, I hope you can find it useful. For any clarification you can write me here, or on my Facebook and Behance page. Cheers!
Federico Ciavarella


LEAVE A COMMENT


|

|

|

|

|


COMMENTS