Evermotion Pass 10% Off - Get Instant Access to Thousands of 3D Assets

Check Plans

Information Clause

In accordance with the art. 13 section 1 and 2 of the European Parliament and Council Regulation 2016/679 of the 27th April, 2016 on the protection of natural persons, with regard to the processing of personal data and on the free movement of such data, and repealing Directive 95/46/EC (General Data Protection Regulation), hereafter RODO, I hereby inform that:

1. EVERMOTION S.C., 8 Przędzalniana Str., 15-688 Białystok, Poland is the Administrator of your Personal Data (APD)

2. Data Protection Inspector can be reached through e-mail: iod@evermotion.org

3. Your personal data are to be processed on the basis of art. 6 section 1 letter a, b and f of RODO in order to:
a) prepare, conclude and execute the agreement and for other purposes approved by you,
b) to execute the legitimate interest like marketing of products and the agreement, claim assertion or defence against claims resulting from the law regulations.

4. Entities entitled to the reception of your personal data may be the authorised public bodies; mail providers; providers of the services covered by the agreement; responsible for debt recovery, keeping the archives, document utilization, legal consulting, technical services, IT services and accountancy.

5. Your personal data shall not be transferred to the third country, nor to the international bodies.

6. Your personal data shall be processed within the period of the agreement and upon your additional consent until you withdraw it. APD shall keep the data for the period of any civil law claim execution connected with the agreement.

7. You have the right to demand an access to your personal data, to correct or to delete the data if there is no other basis for the processing or any other purpose of such processing or to limit the processing of the data, to transfer the data to another administrator and to raise objections to the further data processing if there is no legal basis for further processing and to withdraw any previous consent.

8. You provide the personal data voluntarily, however they are necessary to conclude the agreement. The refusal of providing such data may result in the refusal of the agreement conclusion.

9. You have the right to lodge a complaint to the Personal Data Protection Office when in your opinion the data processing violates the regulations of General Data Protection Regulation of the 27 April, 2016 (RODO).

10. Your data will be automatically processed, including the form of profiling.
11. You are obligated to forward above mentioned information to your representative, especially if you appointed this person in the agreement as the contact person or as the representative for the agreement execution.

OK

Bronte - making of

Alfa Smyrna 2011-10-04 10:12 tutorial  > Making of  > misc

Hello everyone, in this Making Of Story of Bronte scene, I will try to explain you the basic steps of my pipeline.

Theme & Inspiration:
I saw this house in one Internet site and I remember looking at it for some time as it grabbed my attention with the fireplace and sofa in an semi-open high ceiling area with the wooden floors. Unfortunately I didn't bookmark the site or note the name of the house. After some time, I remembered this fireplace and decided to make a 3D version of this house but I haven't got any reference image or the name. So I decided to trust on my memory and build my version of the house. I still don't know the name of the house, where it is or how much it is similar to the original version I once saw.
Collecting Reference Images:

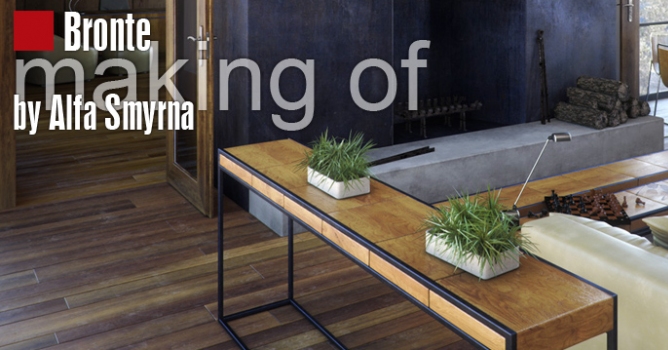
Collecting reference images is one of the most vital steps in a project. I try to collect as many reference images as I can, for objects I plan to model, for materials and textures, and for different examples of the space I am working - for different lighting conditions or anything related. I found out that, collecting references has always inspired me and sparkled different ideas in my mind and gave my projects a significantly better foundation. For Bronte, I had on my mind already one specific image of the space that I once saw and I wanted to stick to this so I mostly looked up for references of specific materials such as metal and wood floors etc

Units: Another very important step is to set the correct units for the scene. Whichever units you use, it is important to have your all your models scaled, proportional. This is very important for modeling, texturing and lighting as well. Without correct scaling, things and lights and parameters for anything will not be coherent with each other.

I use cm as my system units and display units. You can use mm or inches or meters- anything you prefer. As I tried to explain above, the main point is to have all the elements, textures, lights within correct proportions to each other.

MODELLING

Everything in the scene except the floor is created with basic poly modeling tools : connect, extrude, chamfer, move, weld etc.
Here are some screenshots:


Floor:
Floor is modeled through The Floor Generator. (link: https://www.cg-source.com/floorgenerator.php ), the great free plug-in from CG-Source. You can download it from CGSource site and there is a nice video tutorial there about how to use. It is really very clear and easy to use.

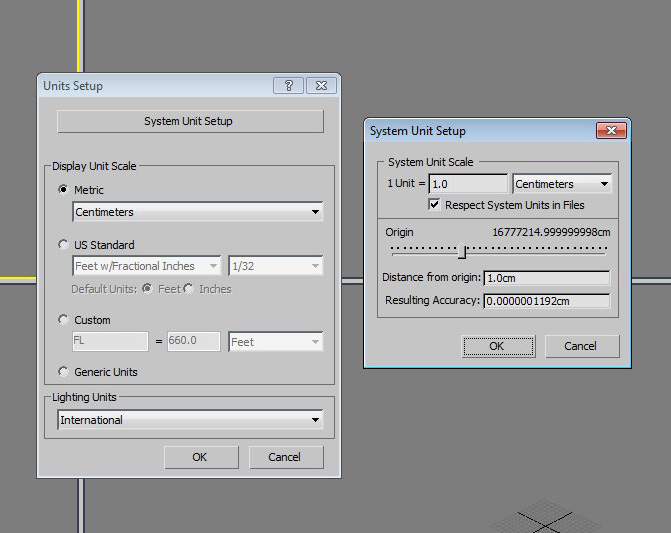
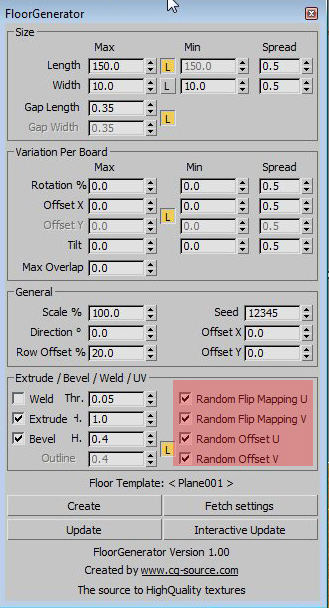
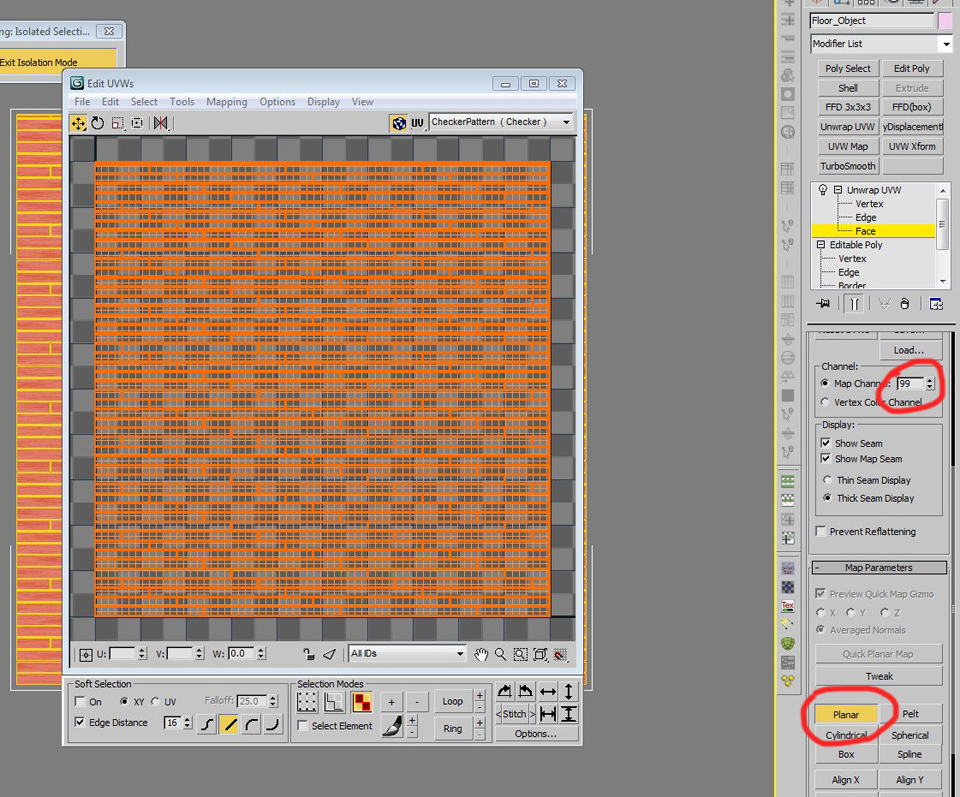
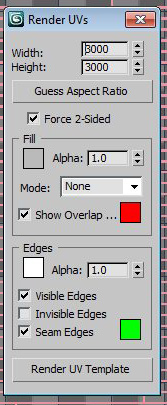
It is very essential to have the red-painted parameters checked as I will use this floor object with a MultiTexture Map again from CGSource which I will discuss in the next section.

TEXTURING / SHADERS

Floor Texturing and Shader : I used MultiTexture Map which enables to load different bitmap textures in diffuse map slot and assigns these textures randomly on the FloorObject elements. This is very easy as the FloorGenerator scrips makes unique material ID or object ID to all the elements automatically, if you check the parameters as I showed above.

To create the dirty footsteps on floor, first I unwrapped the FloorObject in the Map Channel 99. The reason I used 99th channel is that MultiTexture uses some of the channels for the different bitmap textures and just to be safe I used the last channel. Then I selected all faces and applied planar mapping.


Then, from tools menu, I selected "Render UV Template" This is for rendering the UV layout so I can paint a mask texture for the footsteps. I have the habit of painting my textures in very large sizes, 3k, 4k, 6k and down-sizing according to the usage on the scene. By this way, it is always possible to make close-ups for free and I never have to worry about high resolution renders. But keep in mind that, larger textures are very expensive in terms of RAM so keep the high resolution file in your hard drive and use the size that is needed specifically for that shot.


In the image above, you can see the rendered uw template. Now rest is simple to take your brush and paint! I painted a mask where I would like to have footsteps and dirt on floor.

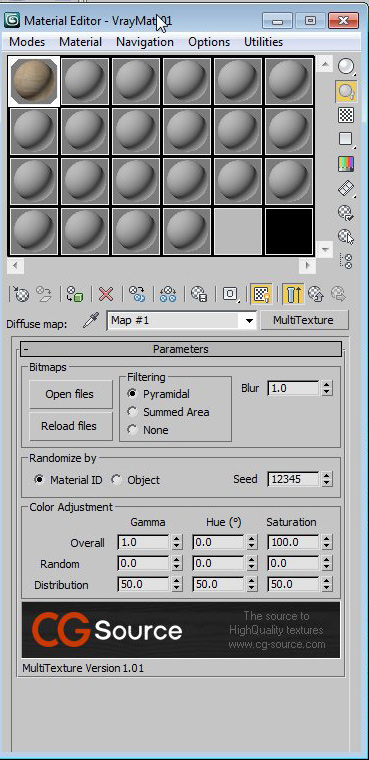
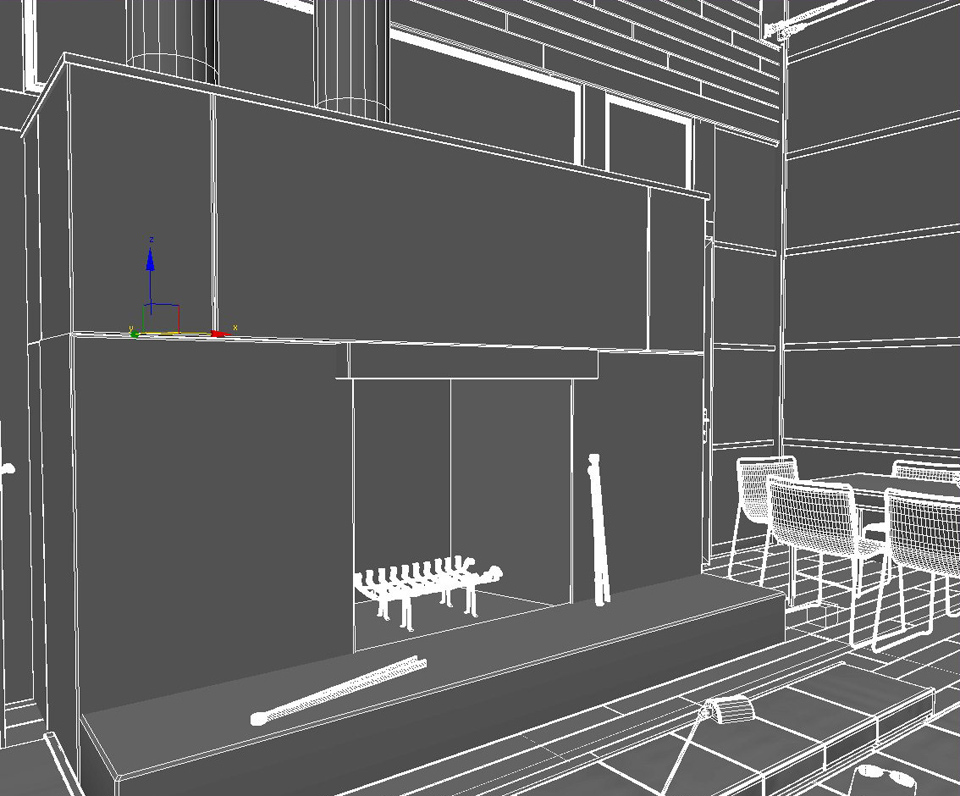
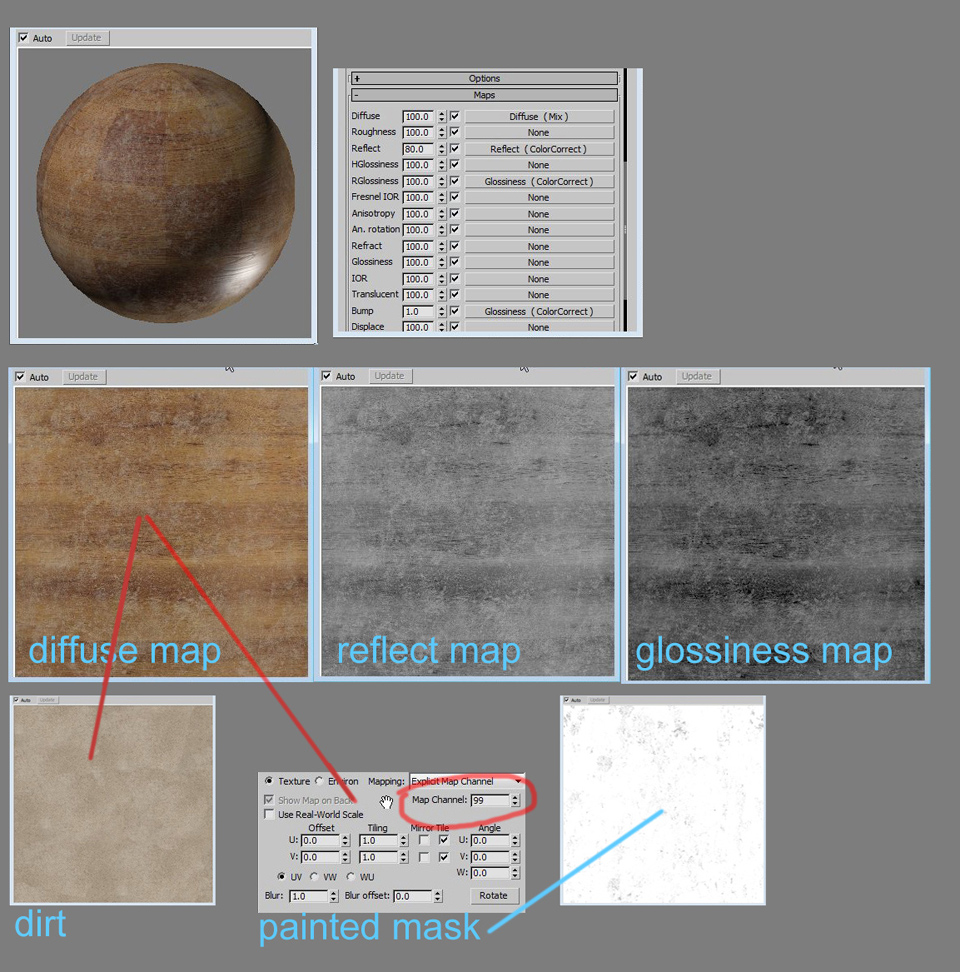
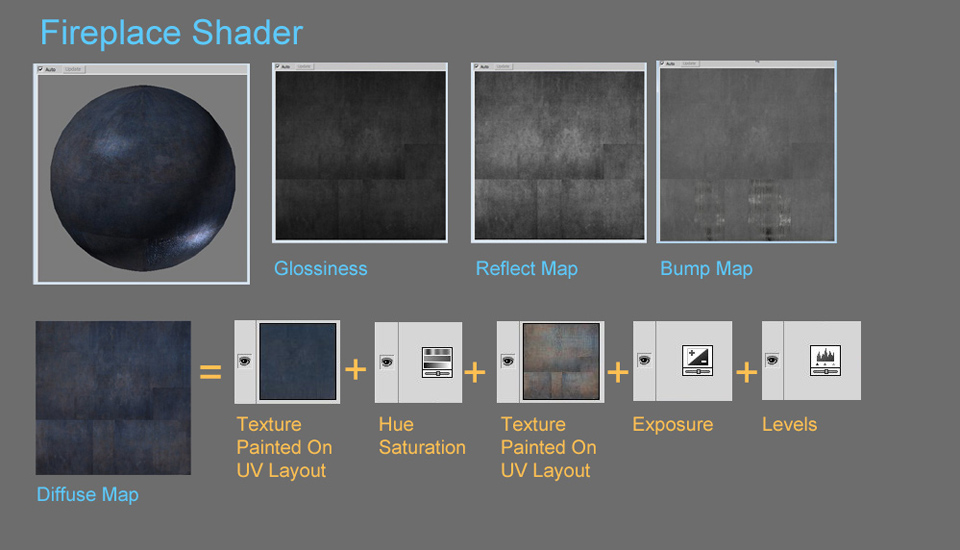
Next step was simple: creating a Mix Map of the MultiTextureMap (that we have already created) and a Dirt Texture map which are mixed with the painted mask. To create the reflect and glossiness maps out of the diffuse map, I used the ColorCorrect plug-in by Cuneyt Ozdas. Although this plugin has some incompatibility issues with 3dsMax 2011, I just can't stop using it as it is so handy to adjust textures very fast especially for the first tests. For the first previewing of the shader, I put ColorCorrect on top of my diffuse textures and make the necessary adjustments for the glossy and reflect and bump maps. I check to see if there are more hand paintings needed specifically for these textures. If not, I continue with this plugin. Sometimes I need to paint the Reflect, Glossy and the Bump Map separately in Photoshop- just as in fireplace shader but colorcorrect still gives me a nice preview about which way to go.

Fireplace Texturing and Shader :
In this shader, again instead of UVW projections, I unwrapped the geometry. After unwrapping and rendering out the UV template, I started painting the texture in Photoshop. Different from the floor texture, I needed to paint the Glossy and Bump and Reflect map separately to be able to have more control on the shader. By this way I was able to control the amount of glossiness, and reflections, type and intensity of bump at any surface of the fireplace. In the image below, you can see the diffuse map extracted and the reflect, bump and glossy map for this shader.

LIGHTING

Lighting scenario is very basic and common: a daylight scene. Again I used the VraySun and VraySky combination. I feel that I need to have a more dramatic lighting for this scene but I have started this scene some time ago and was able to work on it only on my free time. In between, I had to many projects for my clients and with very tight deadlines, I had very busy days which I couldn't touch the scene for weeks. After returning to the scene in my fee time, I found out that I feel distracted from this project and I don't want to work on it anymore but instead I want to move on to something different. However I also felt that the scene is not complete. In neither of my scenes, I ever feel I have completed the scene but always feel there is more to do and millions of things that needs to be improved and needs tweaking. It is like that tweaking can go on forever to reach the ultimate perfection I desire. At this point, maybe distraction is a lucky thing :) - to make us move forward to new projects. For a couple of days, I forced myself to work on it and change the things that I don't like and want to improve but it was useless and I felt bored so I decided to end the project.
Why I am telling all of this is that, I still believe it would be nice to have another lighting scenario and some day I may re-visit the scene and create a different light rig. Here is the VraySun and VraySky parameters which is created automatically in the environment slot when you create your VraySun parameters:


I used the Linear Workflow. Color Mapping is linear and these are the Max Preference Settings :

The dusk scene was a very fast, 1hour post work (and with mistakes) so I didn't render any dusk light rig in 3D.

RENDERING

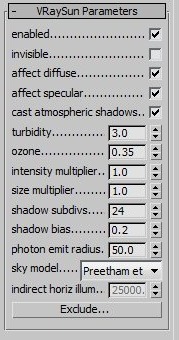
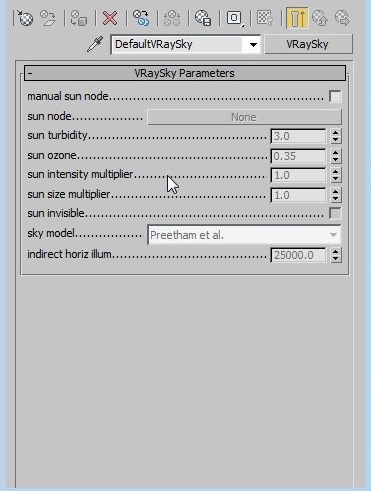
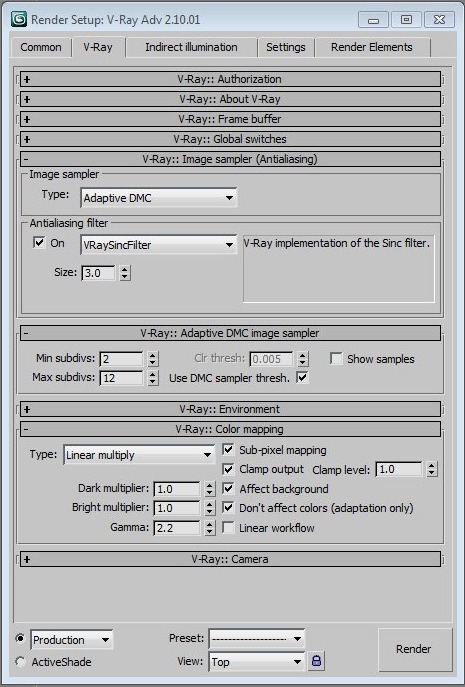
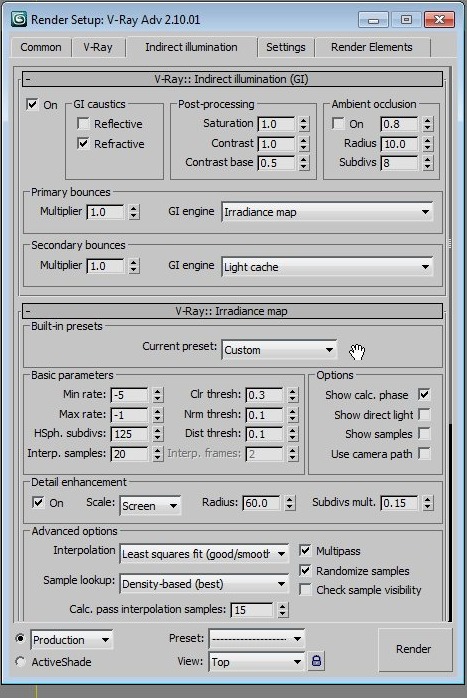
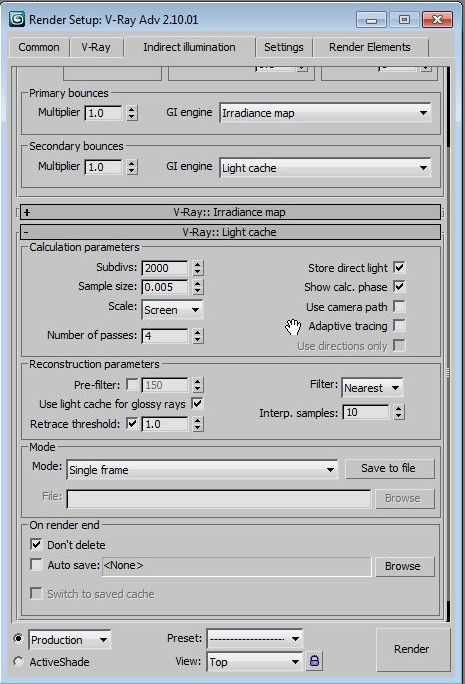
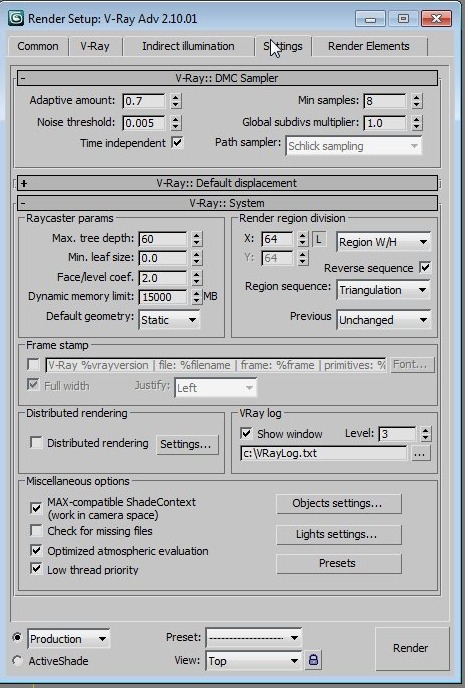
I rendered scene on Vray 2.10.01. and the settings are below. I render to VrayFrameBuffer and use the sRGB button. This is not a compulsory step for LWF. Instead you can disable "Don't Affect Colors-Adaptation Only" button and bake the Gamma Correction into your final render.

I would like to remind everyone that these render settings are specific to my scene and it can cause too high render times or some other different results in different scenes. Noise and Alias was two big issues for me during the scene. I derived these settings by testing a critical portion of my image until I can get acceptable noise-free results. Actually every setting behaves different in dark or bright scenes.


POST PRODUCTION

The day scene has little post production and it is basic curves+color balance+levels, hue-saturation and some specular bloom. I know this doesn't sound very informative but to tell the truth, this is how I make the re-touches. I don't follow any rule or any specified steps but just follow my eye and where it guides me. Below you can see the raw render and the the final version and the layers of effects applied.


The dusk scene is a very fast, 1hour conversion of the day image and it has some mistakes so I didn't include that process in the scope of this making of story not to mislead anyone. If anyone is curious about this procedure, all I can say that it is hand painting with layers on top of the day render and the fire is a montage of a bitmap image.

CONCLUSION

So this was the basics of my workflow. I hope I was able to make a helpful tutorial and answer the questions that have been asked on the forums. Last but not the least, I would like to thank all the CG community and friends for encouraging me, commenting on my work and showing my mistakes. Thanks to all of you for inspiring me.
Cheers
Pixela
https://pixela-3d.com/blog/scenes-in-depth/bronte

https://www.evermotion.org/vbulletin/showthread.php?t=88384
Author: Alfa Smyrna
Tags:
You may also like...
15th Anniversary Scene for Blender

15th Anniversary Scene for Blender

Complete scene with biomes and asset pack!
×

LEAVE A COMMENT

You need to be logged in to leave a comment. Don't have account? Register now.

nycoom 22:29:57  |  06-10-2011
awesome tutorial. thx ! the floor is amazing.
mirame 12:26:58  |  07-10-2011
thank you very much for share! I`m fun of your works. Can u tell us more about the camera settings and the resolution of the image , wich is related to the vray settings parameter? thanks again for the Making of and for your great Blog!
saeedmagic 21:46:57  |  07-10-2011
hi pixela very good tutorial can u tell me about fire? how you make it? saeedamiiri@gmail.com
dongmx2008 04:08:02  |  21-12-2011
牛 人
darknes26 13:44:06  |  19-03-2013
Pleas send picture,settings Vray camera