Topology Study : How To Model Ski Googles in Blender
Using Blender modeling tools for creating realistic ski googles.


In accordance with the art. 13 section 1 and 2 of the European Parliament and Council Regulation 2016/679 of the 27th April, 2016 on the protection of natural persons, with regard to the processing of personal data and on the free movement of such data, and repealing Directive 95/46/EC (General Data Protection Regulation), hereafter RODO, I hereby inform that:
1. EVERMOTION S.C., 8 Przędzalniana Str., 15-688 Białystok, Poland is the Administrator of your Personal Data (APD)
2. Data Protection Inspector can be reached through e-mail: iod@evermotion.org
3. Your personal data are to be processed on the basis of art. 6 section 1 letter a, b and f of RODO in order to:
a) prepare, conclude and execute the agreement and for other purposes approved by you,
b) to execute the legitimate interest like marketing of products and the agreement, claim assertion or defence against claims resulting from the law regulations.
4. Entities entitled to the reception of your personal data may be the authorised public bodies; mail providers; providers of the services covered by the agreement; responsible for debt recovery, keeping the archives, document utilization, legal consulting, technical services, IT services and accountancy.
5. Your personal data shall not be transferred to the third country, nor to the international bodies.
6. Your personal data shall be processed within the period of the agreement and upon your additional consent until you withdraw it. APD shall keep the data for the period of any civil law claim execution connected with the agreement.
7. You have the right to demand an access to your personal data, to correct or to delete the data if there is no other basis for the processing or any other purpose of such processing or to limit the processing of the data, to transfer the data to another administrator and to raise objections to the further data processing if there is no legal basis for further processing and to withdraw any previous consent.
8. You provide the personal data voluntarily, however they are necessary to conclude the agreement. The refusal of providing such data may result in the refusal of the agreement conclusion.
9. You have the right to lodge a complaint to the Personal Data Protection Office when in your opinion the data processing violates the regulations of General Data Protection Regulation of the 27 April, 2016 (RODO).
10. Your data will be automatically processed, including the form of profiling.
11. You are obligated to forward above mentioned information to your representative, especially if you appointed this person in the agreement as the contact person or as the representative for the agreement execution.
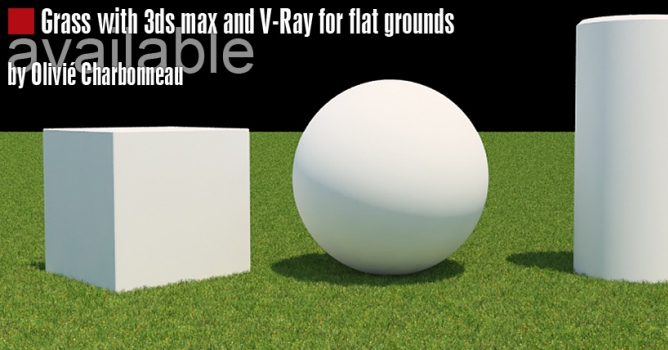

 A lot of tutorials out there are talking about how to make grass with 3ds max and V-Ray. Some are very poor and some are absolutely crazy good (see link) with everything in between. There are different techniques to create realistic grass including using displacement modifier / map, modeling and instancing, using V-Ray proxies, etc... The deal here is to create grass on a flat ground, which is good looking (and visually not repetitive), and not too heavy in the viewport / renderer. All this with the minimum effort :) I tried a few techniques and figured out that for me (so maybe for you) the most efficient way is using Vray proxies. It's a very powerful feature of V-Ray (Mental Ray have it too): it's very memory (RAM) efficient and render time (CPU) efficient, which are major advantages when creating CG grass. Plus it's light in the viewport. So here is my simple and (in my sense) efficient work-flow:
First of all you have to model or buy a square of grass. I have personally chosen 'Puzzle 12 AM63' from Evermotion (see puzzel 12 AM63) which for 15€ is a good time saver and delivers good results.
You have to prepare this square of grass into a V-Ray proxy. Check the size, material, pivot point and whatever of your square of grass, because it will be the foundation of all the next steps. I re-sized the square of grass for it to be 1 meter by 1 meter. I centered the pivot point at the basis of the grass and then placed the grass in the middle of the scene (coordinates 0,0,0). Now you can fine tune and test your grass material. Then to create a V-Ray proxy (.vrmesh file) you select your object and right-click and then 'V-Ray mesh export'. No specific export option required here.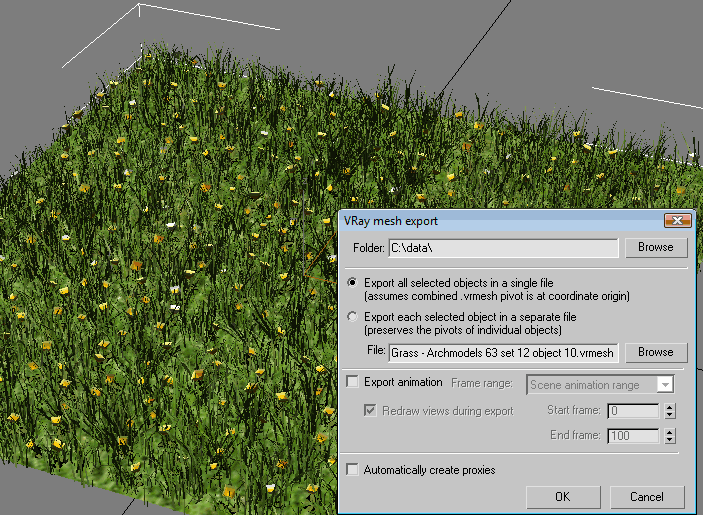
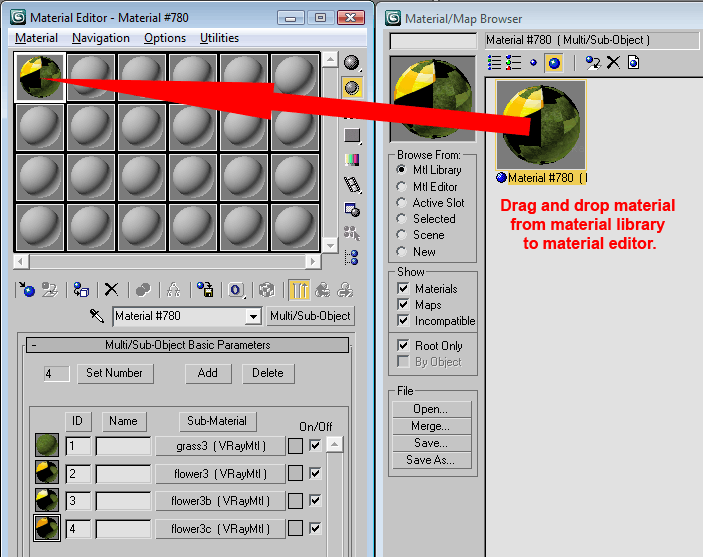
Reset 3ds max to have a fresh scene. To import your V-Ray proxy (.vrmesh file) go to 'Create' then 'Geometry' then 'VRay' then 'VRayProxy' then 'Browse' then find your .vrmesh file. Your grass model will be imported as a proxy into your scene. At this point you need to change the display option of your proxy into 'Bounding box' because it will be instanced hundred times and will kill your computer if you leave the default 'Preview from file' display option. You have imported the mesh but not it's material so you have to import the material separately. To do so, go to the Material Editor and then 'Get material' and then 'Mtl library' and then 'Open' and then choose 'File type = .max' and then find your .max file (the one with the grass model and it's material ; the one of the step 2). Drag and drop the material from the Material/Map Browser into an available spot in the Material Editor. Then apply this material to the V-Ray proxy in the scene. Now you have your grass proxy with it's material assigned, ready to be instanced in order to create a field of grass.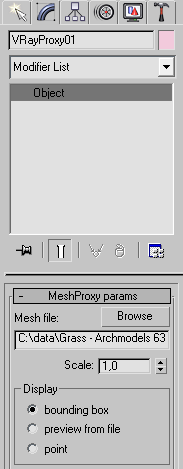
Now you just need to use the Array tool of 3ds max to multiply your square of grass to create a field of grass. Using the 'Top' view is recommended for this step. Here are my settings for the Array tool : X = 99cm. Type = Instance (very important!). Count 1D = 60. Dimensions = check '2D'. Count 2D = 60. Incremental row offset : Y = 99cm. You can preview your array ; you can also undo and retry if needed. Basically the aim here is to obtain a 60x60 repetition of your original square of grass. I used a distance of 99cm instead of 100cm so that the squares slightly overlap on their edges to have a better continuity between them.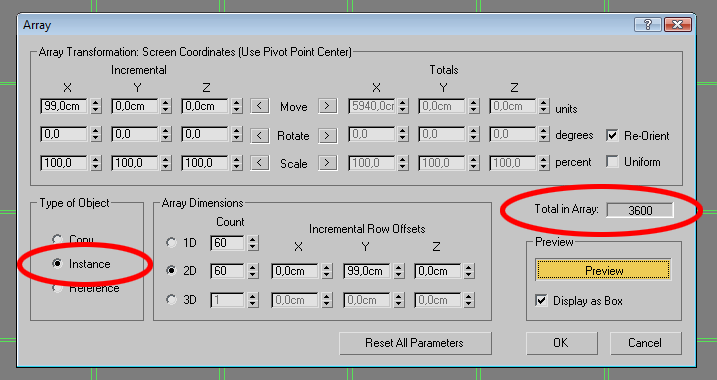
 [adv]reklama[/adv]
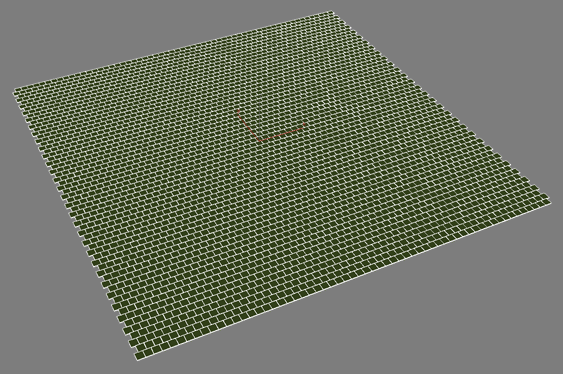
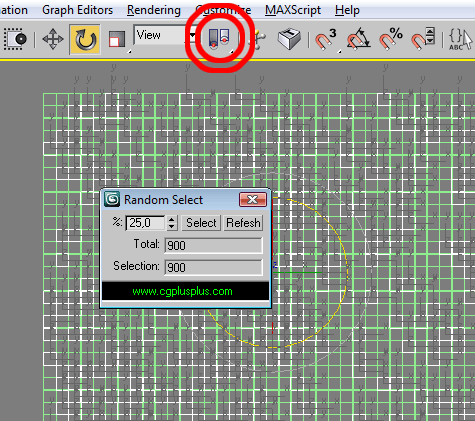
In order to avoid visual repetition of your repeated grass squares you have to rotate them randomly, by increments of 90°. I used the 'Random Select' MaxScript for this. Free download here : https://www.cgplusplus.com/maxscript-en/random-select.html To use the 'Random Select' MaxScript you just have to drag and drop the downloaded .mse file into your 3ds max viewport. The script will appear in a pop-up menu. For the following process I recommend to set the rotation snap to 45°, and you need to set the rotate tool on 'Use pivot point center' mode (very important!). Using the 'Top' view is recommended for the next steps. Now you are ready to create some chaos in your field of grass : Deselect all. Random Select script : % = 25 then hit 'Select', then with the 'Rotate' tool of 3ds max manually rotate these squares of 90° (or enter '90' in the proper transformation field at the bottom of the screen). Then hide this selection. Random Select script : % = 33 then hit 'Select' then with the 'Rotate' tool of 3ds max rotate these squares of 180°. Then hide this selection. Random Select script : % = 50 then hit 'Select' then with the 'Rotate' tool of 3ds max rotate these squares of 270°. Then unhide all. Now a quarter of the grass proxies are not turned (original orientation), a quarter are turned of 90°, a quarter are turned of 180°, and a quarter are turned of 270°. This is quite enough to break the visual repetition of the rendered grass. To add more variation into your grass squares you can select one line out of two and decay this selection of 50cm on the left or right. At this point you have a nice 60x60m field of grass. 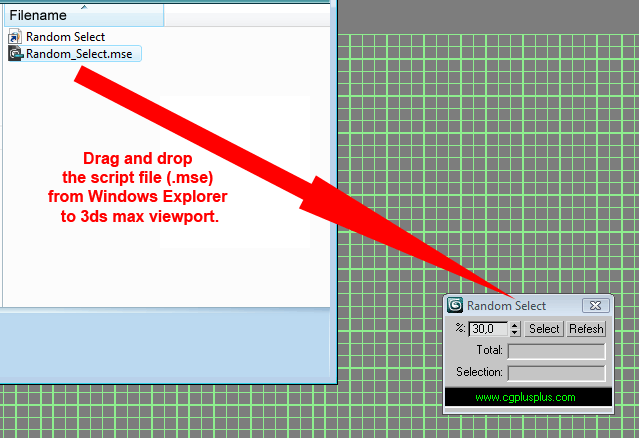

Select all and create a group. You now have a field of grass ready to be merged into any 3ds max scene / project.
Open the 3ds max project you want to add some grass in. Go to 'File' then 'Merge' and select the .max file containing your 60x60m field of grass. Import the grass group. It comes with it's material. You probably now have to rearrange the grass squares in order to fit your scene.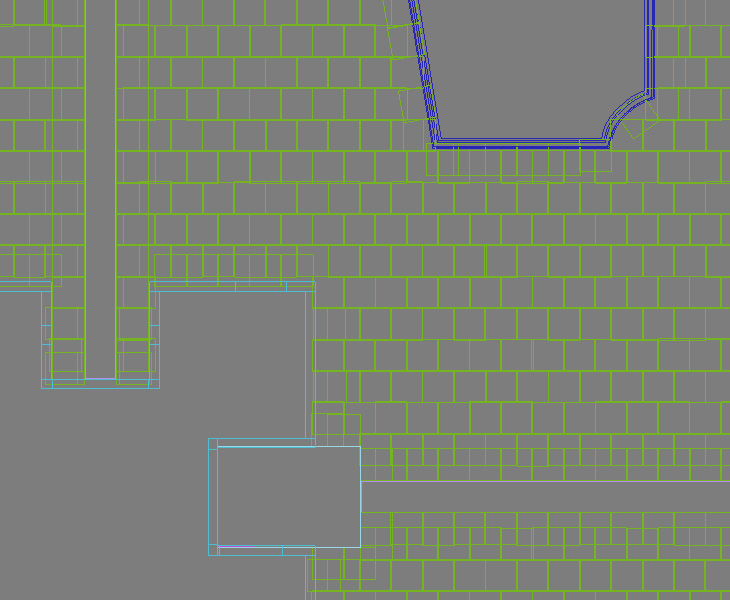 In this example I rearranged the grass to fit a swimming-pool, two walk-paths and a house. You can rotate and overlap grass squares, it's working nicely and this way you can shape your grass as you need. The only thing to avoid is having an empty spot between two squares of grass.
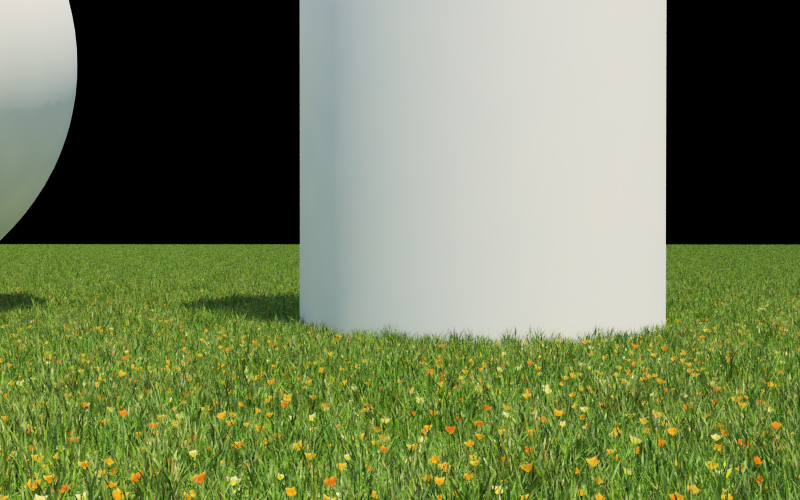
a) If you want to render the grass with Global Illumination it's much simpler to setup and much longer to render. In V-Ray you just have to enable GI, change the render settings as you please, and hit render! Lighting the grass with a VRaySun + VRaySky works good (see the renders on top of the page). b) If you want a fast render (without Global Illumination) you have to prepare a few things. Select the grass group, then right-click, then 'V-Ray properties', then uncheck 'Generate GI' and 'Receive GI'. This way you have GI enabled for the rest of your scene but not for the grass. In this case you may need an additional light to properly illuminate the grass. This light should be quite parallel to the camera and should 'Exclude' everything in the scene except the grass. If you have problems with the shadows in the grass creating dark / black areas (the self-shadows of the grass) you just have to disable the 'Cast shadow' for the grass group, in the 'Exclude' menu of your main light source (your VRaySun for example). Here we are! I hope you enjoyed this tutorial ;) https://olivoist-design.com


LEAVE A COMMENT


|

|

|

|

|


COMMENTS