Topology Study : How To Model Ski Googles in Blender
Using Blender modeling tools for creating realistic ski googles.


In accordance with the art. 13 section 1 and 2 of the European Parliament and Council Regulation 2016/679 of the 27th April, 2016 on the protection of natural persons, with regard to the processing of personal data and on the free movement of such data, and repealing Directive 95/46/EC (General Data Protection Regulation), hereafter RODO, I hereby inform that:
1. EVERMOTION S.C., 8 Przędzalniana Str., 15-688 Białystok, Poland is the Administrator of your Personal Data (APD)
2. Data Protection Inspector can be reached through e-mail: iod@evermotion.org
3. Your personal data are to be processed on the basis of art. 6 section 1 letter a, b and f of RODO in order to:
a) prepare, conclude and execute the agreement and for other purposes approved by you,
b) to execute the legitimate interest like marketing of products and the agreement, claim assertion or defence against claims resulting from the law regulations.
4. Entities entitled to the reception of your personal data may be the authorised public bodies; mail providers; providers of the services covered by the agreement; responsible for debt recovery, keeping the archives, document utilization, legal consulting, technical services, IT services and accountancy.
5. Your personal data shall not be transferred to the third country, nor to the international bodies.
6. Your personal data shall be processed within the period of the agreement and upon your additional consent until you withdraw it. APD shall keep the data for the period of any civil law claim execution connected with the agreement.
7. You have the right to demand an access to your personal data, to correct or to delete the data if there is no other basis for the processing or any other purpose of such processing or to limit the processing of the data, to transfer the data to another administrator and to raise objections to the further data processing if there is no legal basis for further processing and to withdraw any previous consent.
8. You provide the personal data voluntarily, however they are necessary to conclude the agreement. The refusal of providing such data may result in the refusal of the agreement conclusion.
9. You have the right to lodge a complaint to the Personal Data Protection Office when in your opinion the data processing violates the regulations of General Data Protection Regulation of the 27 April, 2016 (RODO).
10. Your data will be automatically processed, including the form of profiling.
11. You are obligated to forward above mentioned information to your representative, especially if you appointed this person in the agreement as the contact person or as the representative for the agreement execution.

Other people you may learn from prefer more or less passes etc. for more control or to save on excess files - so just keep in mind there are usually different ways to do things all with their own advantages and disadvantages (and don't blame me).
In this tutorial I'll be using examples from a couple of shots from our short film 'Diversion'. Directed by myself and Aidan Gibbons
Types of Passes
If you want very fine control in post over every element of the scene, you could render the the objects in tons of passes with a different one for every element in the render, ambient texture, different light passes, shadows, reflection, refraction, GI the list goes on.but generally thats not really necessary.
So if you like you may want to include lighting/shadows/specular/GI all in this one pass and maybe just add a couple of additional passes to this 'Beauty' pass.
For compositing with live action in 'Diversion', we generally used a standard set of passes on all shots, and then on some shots we needed some other specific passes to help out with mattes, masks and the like - which I'll try and mention a couple of later.
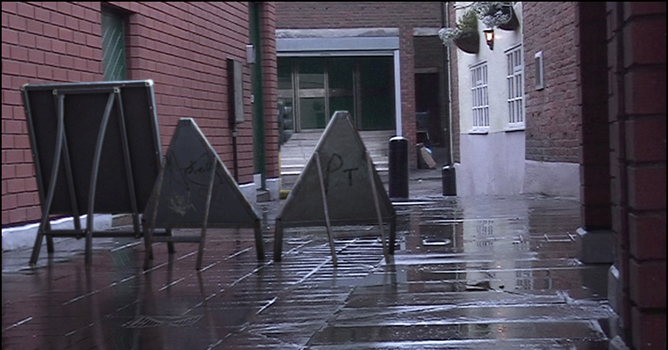
So here is an example from excitingly named 'Shot14′.
First of all, here is the background plate from the footage:

Don't think there's much to explain on that one.

This is the base for the cg elements in the shot, and it can vary a lot what is included in this pass.
Our standard beauty pass included shadows cast onto the objects but not shadows cast onto the plate (separate pass for them) but as there isn't any shadows in this shot, I won't go into why now.
When we light the diffuse pass, I find it helps to make it a bit brighter than you want in the final shot, especially to take into account the 'Ambiant Occlusion' (or 'Dirtmap') pass which adds the darker areas in this shot.

This pass is for specular only, and is layered over the top of the beauty pass with 'screen' (or you could 'add' (additive) it). Screen or Add basically remove all the black in the pass, leaving just the highlights (the specular in fact.)
This is the same for a Reflection pass, and if you want to render a light in a separate pass - as again you just want to hide all the black pixels values and keep the white values.

Whoops, I seem to have got a little ahead of myself there. Anyway this reflection pass, is on the plate, so instead of compositing it onto the last two passes, we can lay it straight onto the plate. Smashing.

Now you can't just slap the reflection onto the plate in this instance, because there are already reflections on the floor that would be occluded by the signs were actually there (they would block them).
So I found a good way to create a matte for where the reflections will be is to make a pass where the signs materials to a constant white material, and have that as the only thing reflecting in the scene.
N.B This needs to be inverted in post truthfully in the film I made the objects black, and rendered them on a white surface and a white environment - but now I realise that is way to overcomplicated as you can just invert it.
You can multiply this pass onto the plate before the main reflections to matte out those reflections you don't want.

Another note about the reflections I'm afraid. If you look at the plate, you can see the differences between the soaked floor, and the standing water/puddles, the puddles are sharp reflections while where the water has soaked in, the reflections are blurred.
So before those passes are rendered I painted a matte based on the plate - and used a camera projection to apply that texture onto the floor, to control the amount of blur for the reflection.
Hopefully that made sense.

This pass effects the CG elements as well as the plate (although often you may want to render 2 separate AO Passes), so to layer it onto both, before this we need to layer the CG passes we have so far, over the plate (including the reflections).
For this pass, we just want to keep the darker values, so to remove/hide the white, we will use 'Multiply'.


This should come earlier in the comp, I mainly use it to colour correct the diffuse pass before anything else is layered on top (so maybe earlier in this guide? But its a bit special so I thought I'd leave it till now). This is a very useful pass for making multiple matte's (masks) in one pass.
By giving certain objects materials that are either, 100% Red, 100% Blue or 100% Green we can extract just one of these channels (R, G, or B) in post as a matte to do colour correction on specific objects or whatever you please. As you can see by this gif below, which cycles through the RGB, then Red, then Green, then Blue channels.

If you're feeling fancy you can use the A channel too, currently the A channel will show the objects that are in the R,G,B channels (as they have an alpha of 1 / 100%), but if you assign everything else a black material with an alpha of 1, you could specifically assign some objects with a black material with alpha 0.
Hope that made sense, don't have any images for that at the moment.

If you want to watch the shot, and the film infact you can find it here: Diversion Film Website..
Hopefully I will write another part to this if its useful about the actually comping process, Multiplying/Adding/Over using ID mattes and so on.
I personally use the FxTree within XSI but Shake/Nuke/Combustion are all the same principles so it shouldn't be a problem.
If you see any mistakes or have any comments please email me or use the comments thing on here - Cheers.


LEAVE A COMMENT


|

|

|

|

|


COMMENTS