Topology Study : How To Model Ski Googles in Blender
Using Blender modeling tools for creating realistic ski googles.


In accordance with the art. 13 section 1 and 2 of the European Parliament and Council Regulation 2016/679 of the 27th April, 2016 on the protection of natural persons, with regard to the processing of personal data and on the free movement of such data, and repealing Directive 95/46/EC (General Data Protection Regulation), hereafter RODO, I hereby inform that:
1. EVERMOTION S.C., 8 Przędzalniana Str., 15-688 Białystok, Poland is the Administrator of your Personal Data (APD)
2. Data Protection Inspector can be reached through e-mail: iod@evermotion.org
3. Your personal data are to be processed on the basis of art. 6 section 1 letter a, b and f of RODO in order to:
a) prepare, conclude and execute the agreement and for other purposes approved by you,
b) to execute the legitimate interest like marketing of products and the agreement, claim assertion or defence against claims resulting from the law regulations.
4. Entities entitled to the reception of your personal data may be the authorised public bodies; mail providers; providers of the services covered by the agreement; responsible for debt recovery, keeping the archives, document utilization, legal consulting, technical services, IT services and accountancy.
5. Your personal data shall not be transferred to the third country, nor to the international bodies.
6. Your personal data shall be processed within the period of the agreement and upon your additional consent until you withdraw it. APD shall keep the data for the period of any civil law claim execution connected with the agreement.
7. You have the right to demand an access to your personal data, to correct or to delete the data if there is no other basis for the processing or any other purpose of such processing or to limit the processing of the data, to transfer the data to another administrator and to raise objections to the further data processing if there is no legal basis for further processing and to withdraw any previous consent.
8. You provide the personal data voluntarily, however they are necessary to conclude the agreement. The refusal of providing such data may result in the refusal of the agreement conclusion.
9. You have the right to lodge a complaint to the Personal Data Protection Office when in your opinion the data processing violates the regulations of General Data Protection Regulation of the 27 April, 2016 (RODO).
10. Your data will be automatically processed, including the form of profiling.
11. You are obligated to forward above mentioned information to your representative, especially if you appointed this person in the agreement as the contact person or as the representative for the agreement execution.
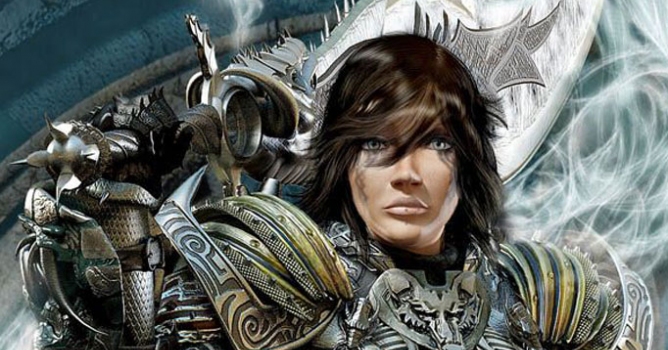


Warrior Project

I had in mind the idea of making a scene based on the fight between a warrior woman and a dragon, inspired in some role-playing games with a bit from both oriental and western design, so I worked on this idea holding tight to this concept.
Anyways as I progressed I started changing some parts and improving others as new ideas and I applied what I was just learning. I think its good to adapt oneself to changes and not clinging to an established idea. So I took pictures of a girl friend and based on the pictures I made some drafts, to adjust the idea of what I wanted to do.
I began with the girl's body, something I had never done before; a human figure of realistic proportions. So far I had read some tutorials about the best ways of constructing her, a basic study of edge loops and other concepts that helped a good deal.
Although at the end the body would totally covered by the armor, I thought it would be a good learning exercise from which I would benefit, as I can take advantage of the experience for future works and save time.

Hands and feet are of the most complicated parts one can stumble upon in my opinion. Because of the grid's complexity and the planning of polygon placement. As it would finally make easier the animation and just the fact of placing them in the most simple, efficient and accurate way.

The face was no doubt the most import part of the work, I focuses on modelling so that it didn't resulted in a typical stereotyped pretty girl most near to the fashion bridge than my project. So I decided she must have her own charm and character to fit the with the projects concept, and this is actually more personal than the result of a study.

The subject of character animation wasn't something really within my plans, as its something I haven't decided yet to learn, therefore the model hasn't be prepared for such process, as there are for example there are some triangles in the grid. I hope to start my next project with this in mind and make a setup for positioning and perhaps animation.
Once the body was finished, I started to model the armor pieces that would cover it, following the reference of some sketches I made, and in some parts just improvising and doing unexpected changes. As I made this in my free time between professional work, I had the time to think and made the adequate changes as I learned.
All the pieces and parts of the armor were modelled using the box modelling technique, starting with a plane and a basic shape, this way there wouldn't be hidden faces and there would less polygons and I would always reccur to the Shell as a solution.

I decided that it was important to avoid too much detail at the model itself, as my ideas was to make the volume and detail through textures done by hand with Photoshop because I am not using programs like Zbrush or Mudbox
So for this the process was the following, I created a map with unwrap above the armor part I intented to texture, I saved this map and in a new scene I applied as a texture over a plane, then over this plane I model the shapes that will be later used as bump or displace map. Using GI and painting the maps and its different channels (diffuse,reflection, bump,etc) with Photoshop.
As you can see, the textures I created are very simple, something anyone with some knowledge on V-ray could achieve. Basically it was materials composed of 2 or 3 layers and the basic parameters of reflection, glossiness, and the other channel materials.

By having simple pieces, the unwrap fitted perfectly. The most tedious of this process comes when one has to unwrap a complex and weaved grid, it can sometimes ruin a work that took long time to make. Sometimes its better to simplify the grid and take advantage of good maps to give the detail.

This is the final result of this piece, a simple metallic piece with an opaque tone, which was what I was really wanted for this part.

Here follows a sample of the mapping and texturing process for the warrior girl boots.

More parts of the armor along with the final result.

For the lighting of this project, I decided to use Hdri, which would help me to create a surrounding light around the character, with different tonalities and somehow positioning it.
Hdri mostly backs-up the armor when dealing with reflections as it offers tonal variety and an almost touchable environment.
My choice of using Hdri was very important, as it must affect the materials in the way I want. I configured my materials in relation to this Hdri. If I changed Hdri I would for sure also have to change the materials.

The lighting was also composed ot three additve lights, a main light that helps defining the frontal of the character and two backup lights that would give volume and shape to the armor. Thus giving more points of interest to the lighting.

Arriving at this point, problems started.
The character's grid wasn't the problem, as the number of polygons wasn't difficult for Vray to handle, but it was difficult to manage those displacements.
The solution I found was rendering piece after piece after converting to proxy each of the elements composing the armor, at the same time rendering regions, besides this I had to look for the lights and shadows so they were correct. It took me very long taking into account that the render was originally planned for 3636x2654.
Finally i had to assemble the puzzle in Photoshop.
After assembling the puzzle, I started drawing the dragon, that should look like an entity. I also added as background a symbol I had previously made in Max. Having completed all the scene's elements, I worked with the Wacom using the airbrush and eraser to achieve the effect I wanted on the dragon, to which I added cold tonalities to stress the entity appereance. At the beginning I thought that a fire effect would be more interesting, but after listening some suggestions I chose a cold tone, later adding blue lights so the whitish tone of the dragon wouldn't be opaqued by the black background.
Regarding the hair, as it was Max hair y had to render separately, but before that I turned it to grid and rendered also that way, then I made some retouches on the render, getting the result you can see.
Now having the final scene made, I tweaked the scene's levels, I worked on the contrast,thus getting the definitive image.
Now I know that many things can be improved, I have learned a lot along the process, and that is the more satisfying aspect of it, to see the traversed path.


Thanks to all my friends for their support in this project, all those persons that were always there when I needed it giving the tips and advise that made this image possible
cuatrod@gmail.com
www.cgside.net


LEAVE A COMMENT


|

|

|

|

|


COMMENTS