Evermotion Pass 10% Off - Get Instant Access to Thousands of 3D Assets

Check Plans

Information Clause

In accordance with the art. 13 section 1 and 2 of the European Parliament and Council Regulation 2016/679 of the 27th April, 2016 on the protection of natural persons, with regard to the processing of personal data and on the free movement of such data, and repealing Directive 95/46/EC (General Data Protection Regulation), hereafter RODO, I hereby inform that:

1. EVERMOTION S.C., 8 Przędzalniana Str., 15-688 Białystok, Poland is the Administrator of your Personal Data (APD)

2. Data Protection Inspector can be reached through e-mail: iod@evermotion.org

3. Your personal data are to be processed on the basis of art. 6 section 1 letter a, b and f of RODO in order to:
a) prepare, conclude and execute the agreement and for other purposes approved by you,
b) to execute the legitimate interest like marketing of products and the agreement, claim assertion or defence against claims resulting from the law regulations.

4. Entities entitled to the reception of your personal data may be the authorised public bodies; mail providers; providers of the services covered by the agreement; responsible for debt recovery, keeping the archives, document utilization, legal consulting, technical services, IT services and accountancy.

5. Your personal data shall not be transferred to the third country, nor to the international bodies.

6. Your personal data shall be processed within the period of the agreement and upon your additional consent until you withdraw it. APD shall keep the data for the period of any civil law claim execution connected with the agreement.

7. You have the right to demand an access to your personal data, to correct or to delete the data if there is no other basis for the processing or any other purpose of such processing or to limit the processing of the data, to transfer the data to another administrator and to raise objections to the further data processing if there is no legal basis for further processing and to withdraw any previous consent.

8. You provide the personal data voluntarily, however they are necessary to conclude the agreement. The refusal of providing such data may result in the refusal of the agreement conclusion.

9. You have the right to lodge a complaint to the Personal Data Protection Office when in your opinion the data processing violates the regulations of General Data Protection Regulation of the 27 April, 2016 (RODO).

10. Your data will be automatically processed, including the form of profiling.
11. You are obligated to forward above mentioned information to your representative, especially if you appointed this person in the agreement as the contact person or as the representative for the agreement execution.

OK

Tank modeling tips by Piotr 'Pionier' Kolus

Pionier 2006-10-13 00:00 tutorial  > 3ds MAX  > modeling

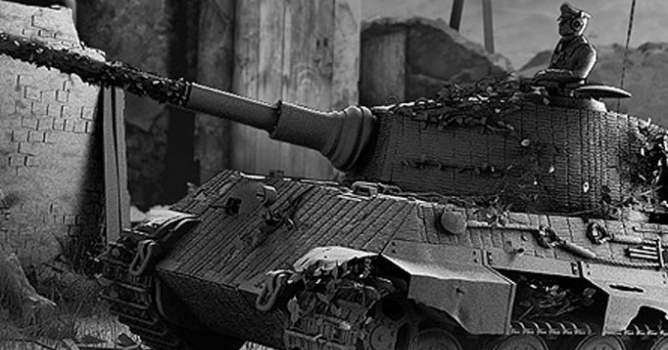
In this tutorial i would like to show you few technics that i use for tank modeling, i will show how you can make zimmerit, camouflage like net with leafs and bushes or destroyed mudguard. For this i used 3ds max 7 and plugin PolyBoost 2.2.


BARREL

Model of barrel I have made from simple objects like cylinder or box that was converted to Editable Poly, so I've been able to make proper shape.


Now we need to put 'plane object' above our barrel. Make segments of it like you want, after that convert it to Editable Poly and add Cloth modify.


Now go to "Objects properties" and set up there some parameters that we need, in this case for our barrel check "Collision objects", and for plane object check "Cloth", and after that select one of material presets. In "Simulation Parameters" set subsample at 5 so intersection of cloth and collision object will be checked 5 times per sample, this will make more accurate simulation.


Now convert our plane object to editable poly and go to vertex subobject edtion, now change selection typ to "paint selection region", and using it select and remove some vertexes form bottom of our net like at image below.


Now one more time select some vertexes from bottom and use "soft selection", add noise modifier so we will get some deformations.


Now its time for Polyboost. Select any edge of our object, and go to "Topology" and click icon "edgedirection".


Select all polygons and choose option "inset". After this delate new polygons, so we will get nice net :).

Leafs I are made in the same way like in previous tutorial about making of simple plant.Simple leaf was deployed on net using ParticleFlow. Leafs variations I get using 'vartiations' in 'shape instance' tab.


TOW LINE

Now create 4 circles like at image below, and after this attach it to one object. At the end using "boolean" get proper shape.


Add 'loft' modify, and all aptions set like at image below. This is effect:


ZIMMERIT

From choosen element of tank detach polygons that you want convert to zimmerit, and using tool 'cut' and 'connect' add some edges. Half of our polygons bevel, and manualy add some crush fracture.


DESTROYED MUDGUARD

Process of making mudguard show us animation below


After selecting appropriate edges I used tool 'CornerLoop' that comes with PolyBoost. CornerLoop - inserts a loop automatically builds quad corners when the loop turns. And after that I used Tesselate for selected polygons.

Hope that you understad everything and this tutorial was helpfull.

hooooah !

Piotr 'Pionier' Kolus


Author: Pionier
Tags:
You may also like...
Outdoor Lighting in 3D. Is there a magic formula?

Outdoor Lighting in 3D. Is there a magic formula?

Ever struggle to light exterior scenes in 3D? In this video, we'll have a look at a cinematic lighting framework, inspired by filmmaking techniques, to elevate your 3D art.
×

LEAVE A COMMENT

You need to be logged in to leave a comment. Don't have account? Register now.

vietanh2512 19:27:55  |  09-10-2012
wow
mo7sen1st 04:30:15  |  29-04-2013
Nice