Topology Study : How To Model Ski Googles in Blender
Using Blender modeling tools for creating realistic ski googles.


In accordance with the art. 13 section 1 and 2 of the European Parliament and Council Regulation 2016/679 of the 27th April, 2016 on the protection of natural persons, with regard to the processing of personal data and on the free movement of such data, and repealing Directive 95/46/EC (General Data Protection Regulation), hereafter RODO, I hereby inform that:
1. EVERMOTION S.C., 8 Przędzalniana Str., 15-688 Białystok, Poland is the Administrator of your Personal Data (APD)
2. Data Protection Inspector can be reached through e-mail: iod@evermotion.org
3. Your personal data are to be processed on the basis of art. 6 section 1 letter a, b and f of RODO in order to:
a) prepare, conclude and execute the agreement and for other purposes approved by you,
b) to execute the legitimate interest like marketing of products and the agreement, claim assertion or defence against claims resulting from the law regulations.
4. Entities entitled to the reception of your personal data may be the authorised public bodies; mail providers; providers of the services covered by the agreement; responsible for debt recovery, keeping the archives, document utilization, legal consulting, technical services, IT services and accountancy.
5. Your personal data shall not be transferred to the third country, nor to the international bodies.
6. Your personal data shall be processed within the period of the agreement and upon your additional consent until you withdraw it. APD shall keep the data for the period of any civil law claim execution connected with the agreement.
7. You have the right to demand an access to your personal data, to correct or to delete the data if there is no other basis for the processing or any other purpose of such processing or to limit the processing of the data, to transfer the data to another administrator and to raise objections to the further data processing if there is no legal basis for further processing and to withdraw any previous consent.
8. You provide the personal data voluntarily, however they are necessary to conclude the agreement. The refusal of providing such data may result in the refusal of the agreement conclusion.
9. You have the right to lodge a complaint to the Personal Data Protection Office when in your opinion the data processing violates the regulations of General Data Protection Regulation of the 27 April, 2016 (RODO).
10. Your data will be automatically processed, including the form of profiling.
11. You are obligated to forward above mentioned information to your representative, especially if you appointed this person in the agreement as the contact person or as the representative for the agreement execution.
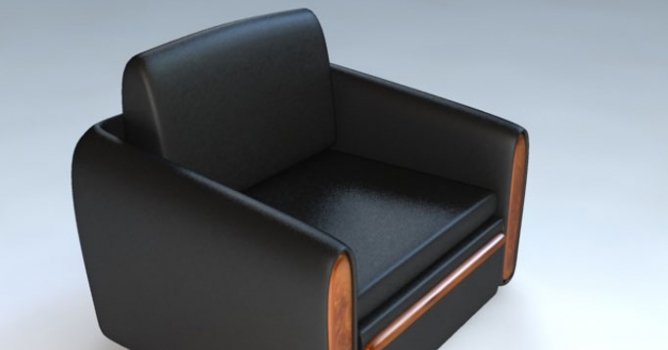

This arm-chair is only base, you can modify it in many ways.

 |
step1 - creating box In first step we should create a simpe box 90x80x10, and change it into Editable Poly. |
 |
step 2 - Extrude selected polygons Extrusion type - Group Extrusion Height - 15 |
 |
step 3 - Slice arm-chair Select face like in picture -> left click on viewport -> select quickslice |
 |
step 4 - Slice Slice selected face. |
 |
step 5 - Extrude selected polygons Select 3 polygons and extrude it. Extrusion type : Group Extrusion Height : 50 |
 |
step 6 - Move selected vertices Move 6 vertices like in picture. |
 |
step 7 - Slice arm-chair Slice arm-chair |
 |
step 8 - select vertices and scale mark 4 vertices and use uniform scale by by X axle. |
 |
step 9 - Bevel selected polygons Select 2 polygons like in picture and bevel it. Bevel type : Group Bevel Height : 0,0 Outline Amount : -0,3 |
 |
step 10 - Extrude selected polygons Select beveled polygons and extrude it. Extrusion type : Group Extrusion Height : -0,2 |
 |
step 11 - Bevel selected polygons Bevel polygons. Bevel type : Group Bevel Height : 0,0 Outline Amount : -0,4 |
 |
step 12 - Extrude selected polygons Select polygons and extrude it. Extrusion type : Group Extrusion Height : 2,2 |
 |
step 13 - Slice arm-chair Slice arm-chair like in picture. |
 |
step 14 - Slice arm-chair again. Slice arm-chair like in picture. |
 |
step 15 - create box Create box 80x80x20 inside arm-chair, and change it into Editable Poly. |
 |
step 16 - Select polygon and extrude. Select polygon and extrude it. Extrusion type : Group Extrusion Height : 4 |
 |
step 17 - Select one polygon and extrude. Select polygon and extrude it. Extrusion type : Group Extrusion Height : 10 |
 |
step 18 - Slice polygon twice. Slice polygon twice, like in picture. |
 |
step 19 - Select, bevel and extrude. Select polygon, bevel and extrude like in picture. Extrusion type : Group Extrusion Height : -0,5 |
 |
step 20 - Slice polygon again. Slice polygon twice, like in picture. |
 |
step 21 - slice again. Slice polygon twice again. |
 |
step 22 - select vertices and move. select vertices like in picture and move it down. |
 |
step 23 - select vertices and move. select vertices like in picture and move it. |
 |
step 24 - select vertices and move. select vertices like in picture and move it. |
 |
step 25 - Bevel selected polygons Bevel polygons. Bevel type : Group Bevel Height : 0,1 Outline Amount : -0,9 |
 |
step 26 - Select polygon and extrude. Select polygon and extrude it inside. |
 |
step 27 - creating box create a simpe box 80x80x10, and change it into Editable Poly. |
 |
step 28 - slice box slice box like in picture. |
 |
step 29 - creating box create another box 15x50x80, and change it into Editable Poly, rotate and move like in picture. |
 |
step 30 - select vertices and move. select vertices and move it by X axle. |
 |
step 31 - slice box. slice box. |
 |
step 32 - slice box. slice box again. |
 |
step 33 - select vertices and move. select vertices and move it by Y axle. |
 |
step 34 - Use Nurms Select Use NURMS Subdivision for all object. Render Iterations 3,0 |
 |
step 35 - Create plane. create plane 1700x1700. |
 |
step 36 - Create first material (V-ray) Create V-ray material (VRayMtl): Diffuse color - R 30 , G 30 , B 30 Reflect color - R 40 , G 40 , B 40 Glossines 0,6 *In BRDF menu select Blinn Put material on all object. |
 |
step 37 - Second material Diffuse material (wood material, standard Max material Burloak.jpg) Reflect color - R 60 , G 60 , B 60 Glossines 0,6 |
 |
step 38 - Environment map Create VRayMtl + diffuse map use VRayHDRI I use free Kitchen_cross.hdr Map type - Spherical environment |
 |
step 39 - Add to environment Open Environment and Effects menu by press 8. select Use map Environment Map select Kitchen_cross.hdr (select Instance) |
 |
step 40 - Add second material select polygon like in picture and add Wood material add UVW Mapping modifier and select Box Mapping. |
 |
step 41 - Add second material select polygon like in picture and add Wood material add UVW Mapping modifier and select Box Mapping. |
 |
step 42 - Plane material (white material) Create V-ray material (VRayMtl): Diffuse material - R 255 , G 255 , B 255 |
 |
step 43 - Renderer settings (V-ray) *Image sampler (AA) - Adaptive subdivision *Indirect Illumination (GI): first bouce - irradiance map (irradiance map prestets - Low) secondary bounces - Direct computation *Global switches disable - default light |
 |
step 44 - Render scene select perspective View and click render (F9 button) |
 |
step 45 - The End |


LEAVE A COMMENT


|

|

|

|

|


COMMENTS