Topology Study : How To Model Ski Googles in Blender
Using Blender modeling tools for creating realistic ski googles.


In accordance with the art. 13 section 1 and 2 of the European Parliament and Council Regulation 2016/679 of the 27th April, 2016 on the protection of natural persons, with regard to the processing of personal data and on the free movement of such data, and repealing Directive 95/46/EC (General Data Protection Regulation), hereafter RODO, I hereby inform that:
1. EVERMOTION S.C., 8 Przędzalniana Str., 15-688 Białystok, Poland is the Administrator of your Personal Data (APD)
2. Data Protection Inspector can be reached through e-mail: iod@evermotion.org
3. Your personal data are to be processed on the basis of art. 6 section 1 letter a, b and f of RODO in order to:
a) prepare, conclude and execute the agreement and for other purposes approved by you,
b) to execute the legitimate interest like marketing of products and the agreement, claim assertion or defence against claims resulting from the law regulations.
4. Entities entitled to the reception of your personal data may be the authorised public bodies; mail providers; providers of the services covered by the agreement; responsible for debt recovery, keeping the archives, document utilization, legal consulting, technical services, IT services and accountancy.
5. Your personal data shall not be transferred to the third country, nor to the international bodies.
6. Your personal data shall be processed within the period of the agreement and upon your additional consent until you withdraw it. APD shall keep the data for the period of any civil law claim execution connected with the agreement.
7. You have the right to demand an access to your personal data, to correct or to delete the data if there is no other basis for the processing or any other purpose of such processing or to limit the processing of the data, to transfer the data to another administrator and to raise objections to the further data processing if there is no legal basis for further processing and to withdraw any previous consent.
8. You provide the personal data voluntarily, however they are necessary to conclude the agreement. The refusal of providing such data may result in the refusal of the agreement conclusion.
9. You have the right to lodge a complaint to the Personal Data Protection Office when in your opinion the data processing violates the regulations of General Data Protection Regulation of the 27 April, 2016 (RODO).
10. Your data will be automatically processed, including the form of profiling.
11. You are obligated to forward above mentioned information to your representative, especially if you appointed this person in the agreement as the contact person or as the representative for the agreement execution.

Introduction
Hey there! My name is Jonathan Holmes. I’ve been a 3D artist since 2002. I work for Quixel, performing community management, product support, and helping run development and features for Quixel Suite. The people I work with at Quixel are insanely talented. These guys have an unbridled passion for creating texturing tools and scanning techniques. It’s a very humbling experience to be surrounded by people who are so purpose-driven that a large part of their life is dedicated to excellence.
My primary role at Quixel is support, which encompasses community management as well. I’m very active in the Quixel Tools Group - either posting personal work I do in my downtime or observing what others are up to as they work with the tools we develop. This entire project was done during my downtime. My personal passion has been in developing environments, but I work on vehicles too. In this breakdown, I’ll show a mix of both vehicular modeling/texturing and environment work.
I spent about a year working on this project. It’s meant to be a showcase to demonstrate the power of Quixel Megascans in real-time applications. Unreal was a natural choice for this so I developed everything using the engine. In order to get to the point where the Megascans asset library would be useable, I needed to develop the models that would be put into the environment.
Railroad Component Breakdown
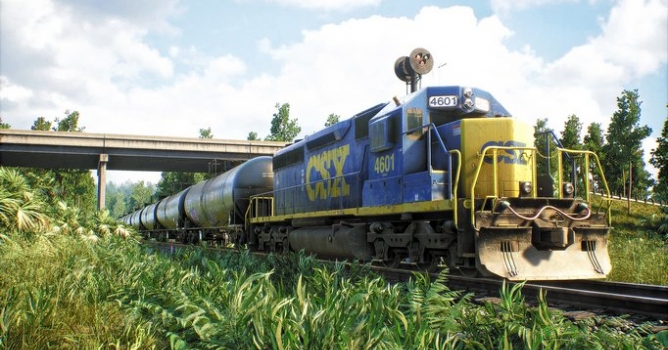
I started work on the EMD SD40-2 locomotive in 2011. It was a project I started after graduating college that I never finished - one of many projects I started and abandoned after finding something else to work on.\
You can click on images in this article to enlarge them.

One of the biggest challenges I face as an artist is staying focused. It’s very easy for me to find something to be distracted with - another model, reading the news, playing games, etc. I’m fighting that distraction even now as I write this breakdown - the endless lure of the Internet makes it very hard to focus sometimes!
The locomotive itself eventually got put together and textured using Quixel Suite 2 in early 2016 after being completely rebuilt. The original geometry from 2011 wasn’t entirely reference-accurate, so I made the decision to rebuild it to save time and get it right. If you’re interested in how I textured it, I wrote up two tutorials on ArtStation on how I used both NDO and DDO to develop the look you see here.


A similar process was used to develop the tank cars that the locomotive is coupled to in this scene, albeit with a bit less rust and wear considering the new state of these tankers compared to the 1970s-1980s era SD40-2. Both the locomotive and tankers use 8k and 4k materials.

The scatter meshes were textured in Quixel Suite 2 and quickly modeled in Max. I wanted to be modular with these because I didn’t see a point to making assets that I couldn’t reuse in several different areas. I started with a few meshes and added more to the mesh atlas in DDO via the reimporter as I developed new meshes for the scene, thus optimizing at least a small part of the environment work.
Foliage Breakdown
The pines and palmetto bushes were created by fellow Quixel artist Eoin O’Broin to my specifications. I provided reference images to him for the specific look I needed and he worked his wizardry in GrowFX to make it happen. The rest of the plants are all mine though - except for the textures, of course. That’s all Megascans - this is a showcase after all!

This is the basic foliage master material I developed for this scene. Every plant in this environment is basically an instance of this material. Most of it is parameterized so it can be adjusted per-instance. A lot of time was spent tweaking values until I was happy with how it looked in all of the different lighting scenarios that this environment presented. If you’d like to play around with it, I’ve included the material here. To use it, unzip the *.uasset file into your project folder and simply create a material instance of the material.
The shader uses the FuzzyShadingGrass node in Unreal. Sometimes it works well on certain assets, sometimes it doesn’t. I find it’s less useful on thinner assets like weeds or grass strips, so I used the parameters to disable it entirely for those specific instances.

Environmental Breakdown
The vast amount of work for this scene was the environment itself. It presented a unique challenge in a few ways. The first being how to develop the assets to get a specific look outside of the location where the assets were scanned, primarily the Nordic countries and Pakistan. Nordic foliage really isn’t seen in Florida, so getting the plants to look right was a careful choice of different textures based on “close enough” approximations to Florida plants.
Finding the right mix of dirts and sand with grass was also challenging. Working with Megascans meant that I avoided the procedural texture development workflow - I pushed that toward the end of the process by using procedural effects in Studio to blend together different dirts, rocks, and grasses to come up with terrain-specific textures for the environment. Working this way was a massive time-saver for me. It also improved the overall quality of the project because I spent less time developing textures that already exist in our Megascanned library and more time on the aesthetics of the foliage placement, terrain design, and overall scene composition.
The terrain itself is pretty basic. It was all hand-sculpted using the UE4 terrain editor and a relatively simple terrain shader with parameterized UV, specular, AO, normal, and roughness inputs.

I took a lot of time developing the look of the terrain. It was originally going to be a pine forest with the tracks cutting through it and a tunnel in the background. I changed that idea several times - each time I resculpted the terrain, I tended to end up with a field surrounding the tracks and a forest in the background, so that’s what I stuck with. The evolution from pine forest to field was an interesting journey and had its own unique advantages and drawbacks.
Sticking with a forest meant that I could have used trees to cover up more of the screen space. This would save a lot of development time at the cost of everything looking very similar. Going with a field meant that I needed to spend the time to imagine what would exist there instead of just having trees cover up the space - as I’m developing the terrain, I’m imagining the kind of structures that would need to exist in the field. Fences, poles, signs, plastic marker flags, etc. There’s a lot of stuff to add for authenticity’s sake.
The shader is really what makes the scene pop here. I had full control over almost all of its visual aspects because of the parameterized material. If at any time I needed to change even the most basic thing in my material, I was able to do it via the instanced material I applied to the landscape without needing to wait for the terrain shader to recompile. This alone saved me from a lot of annoyances and helped keep my focus on improving the end-result instead of being bogged down in waiting minutes each time I had a tweak to make.

Here’s what the terrain shader looks like zoomed out in the material editor. Pretty much everything here is parameterized, from the texture samples to the Constant parameters, 3 Vectors, etc. Keep in mind that what I did here isn’t exactly suggested for production on professional AAA games and may cause some experienced game artisans’ heads to explode - this shader, like all the shaders I developed for this project, was specifically created to work well with this project - in a team environment, you’d want something more standardized. If you’re doing personal work or showing off, this should be acceptable.
If you’d like to use my terrain shader in your project, you’re welcome to do so! It’s available from my website. To use it, unzip the *.uasset file into your project folder and simply create a material instance of the material. It uses RDA-packed textures for roughness, displacement, and ambient occlusion. Roughness being placed in the red channel, displacement in green, and AO in blue, with sRGB (Masks compression) set for the RDA-packed textures.
The albedo landscape textures use a highly clamped alpha derived from the albedo which provides a nice transition between materials.

It’s pretty easy to do this, too. I simply copied the albedo into the alpha channel in Photoshop and adjusted the levels until I got a result that would allow me to have a much more natural transition instead of the bland alpha fade that happens with no texture to break it up. If you’re using my terrain shader, plugging in an albedo with alpha will automatically give you a nice transition fade like this between materials:

Of course, a lot of this comes from simply taking the time to hand-paint the landscape. There’s a lot of techniques to do this and nothing I write here will really do it justice, so my best advice would be to experiment and learn what works best for you. Try all of the different brushes. Play with different tool strength settings to get a dry brush effect, or to slather on materials quickly. There’s really no substitute for curiosity and experimentation!
Another major part of the terrain is assigning the grass foliage to only show up where I’ve painted grass on the terrain. I’ve chosen the Megascanned grass texture because it was relatively unobtrusive, so it blends well into the grass cards that I’ve placed. The end result looks like this:

Having the grass material on the terrain helps “ground” the plants into the scene. It gives them a sense of belonging when you look at the image. Adding enough grass meshes to the scene is also vital if you’d like to push the realism of the scene. The unfortunate side-effect of this is that it will also push the limits of your system resources. My machine with 32 GB of RAM, i7-6700k, and GTX 970 runs very poorly (read: 4 FPS or so in the editor) after placing 556,000 grass meshes!
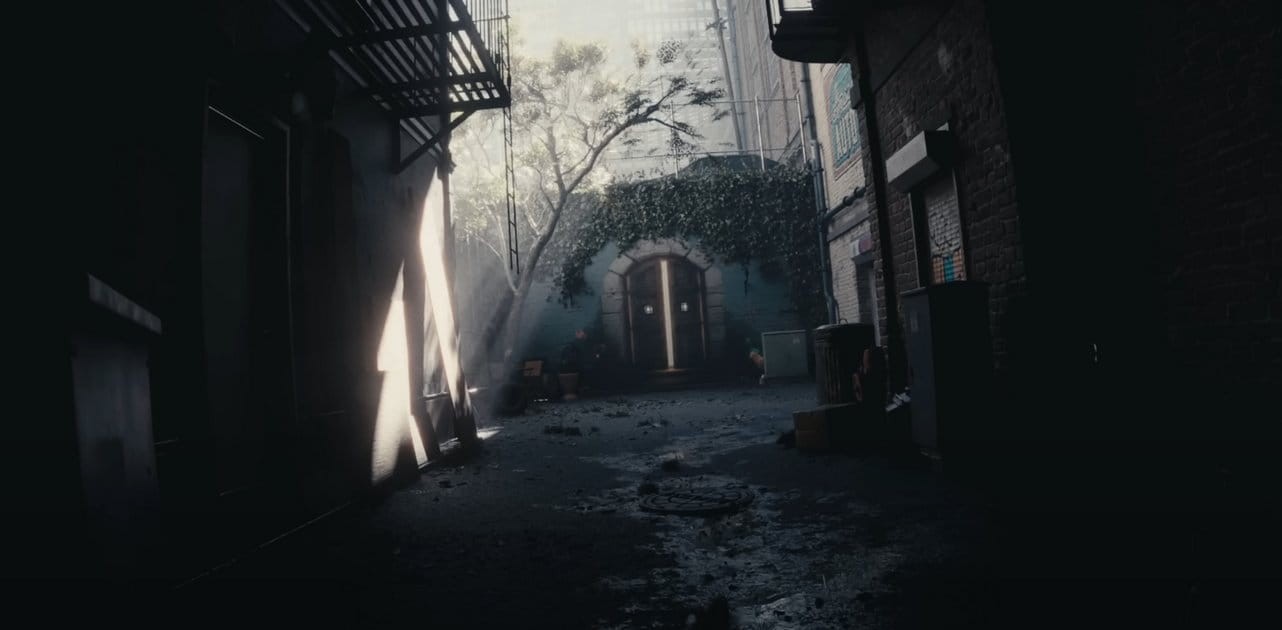
Another big aspect of the environment was the overpass above the railroad. This was also a combination of Megascans, specifically our concrete scans and an array of leaking decals and hand-painted graffiti. Here’s the graffiti sheet I painted for this project:

All of the train cars have at least some graffiti on them. The walls of the overpass are also covered in it. The graffiti lends a very realistic touch to the scene - places where people successively come to leave their mark will always show some signs of defacing. Rolling stock like the tankers are frequent targets of graffiti artists. To help get some authentic feeling to the graffiti (beyond just being a graffiti buff in general), I referenced the book Freight Train Graffiti which was an invaluable resource into the art form.
Lighting
I used a couple of techniques to pull this scene together. The primary light source is the Directional Light. You’ll get varying opinions about how to use it. I personally go with what works best for my scene - I’m not interested in rigid numbers. I used a value of 35 for this scene. I also used the skybox HDR file as the Ambient Cubemap on each camera, set to an intensity of 3. You can see the difference here:

Left is without the Ambient Cubemap. Right is with it enabled at 3.0 intensity. I used the same HDR as the sky because I wanted to ground the scene entirely within itself without introducing lights that wouldn’t exist in the scene. I know some artists like to add fill lights and other tricks to get around bad lighting. I’d rather work with what exists in my scene because I want my camera to capture what exists.

The difference can also be seen in Lighting Only mode.
The scene used a Skylight set to 3.5 intensity, but with the scene itself providing the lighting instead of the cubemap - so you’ve got the environment combining with the skybox to produce an acceptable result using the method I’ve demonstrated here. I hesitate to say “better result” because I’m sure someone can do way better than this!
Camera Work
The most critical part of this project was the camera work. Even the best modeling and texturing will fall flat without composition. Photographic basics really come into play here now that UE4 supports Cinematic Cameras. All of the CCs in this project used the Olympus Micro 4/3s System as their Filmback setting, meaning all images rendered by these cameras are using a 4:3 aspect ratio with a doubled crop factor.
This means that 17.5mm lenses in M4/3 are 35mm equivalent lenses, so if you’re shooting M4/3 in Unreal you’ll need to remember to double any focal length settings to get the 35mm full-frame equivalent. I shoot Olympus as an amateur photographer. I find it significantly easier to compose shots because the viewfinder in Unreal is exactly what I see in my E-M10II camera, so it feels very natural to me to work in the M4/3 format.

Here’s an example of some of my M4/3 photography. The smaller aspect ratio forces you to work more creatively to compose shots - I enjoy the limited field-of-view because I find myself trying harder to creatively work within its constraints.
The camera Filmback choice isn’t terribly important, but using a Cinematic Camera is. Given the choice between a standard camera and the Cinematic Camera, take the CC any time you can. It’s much easier to set up for shooting stills and the resulting captures are significantly more realistic because they’re based closer to physical values than the standard camera is. The new Tonemapper in 4.15 is also a huge boon for realism. Here’s the average camera setting I used:

Some shots required adjusting the Slope and Toe higher or lower depending on the amount of highlight and shadow I wanted in that particular shot. When I wanted more precise control, I’d switch to the Global color grading and adjust Contrast, Gamma, Gain, and Offset. A little bit of these controls goes a long way - it’s very easy to push something too far. Check against the reference you’re using before you commit to the values.
The same goes for Bloom. I like to slightly overexpose depending on the amount of darkness in the scene, so I tend to push the Bloom anywhere from 3 to 12. The bloom in the editor is a bit different than the high-res screenshot bloom - which is always smaller due to the nature of HRSS in Unreal. Setting the bloom up by about double usually compensates for the smaller bloom effect in the HRSS. It’ll look awful in the editor, but the final product is what we’re concerned with here.
A huge part of the post-processing on each camera is my custom LUT that I developed specifically for this scene. If I really wanted to go for the gusto, I could’ve adjusted it per shot and ended up with ~40 different LUTs to load per-camera. I think the one I developed is good enough, but my interest is definitely piqued in using LUTs per-camera in the future to enhance each shot further. I’ve attached the LUT I used here - maybe you’ll find it useful! The LUTs are a very useful tool in enhancing the final image by altering the look of the colors in the scene. Using Photoshop to adjust a screenshot of the project is trivial and adds so much to the final result.
Progression
I actually saved the progression on the scene. Here’s how it looked from beginning to end, chronologically sorted.


And of course, the finished results!

Closing Up
I feel like this project made a lot of progression over the year I worked on it. It was an awesome, frustrating, annoying, interesting, fun, and educational experience. I hated it intensely at times and loved it dearly when things started falling into place like I imagined. There was a lot of balance between family life and work. I don’t just work for Quixel, I also work for a local simulation company in Orlando, so I regularly work 60 hour work weeks on top of family life. Finding the time to tackle a project this big was a gargantuan task. I devoted three to five hours a night working on it. If I can do this, so can you!
If you’re a newer artist reading this, don’t feel overwhelmed. I used to despair reading blogs written by other artists when I compared myself to them. The worst thing I ever did was compare myself on an average day to another artist on their best day. It’s kind of like reading Facebook statuses from people you’re acquainted with - many people only post the most fantastic things that ever happen to them. They rarely post the usual drama of life. This goes for artists, too. Focus on improving yourself and you’ll get better with time. It’s guaranteed!
I hope you found this useful! If you’d like to see the final project, it’s on ArtStation. Thanks for reading!


LEAVE A COMMENT


|

|

|

|

|


COMMENTS