Create Dirty Windows - material tutorial
New tutorial by RenderRam.


In accordance with the art. 13 section 1 and 2 of the European Parliament and Council Regulation 2016/679 of the 27th April, 2016 on the protection of natural persons, with regard to the processing of personal data and on the free movement of such data, and repealing Directive 95/46/EC (General Data Protection Regulation), hereafter RODO, I hereby inform that:
1. EVERMOTION S.C., 8 Przędzalniana Str., 15-688 Białystok, Poland is the Administrator of your Personal Data (APD)
2. Data Protection Inspector can be reached through e-mail: iod@evermotion.org
3. Your personal data are to be processed on the basis of art. 6 section 1 letter a, b and f of RODO in order to:
a) prepare, conclude and execute the agreement and for other purposes approved by you,
b) to execute the legitimate interest like marketing of products and the agreement, claim assertion or defence against claims resulting from the law regulations.
4. Entities entitled to the reception of your personal data may be the authorised public bodies; mail providers; providers of the services covered by the agreement; responsible for debt recovery, keeping the archives, document utilization, legal consulting, technical services, IT services and accountancy.
5. Your personal data shall not be transferred to the third country, nor to the international bodies.
6. Your personal data shall be processed within the period of the agreement and upon your additional consent until you withdraw it. APD shall keep the data for the period of any civil law claim execution connected with the agreement.
7. You have the right to demand an access to your personal data, to correct or to delete the data if there is no other basis for the processing or any other purpose of such processing or to limit the processing of the data, to transfer the data to another administrator and to raise objections to the further data processing if there is no legal basis for further processing and to withdraw any previous consent.
8. You provide the personal data voluntarily, however they are necessary to conclude the agreement. The refusal of providing such data may result in the refusal of the agreement conclusion.
9. You have the right to lodge a complaint to the Personal Data Protection Office when in your opinion the data processing violates the regulations of General Data Protection Regulation of the 27 April, 2016 (RODO).
10. Your data will be automatically processed, including the form of profiling.
11. You are obligated to forward above mentioned information to your representative, especially if you appointed this person in the agreement as the contact person or as the representative for the agreement execution.
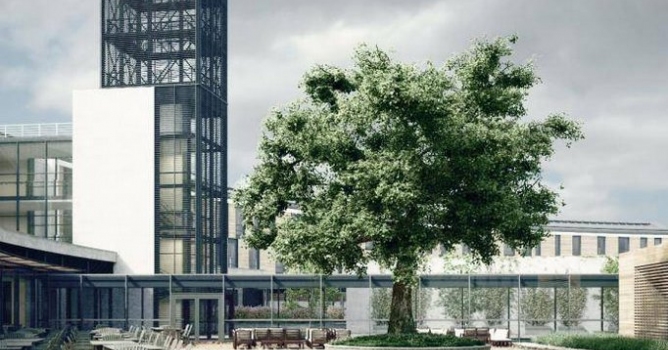

This presentation and the scene files were originally shown at State of Art Academy Ad#5. iToo promised attendees that they'd discover a new super-power: The ability to see parametric objects everywhere in the world around them. The company decided to release this now so that users who weren't able to attend can benefit.
iToo is a company that makes great arch-viz tools: ForestPack and Railclone. Both available in Evermotion Shop.

Using the example of the DoubleTree by Hilton Hotel - the venue for the conference - iToo explored the limitless applications of RailClone and Forest Pack. The presentation was structured around a number of questions you should ask before your start creating a parametric object. Via a wide range of examples, we explained how to analyse, model and create materials for a typical arch viz scene using scattered and rule-based parametric geometry. Along the way showcasing many of RailClone and Forest Pack’s features and illustrating how they can be used to compliment one another.
Here you can find the exercise files and the presentations itself. There's no sound in the videos in this presentation, but below you can read the notes that accompanied each slide.
There are 10 questions posed in this presentation. Click below to go to the notes for each associated video.
Presentation Notes
1 - What Type of Array Should I use?
If you reduce RailClone to its essence, it’s an array based modelling tool. Each array has a number of possible inputs and each array is suited to a different purpose. Consequently the first question you should ask yourself when tacking a new modelling challenge is "which is the best array to to model that?". In this video we’ll look at how RailClone’s two array types are used to model different parts of the hotel.
Let's start at the top, literally, with the roof. In this simplified version there are 4 segments: A start, an end, a main roof section and the ribs. I'll use these to illustrate a one dimensional array.
First of all each array type has a generator with a number of inputs. For the L1S generator we need a single spline (or a dimension) to set the length of the array.
Then we can add other elements like the start of the array ... and the end ... and then the default, which always fills in the spaces inbetween. Finally to add the ribs we can use the Evenly input which breaks up the array with regularly spaced segments.
The distance between evenly segments is adjusted using the Evenly Distance parameter which can be found in the properties panel when you have the generator selected. The beauty of RailClone is that once this is set up changing the path updates the whole array, including deforming segments to create curves. Unfortunately the roof on this hotel isn't quite as simple as that, it has a section above the main entrance with an offset between the front and back. This can be solved by splitting the source models for the roof into four segments, two for the front and two for the back. And then the back and front, each have a separate generator with two slightly different splines.
A2S Generator
In this example we'll create the wooden cladding on seen on the facade. Like the previous example, this array is driven by splines, but this time one for the X and one for the Y axis. So we'll add a single plank to the Default input to create the array. If you right click on a RailClone object you have the option to select its Base Splines, and as you can see adjusting this splines automatically updates the array. It's also possible to build arrays purely using dimensions. To do this don't attach splines to the generator. Instead use the X and Y Size values from the Properties panel.
You'll see that with no splines attached the array is built on the X/Y plane. To rotate it you can use the X Rotate parameter. The default segment tiles along the length of the array, when it reaches the end it will be sliced. This behaviour can be changed. In Scale mode for example, only one single default segment will be scaled to fit the length of the entire array. In Adaptive mode a new segment is added only when the length reaches a certain threshold, and then they are are scaled to ensure that only whole segments are used. In Count mode you specify a fixed number of segments to stretch along the array, again no slicing occurs in this mode.
Continuing with this facade we'll look at how to construct the windows. It's often helpful when slicing up a mesh for use with RailClone to thing of it as a stack of 1D arrays, in each case the height of the segments in a row should match if you don't want gaps to occur. Let's start by adding the Left hand side and Corners. You can see that there are a number of different elements of the array that can be targeted, making it great for creating objects like this. Next we'll add the Bottom, Glass and Top section. And finally by using the mirror operator we can reuse the segments in the left side slots to create the right side of the array and finish the style.
Once created, use the Y Spline to control the overall height... and add new spline segments to add windows of different lengths and orientations.
Using Multiple Generators
When I first started using RailClone I used to heroically try to fit everything into one generator. That's the instinct. But it's often much easier to create styles using multiple generators. This also often has the benefit of making them easier to paramaterise. Lets take the sun shade outside the entrance as an example. I've built this with 3 generators, but this allows me to easily adjust the height in case I need to change or re-use it later.
In the first generator I add the main supports to the Evenly input and also export the Evenly Distance so that it's easy to wire multiple generators together. I'm also going to export the support segment's X Size value so I can control the height. Now we have those properties set up, copy and paste the generator to save doing that work again. We'll use this generator to build the horizontal elements and export the Z Offset so that it sits on top of our supports.
Now copy the generator a third time and add the brackets for the glass to the evenly input and the glass to the default. I'm adjusting the padding at the beginning and end, we'll look at that in more detail later.
Finally if you look at this sun shade there are twice as many glass supports as there are posts. To create that I can add a sequence operator and alternate between a post segment and a segment that has no geometry selected, creating a "gap". Of course, now that this is set up. If you want to create a curved shade it's as easy as adjusting the base spline!
Combining A2S Generators
Now lets turn out attention to the tower in the middle of the hotel. In this example I'm going to use multiple generators to layer up detail. The segments for this are astonishingly easy to model. Starting with the structural elements, we use the Top/Bottom, Y Evenly, X Evenly and Corner inputs to create the main frame. Then duplicate the generator and detach the elements. Note that the X Evenly and Y Size values are wired together.
I'm using this generator to add the diagonal braces. Wire an empty segment to force a break at the corners and evenly segments. Because this generator is set to Scale mode, this will result in only one brace in each bay on the X axis.
On the Y axis we have to do something different. I need to scale the brace segment so that it matches the story spacing. Just export the segment's Y Evenly height and wire to the same numeric node used to control the Y Evenly distance.
Now I can clone the generator a 3rd time to add the outer mesh but I want to interrupt this for a second to talk about RailClone's new Bevel Corners function. In this example I'll add some quoins to the corner input. Notice that it's one input but with bevel on two segments are placed one either side of the corner and sliced. The spacing is controlled using BC offset. What happens if we add a compose operator and a window segment either side of the corner input, so there are 3 inputs? In that case the centre segment is slice, but the windows either side are displayed only once. In our tower example we want to do something similar, but the centre segment in this case will be empty to create a gap. So in the same way attach the segments, only this time we need to add a mirror operator to flip one side on the X axis. Next we can add the default segment to fill in between the corners and then add X evenly segments. Finally you can keep going like this - adding further generators driven by the same splines and parameters to add for example, a top, bottom and floor plates, including two sets of railing inside. Once this is done it's easy to assign new splines or create completely different shapes by drawing new splines.


LEAVE A COMMENT


|

|

|

|

|


COMMENTS