Create Dirty Windows - material tutorial
New tutorial by RenderRam.


In accordance with the art. 13 section 1 and 2 of the European Parliament and Council Regulation 2016/679 of the 27th April, 2016 on the protection of natural persons, with regard to the processing of personal data and on the free movement of such data, and repealing Directive 95/46/EC (General Data Protection Regulation), hereafter RODO, I hereby inform that:
1. EVERMOTION S.C., 8 Przędzalniana Str., 15-688 Białystok, Poland is the Administrator of your Personal Data (APD)
2. Data Protection Inspector can be reached through e-mail: iod@evermotion.org
3. Your personal data are to be processed on the basis of art. 6 section 1 letter a, b and f of RODO in order to:
a) prepare, conclude and execute the agreement and for other purposes approved by you,
b) to execute the legitimate interest like marketing of products and the agreement, claim assertion or defence against claims resulting from the law regulations.
4. Entities entitled to the reception of your personal data may be the authorised public bodies; mail providers; providers of the services covered by the agreement; responsible for debt recovery, keeping the archives, document utilization, legal consulting, technical services, IT services and accountancy.
5. Your personal data shall not be transferred to the third country, nor to the international bodies.
6. Your personal data shall be processed within the period of the agreement and upon your additional consent until you withdraw it. APD shall keep the data for the period of any civil law claim execution connected with the agreement.
7. You have the right to demand an access to your personal data, to correct or to delete the data if there is no other basis for the processing or any other purpose of such processing or to limit the processing of the data, to transfer the data to another administrator and to raise objections to the further data processing if there is no legal basis for further processing and to withdraw any previous consent.
8. You provide the personal data voluntarily, however they are necessary to conclude the agreement. The refusal of providing such data may result in the refusal of the agreement conclusion.
9. You have the right to lodge a complaint to the Personal Data Protection Office when in your opinion the data processing violates the regulations of General Data Protection Regulation of the 27 April, 2016 (RODO).
10. Your data will be automatically processed, including the form of profiling.
11. You are obligated to forward above mentioned information to your representative, especially if you appointed this person in the agreement as the contact person or as the representative for the agreement execution.
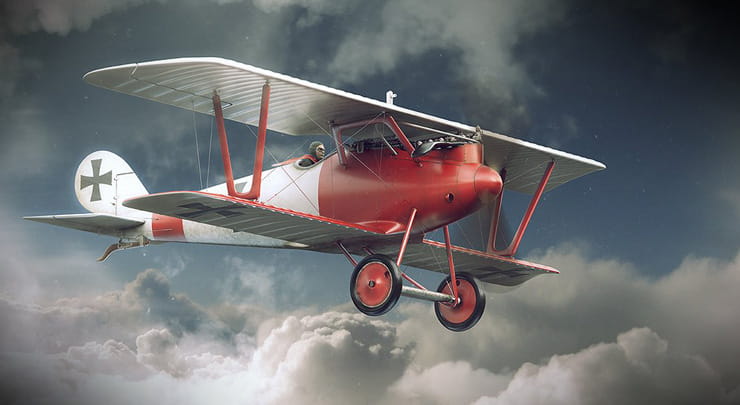

Hello to everybody! My name is Alexandr Novitskiy and I make models and visualizations. I’m also the instructor at the CGTarian Online School. Today we will talk about airplanes. I am a lover of the First Great Air War aviation, so the choice fell on the plane Pfalz DIII (DIII because of Mercedes DIII engine on board). To create the work I used the following software: Maya, 3ds Max, Unfold 3D, Mari, Vray 3.0 (with 3ds Max), Photoshop. In fact, software is not as important as understanding of the key stages of making this scene.
Idea
I think this is the most important step. Originally I wanted to show the airplane in conditions of war, show dirt and gloom on the ground in contrast to the vast of light and hope in the sky. Paint scheme belongs to a real Ace. Also I decided not to use the standard paint scheme so is not to depersonalize plane and give it a character. Initially, by the way, I was not planning to model it completely, but in the end, got carried away. Idea of knights of the sky is very inspiring. It was a time of honor and dignity. No parachutes. Only machine guns and trusty steed.
Modeling
This is the most time-consuming process, as the model was created in great detail. In fact the aircraft of the First Great Air War is very interesting theme. Photos with references are rare. Many airplanes of that time (every fifth or close to this figure) were assembled little bit different with changes in design. So the main task was not to find many photos with Pfalz DIII but to find a series of references with particular instance. Also I learned a lot of technical documentation, that's why I haven't stop on creating visible items only, and went further with whole engine, machine-guns and cockpit.
Click on image to enlarge
Then came the development of certain forms, the study of various parts and so on. In this work I had to devote enough time to details, as they play a significant role in the final result.
Important: create each new group of objects in a separate group that through formal logic can be easily understood and that is where. It’s really important and doesn’t matter in which software do you work – max or maya. Use layers, if it will help facilitate the work, but if we talk about the Maya, it is enough to be competent to sort the objects in the outliner. Do not hesitate to name every detail - the less unnamed objects in the scene you have, the better.
For example: if we called a wing «wing», we should call the child element «wing_element», etc. This is necessary to avoid confusion and do hundreds of groups. In one scene must be one logic in naming objects, otherwise we will have mess. Also with such a scene is always more comfortable to operate, more comfortable to texture in Mari, and in general, it’s simply more accurate.
Click on image to enlarge
Click on image to enlarge
Click on image to enlarge
Click on image to enlarge
Click on image to enlarge
Click on image to enlarge
Click on image to enlarge
Click on image to enlarge
Click on image to enlarge
Unwraping, texturing, materials
Since I had 4 groups (aircraft , cockpit , engine, machine guns + pilot who was made afterwards and is not considered), I decided to split the first and second uv’s on two squares, and to make one for the rest.
This is very important because the returning back to Mari to change the color of rust is not the best solution. The best is to draw good masks and deal with VrayBlend materials later.
Important: better to draw textures in higher resolution than they will eventually be on the scene. This allows to have a better control over various effects. I also place all textures in different layers, even if we are talking about two different types of dirt in Mari, which eventually end up baked as one texture.
Click on image to enlarge
Click on image to enlarge
Note: in the earlier version of the engine I used exclusively procedural method using VrayDirt and the result was somewhat different. For the final I decided to make it more realistic and less glamorous and re-drawned textures manually.
Click on image to enlarge
Click on image to enlarge
Click on image to enlarge
Click on image to enlarge
Click on image to enlarge
Click on image to enlarge
Click on image to enlarge
That's it. Actually, as I said in the beginning: there is basically not a big difference in using different software than I did. You can make a model in any 3d package, unwrap it in Unfold-3D or UV-Layout, etc. The same is true for the textures - you can make them with 3DCoat, Mudbox, DDO or with Photoshop. Software is just a tool.
If you want to learn 3D modeling as I do it, come to my online course. At CGTarian we have a lot of interesting courses: modeling, vfx, and animation with instructors from Disney and DreamWorks.


LEAVE A COMMENT


|

|

|

|

|


COMMENTS