For the beggining, messiah was a plugin only avalaible for Newtek's Lightwave users. There it developed and morphed. Now, PMG decided to release Standalone version and adjust the Messiah to cooperate with other applications like Maya, 3d studio max or Cinema4D. There's still no version for XSI avalaible.
We should start our adventure with this brilliant software by reading manual. It is very useful and precise source of information. Unfortunatelly, PMG doesn't provide with paper version. Thank to humorous attidute of authors manual is readable and easy. It's essential to note, that there are huge difficulties with Messiah tutorials on the web. There is only few of them and, on the god's sake, most of them are non-free.
After the installation application is about 90 megabites big. Together with documentation, we ought to install HASP driver as well. After that Messiah is ready to use.
After initiall running up Messiah takes about 90,000 kilobites in the ram memory, so not so huge amount. To compare, 3d studio max takes about 190,000 and softimage xsi 140,000 (data after loading of scenes). Hardware key “dongleâ€, provided by PMG, is crucial ro run Messiah. Dongle has two versions - USG and LPT (printer's interface). The interface reminds of Newtek's Lightwave. Users never used to Lightwave can be puzzled by it. In fact, the interface is inteligently sited. For newbies, the information about navigation in the scene can be very useful. We can use icons 'move', 'zoom' and 'rotate' (placed in the upper right corner of the screen) or key shortcuts. Alt+lmb/rmb(rotate);alt+ctrl+lmb/rmb(move);alt+shift+lmb(zoom). Interface is divided into nine parts:
File tab: There we load previously saved scenes and save them. All information about our scene: number of objects, etc. can be obtained here. We can mirror bones or clone.
Animate tab: I take for granted you will spend most of your time there, since here we create animations. It's just ingenious. Bezier curves can be perfectly controlled. Thank to Messiah I liked animation on curves.
Compose tab: Here we can choose from bunch of non-linear animation tools. In practice, we bake motion clips and then compose them in this tab.
Setup tab: Quick glance at some of the effects:
Bloat: By this, we can pump up our character. This tool moves points to its normals, so we can get effects of pumping or breath.
Bulge and Spherize: Those are two effects helpful for getting characters' mustle effects. One cannot help but be impressed by them.

Bone reform: Creating bone systems. One of best points of this application. Rigging never was faster! Thing, which hurted the most - skinning, here does not exist! And no one misses it. There are no maps of weight, bones has got their own, wireframe deforming, power. We create bones (in animate tab we check out how bones deform the wireframe). If in places, when power and area of bones end, the hideous deformation befalls in 3d studio max, XSI or Maya we ought to paint the weights. In Messiah, it's only a question of creating additional bones in those places. Simple and extremely fast method. (deformacje1.jpg, deformacje2.jpg). We have got a possibility to create mustle structures, basing on bones (seen as blue objects on the scene) as well. Bone system, in general, can seem to be odd and intricate or even obstacle for newbies. In fact, it's one of biggest revelations I've lately seen. We can correct deformations by Metaeffector.
AutoRig: It's ready bone system for characters, perfect for second plane objects.
Soft body dynamice: Creating effects of soft bodies: folds, soccer balls, clothes, etc.
Either, we have got useful tools in 'Tools'. For example, metaeffector calculates weights, for example, mark the range of bones influence or of the bloat effect. In tools we create sliders, forces, curves, clusters, null objects or primitives.
Armatury is a great solution, giving us ability to create own interface.We can create a button adequate to our favourite option or script. We can use Armatury to nagivage in our bones either, by creating an icon in the place of the bones and configure the left mouse button to rotate the bone on one axis and the right one on second axis.
Command tab: In this panel we oparate on expressions. Expressions are biggest advantages of messiah due to enormously huge abilities and simple interface. We can choose from about 300 expressions among which we have expressions responsible for:
- creating mustle structures
- creating IK
-looking AT target (for example, changes positions of cameras)
- constraints
- and loads of others
Edit tab: There we can operate on keyframes. Motion spline editing operations are included either.
Play Tab: Creating previews, setting up the screen and background, loading pictures and audio files.
Custiomize tab: There we can obtain application options..

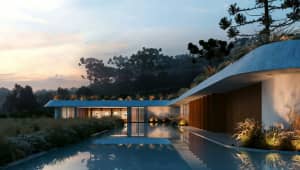
Render tab: Messiah is maliny an application dedicated to animate, though it has very goud rendering engine. Messiah renderer is based on the Photon Map and MonteCarlo sampler technologies, used in popular renderers such as Brazil, Vray, Final Render and others.
Engine is surprisingly simple and clear - options load only when used. There are not too many of them, but if we use them correctly we can reach the quality of best renderers. Furthermore, SSS technology is way better than in the other renderers.
Renderer has all newest improvements of Hi-end-realistic technology. Here comes the list of tools and their descriptions.
QUALITY:
Antialiasing – we can choose from: Adaptive Super-Sampling (used In all renderers) and Enchanced (improved Adaptive SS) and soft (very simple - Generated picture is blurred).
Depth of field - Interpolated (fast) and Sampled (precise) – DOF sampling (sampling of a geometry).
Motion Blur – Motion Blur sampling (sampling of geometry in time) is connected with camera settings.
Ray Depth - how "deep" the rays bounces will be samples - works, of course, only with reflect/refract materials.
ILUMINATION:
Light source - Direct traditional lighting brought about by ray tracing metod and Enviroment, implied by enviroment lightening such as for example exteriors and industrial renderings. Alt is third and last setting and uses all those light sources.
Gi type - Here we can use GI Photons (proton map) and MonteCarlo or both in so called hybird mode, which we suggest you to use. Photon map for basic lighting and monteCarlo for final GI
CAUSTICK:
Photon Map - standard caustick based on proton map technology (light source generates photons which reflect and refract in the scene)
Approximated - faster, less preciseful caustic effect - adviced for animation.
ATMOSPHERE:
Fog Density - volumetric effect caused by volumetric by volumetric lights.
Samples - numer of samples (direct illumination) in volume effect and counting algorithm.
Attenuation - Settings of effect fog.
Scattering - this option enables SSS effects. It is connected with Illumination and Atmosphere as well as with volumetric shaders.
Scattering Samples - Number of illumination samples for SSS effects. We set up precision of global illumation in SSS effect.
Eccentricity - used especcially for HG samples. (very advanced option).
OUTPUT: We can save our renders or animations as single frames for example tga sequences. We can either prepare parts of posproduction like z-depth or Alpha Channel. We can choose from loads of professional formats, and furthermore we can make our custom format. We can use scale and resize our renders in order to make our work easy, so we won-t be forced to change loads of camera settings.
Menager, another tool here adds numbers to frames - amount of numbers can be defined in 4 methods.
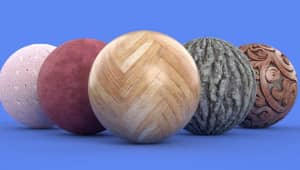
SHADERS AND SHADERS: We can both create shaders in the Render Tree (like in XSI) and Material Editor (3dsmax, though it seems to be lightwave-like more). A shader is shown straight away in Material Trays window, so we watch changes live. Choice is great, we can mix shaders up and connect them. Here every cook will make a delicious food simply and efficiently. To be frank with you - we found a complete amount of O (null, nicht, kein)bugs here. Applaus ladies and gentlemans! It's enought here to write a novel about shader cooking, but to put it briefly - we can simulate every single material available in nature! Without doubt, perfect 3S deserves the greatest attention. Shaders are rendered fast... and, sorry for an euphemism, they rule. Just look on it.
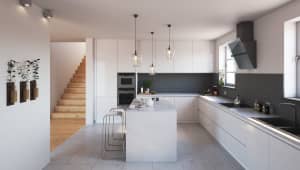
SURFACES: Here we can set up properties of rendered objects, the light and an enviroment - adding materials previously done by us, changing the parameters of objects, turning off and on parts of our scene (useful while using matte effects or generating previews of sequences of our work) - all of it can be done here. Rendering groups is a fresh and interesting solution - it something like layers, where each set is rendered together.
LIGHT: Available lights are: 'distant light', the light knows as direct light (for example, perfect for sun simulation), point light, spot light (light with changable focal length, sphere light and plane light. The two last lights generates area light effects and, of course, area shadow.
All of the shadows have intensity parameter - generall scale of brightness, difuse and spectacular - scale of brightness influencing each parts of material. Of course, we can select a color for each light. Falloff - traditionally, we change inverse squere and inverse squere normal. A bunch of cone settings is available here in spot lights.
Shadows - generated by a light can be of two types - the shadow map or the raytrayce (with geometric area lights, with using the ray trace brings about the area shadow effect, the effect of smooth lights.
Some new functions and facilities in mesiah:studio 2 Displacement - Better than bump maps! Displace lets you add dimensional detail to your models. (And you can set the detail level too!)
Improved Sub-Surface Scattering - Using the new BasicShader, you can create stunning sub-surface scattering effects, even with soft-shadowing backlights!
Faster Global Illumination - Renders up to 20 times faster on scenes that have multiple objects and that use any Global Illumination rendering.
Even FASTER Global Illumination - The new GI Noise Reduction feature gives an unbelievably significant increase in quality vs. time. This is a speed increase even over the speed increase mentioned above!
Reflection/Refraction Threshold - These two new settings can dramatically decrease render times when using reflection and/or refraction.
New Geometry Rendering Options - Choose from one of four ways for the renderer to interpret the geometry.
Vastly Improved TrueBump - More accurate and better looking.
Gradient Control - Fresnel Power can be used to flatten or exaggerate the gradient spread calculated by camera fresnel.
Lights Settings - Specularity and Diffuse settings per light and per surface.
Light Materials - Lights can use materials, just like a surface can. In essence you are "illuminating textures" on the object. (This is different than the spotlight projection maps.) So now you can texture lights!
Texture Map Control - Use Curves and Procedural weight tools to control the mapping of a texture map. You are no longer limited to standard Planar, Cylinder, Cubic, UV, etc. types.
Render Groups - This unique feature lets you group models and/or lights and control the rendering of the entire group at once. Apply materials to every item in a group-- with the ability to override those materials on a per-surface basis. Not only that, but you can bring lights into a Render Group and they will only affect the models within the group!
Object Selection By Surface - Automatically select objects or lights by selecting one of their surfaces in the Surfaces List.
Improved Motion Blur - Motion blur has been upgraded and also looks better with depth-of-field.
Improved Material/Shader Library - Easily store and retrieve shaders and materials (with previews). The Palette has been improved to allow for directories, so now it's easier to keep everything organized, either by types or by projects (or both, of course).
Streamlined Shader Flow - The Shader Flow system has been completely rewritten to be easier and significantly faster to work with. Improvements include easier copying/pasting, previews for each node (of any input or output), easier navigation, and much more.
Shader Node Previews - Every node can have a preview of any of its inputs or outputs. This makes it easy to see exactly how the final material is being built-up.
Weight Tool Integration - Curves and Procedurals can be used in texturing. Besides Texture Maps, weights can be used with WeightSpot.
Eye Shader - The DollsEyes shader will let you create almost any eye you want. (Except the eye in Team.)
New Noise Shader - The Noisette shader is great for things like lava and clouds. With two examples like that you can imagine how versatile this is! (This is the shader that was used for the Displacement image near the top of our Home page.)
ColorCorrection Shader - Adjust Hue, Saturation, Brightness, and Contrast for any input (such as texture maps). You can also Pinch, or "shift" the color toward a specific color.
Image Filters - The image filter system is in place. Image Filters are sort of like an overlay over the render.
Particle Rendering - Particles can be rendered as sprites or metablobs. Of course you can still attach objects to the particles too, to have custom particles.
Massively Enhanced Render API - Now you have even more control when you write shaders and shaderscripts!
Now fully supported by ButterflyNetRender! ButterflyNetRender is a third-party network render controller that's used throughout the industry.

Standard Features: Customizable shader flow system with animatable parameters
Global Illumination with Choice of Photon, Monte Carlo or hybrid sampling
Caustics with choice of methods
Volumetric Spot Lights and Shadows
Two types of Depth of Field
Motion Blur with adjustable sampling
Light types - Distant, Point, Area, Spot with texture projection, Panel - user adjustable soft quality settings
Volumetric Translucency and Subsurface scattering
Fuzzy Reflection and Refraction
UV and projection textures
Fully Multi-Threaded rendering
Unlimited network render nodes at no additional cost. (Network render controller required. The RenderHost API/SDK is included for creating custom render controllers, and a very full-featured render controller, ButterflyNetRender , is available from LiquidDreamSolutions.)
User adjustable anti-aliasing settings with new proprietary AA technique that gives the look of twice the quality in half the time
Write shaders with messiah's scripting language, or use our default ones
Procedural object rendering and pixel displacement effects
Connection ability to popular render control and scheduling software
Directly renders MetaNURB subdivision surfaces without the need to take up ram with thousands of pre-generated polygons
Frame segmented rendering option to render to ram or disk chunks
Supports loading and saving of more than 18 different image formats, including OpenEXR
Multi-threaded Convolution Filter rendering
High Dynamic Range rendering and Image Based Lighting

ADVANTAGES:
Fast and efficient render.
Fast and brilliant 3s effects
Excellent material editor
Marvellous Displacement
Bugs:
Lack of possibility to save light maps to file.
Low stability of software (with max. Connection)
Not correct viewing in direct 3d 32 bits on ATI cards (only in opengl 16 text is shown)
Problems with conversions of 'poly' scenes (mesh ones are better conversed)
Best Regards,
Evermotion Team


COMMENTS